SEP 安裝或升級至 12.1.5(RU5)後,內嵌資料庫無法啟動

錯誤訊息

In the Windows event log:

SQLANYs_sem5
Can’t open Message window log file: D:\Program Files (x86)\Symantec\Symantec Endpoint Protection Manager\db\out.log

In the Upgrade-0.log:

The service SQLANYs_sem5 failed to be started.

In the Management Server Upgrade Wizard:

Setting
ACL…(100%)…Done
Error occurred

Cause

在 SEP 12.1.5 (RU5), Symantec changed the SemSrv and SemWebSrv services to use service virtual accounts. These services are set to an UNRESTRICTED SID type, but the SQLANYs_sem5 service remains under the RESTRICTED category.

Solution

Use the following workaround to change the SID type to UNRESTRICTED, since we are using a service virtual account for the Symantec Embedded Database service as well.

Check the SID type of the service
  1. On the computer where SEPM is installed, click Start > Run.
  2. Type CMD and click OK.
  3. Type sc qsidtype SQLANYs_sem5
  4. Verify that the following is returned:
    [SC] QueryServiceConfig2 SUCCESS
    SERVICE_NAME: SQLANYs_sem5
    SERVICE_SID_TYPE: RESTRICTED

image

Change the SID type of the SQLANYs_sem5 service to UNRESTRICTED
  1. On the computer where SEPM is installed, click Start > Run.
  2. Type CMD and click OK.
  3. Type cd “<Drive>:\Program Files (x86)\Symantec\Symantec Endpoint Protection Manager\bin"
    Note: Replace <Drive> with the drive that SEPM is installed on.
  4. Type ServiceUtil.exe -changeservicesidtype 1 -servicename “SQLANYs_sem5″
    Note: Running the command returns: “Change the semsrv service SID successfully." The string “semsrv" is hardcoded, but we are changing the SID type for the SQLANYs_sem5 service. Please disregard that message.

image

Verify that the SID type has changed to UNRESTRICTED
  1. On the computer where SEPM is installed, click Start > Run.
  2. Type CMD and click OK.
  3. Type sc qsidtype SQLANYs_sem5

image

Start services

After following the preceding steps, start the following services:

  • Symantec Embedded Database
  • Symantec Endpoint Protection Launcher
  • Symantec Endpoint Protection Manager
  • Symantec Endpoint Protection Manager Webserver


https://support.symantec.com/en_US/article.TECH225587.html

[SSR]為何 SSR 備份狀態會出現問號圖示?

image

為何 SSR 備份狀態會出現問號圖示?

Issue

The Status of Backup History is changed to ‘Unavailable’ if some of non-Windows NAS devices are used as the backup destination.

Cause

Symantec System Recovery (SSR) uses the CIFS protocol ‘change notify’ (NotifyChangeDirectory) to check the Status of Backup History.
When ‘change notify’ is not supported on the NAS devices which are used as backup destination, SSR shows ‘Unavailable’ status.

Solution

Please ignore this status. Backup/restore operations are not affected.
For example, if Samba is used, confirm that change notify parameter is set as “yes" in smb.conf file.


http://www.symantec.com/business/support/index?page=content&id=TECH214450

如何設定 PGP 用戶端郵件加密

1. 開啟「Symantec Encryption Desktop」。

image

2. 點選「PGP Keys」,接著點選「All Keys」,接著以滑鼠右鍵點選您所製作的 Private Key,接著點選「Send To」→「Mail Recipient」,將 Private Key 寄給收件者。

image

3. 輸入收件者信箱,點選傳送。

image

4. 待收到 PGP Key 時,來進行匯入,選取「File」,接著點選「Import」,開始匯入 PGP Key。

image

5. 選取所收到的 Private Key,點選「開啟舊檔」。

image

6. 可看到欲匯入的 PGP Key 資訊,點選「Import」。

image

7. 匯入完成,可看到多了一組剛剛所匯入的 Key。

image

8. 選取「PGP Messaging」,接著點選「所設定欲加密的信箱」,點選「Edit Policies」。

image

9. 點選勾勾,以取消所有預設 Policies。

image

10. 取消完成,點選「New Policy」。

image

11. 輸入 Policy 名稱,選取條件。

image

If any

以下條件滿足任一項

If all

以下條件全部滿足

If none

沒有以下條件

12. 輸入 Policy 名稱,選取條件。

image

Recipient(收件者)

郵件到指定的收件者

Recipient Domain(收件者網域)

通過電子郵件發送指定的收件者網域的郵件

Sender(寄件者)

具有指定寄件者地址的郵件

Message(信息)

已指定的簽名和/或加密狀態信息

Message Subject(信件標題)

使用指定的信件標題

Message Header(信件標頭)

為其指定的標頭符合指定標準的訊息。

Message Body(信件內容)

使用指定的信件內容

Message Size(信件大小)

指定大小的郵件(以bytes為單位)

Message Priority(信件優先級)

使用指定的消息優先級的信件

Message Sensitivity(信件靈敏度)

使用指定的消息敏感性信件

13. 選取條件。

image

is(是)

與輸入內容相同

is not(不是)

與輸入內容不同

contains(包含)

包含輸入的內容

does not contain(不包含)

不包含輸入的內容

begins with(開始於)

開始於輸入的內容

ends with(結束於)

結束於輸入的內容

matches pattern(匹配模式)

第一個條件字段文本鍵入文本框中模式匹配

greater than(大於)

大於輸入的內容

less than(少於)

少於輸入的內容

14. 設定符合條件後,將執行的動作。

image

Send In Clear

不加密模式

Sign

指定的信件應該簽章

Encrypt to

指定的信件應該被加密

15. 設定指定動作後的第二動作欄位設定。

image

recipient’s verified key

收件者的驗證密鑰。確保該信件只對預期收件者的驗證密鑰加密。

recipient’s unverified key

收件者的未經驗證的密鑰。允許該信件被加密到既定收件者的未經驗證的密鑰。

a list of keys

指定的信件只能被所選取的密鑰加密

16. 設定完成,點選「OK」。

image

17. 可看到剛剛所設定的 Policy,接著點選「Done」。

image

18. 假設指定特定的密鑰來加密。

Ø   假設收件者包含:aaron_weblink@mail.com

Ø   假設信件標題包含:會議記錄

Ø   假設使用指定密鑰:Aaron_weblink


image


Ø   寄送符合條件的信件。


image


Ø   可看到寄送郵件後的 LOG


image


Ø   切換至收件者電腦,可看到信件已透過 PGP 加密。


image


Ø   可看到收到信件的 LOG。


image


Ø   登入 Web Mail,可看到無密鑰及無法瀏覽信件內容和附件。


image


19. 假設發送的郵件增加簽章。

Ø   假設收件者網域包含:mail.com

Ø   假設信件標題包含:通知


image


Ø   寄送符合條件之信件


image


Ø   寄送信件時的 LOG。


image


Ø   切換至收件者電腦,可看到信件已透過 PGP 簽章。


image


Ø   可看到收到信件的 LOG。


image


Ø   登入 Web Mail,可看到簽章。


image

Symantec DCS Agent 健康狀態說明

問題:

  • 針對 SDCS Agent 端 Health 狀況說明

版本:

  • 6.0

說明:

image

Agent Health 在 Assets「資產」頁面的 Agent Health「代理程式健康狀態」欄中,會以綠色、黃色或紅色圓形圖示表示。

  • 綠色圖示表示 Agrnt 在線上。
  • 黃色圖示表示 Agent 可能離線。
  • 紅色圖示表示 Agent 已經離線。

黃色與紅色預設值分別用於實體環境及虛擬環境。Agent Health 圖示的顏色是按照以下規則決定:

  • 綠色:如果上一次 Contact Time 或 Last event time 與黃色間隔秒數相加,所得時間大於目前時間。
  • 黃色:如果上一次 Contact Time 或 Last event time 與黃色間隔秒數相加,所得時間小於目前時間,而上一次聯絡時間或最後事件時間與紅色間隔秒數相加,所得時間大於目前時間。
  • 紅色:如果上一次 Contact Time 或 Last event time 與紅色間隔秒數相加,所得時間小於目前時間。


代理程式健康狀態的逾時設定如下:

1. 於 Asset 頁面,以滑鼠右鍵點選 Agent,選取「Propertise」。

image

2. 點選「Configure Health」,接著可以修改設定。

image

image


為避免代理程式離線和連線時產生大量網路流量,全系統流量控制選項可將狀態變更事件彙總成單一事件。

選取「Admin」頁籤,點選「Settings」接著選取「System Settings」,最後選取「Agent Settings」頁籤。

image

代理程式狀態變更事件數的臨界值,此數目會引發產生單一彙總狀態變更事件,而不是大量個別代理程式事件。若因網路中斷而一次影響大量代理程式,此設定有助於限制產生的無意義事件(及任何相關警示)數目。預設:25。

針對 SEPM 弱點掃描 CVE-2007-6750

問題:

  • 針對 SEPM 進行弱點掃描發現 CVE-2007-6750

版本:

  • 12.1.2 ~ 12.1.3

解決方案:

如果無法立即升級,可先進行下述設定。這種解決方法僅適用於上面提到的版本(12.1.2 ~ 12.1.3)。

如果版本屬於 12.1.2 以前,應該升級直接到 12.1.4 或更高版本。

1. 請先行下載 mod_reqtimeout.so

2. 將文件複製到 %SEPM_Install_Dir%\apache\modules。
(注 ​​:在大部份的系統中,預設的 SEPM 安裝路徑是 C:\Program Files(x86)\Symantec\Symantec Endpoint Protection Manager)

3. 用記事本開啟 %SEPM_Install_Dir%\apache\conf\httpd.conf,於檔案最後修改並增加下面內容

LoadModule reqtimeout_module modules/mod_reqtimeout.so
<IfModule reqtimeout_module>
RequestReadTimeout header=20-30,MinRate=256 body=100-120,MinRate=512
</IfModule>

4. 重新啟動 Symantec Endpoint Protection Manager Webserver 的服務。

可參考 http://www.symantec.com/business/support/index?page=content&id=TECH205208

[SEP]Symantec Endpoint Protection Manager 主控台升級

問題:

  • 如何將 Symantec Endpoint Protection Manager 主控台升級版本

版本:

  • 11.0.X
  • 12.1.X

解決方案:

1. 登入Symantec Endpoint Protection Manager。

image

2. 點選右上角「說明」,接著點選「關於」。

image

3. 看到目前使用版本為:12.1.2015.2015。

image

4. 開啟新版的安裝程式。

image

5. 點選「安裝Symantec Endpoint Protection」。

image

6. 點選「安裝Symantec Endpoint Protection Manager」。

image

7. 準備進行升級管理伺服器與主控台,點選「下一步」。

image

8. 確認下列應用程式已關閉,接著點選「下一步」。

image

9. 點選「我同意」,接著點選「下一步」。

image

10. 點選「立即備份資料庫」。(若已備份可忽略)

image

11. 開始進行資料庫備份,點選「是」。

image

12. 點選「完成」。

image

13. 點選「備份」。

image

14. 確認是否要「備份日誌」,接著點選「是」。

image

15. 備份資料庫中。

image

16. 備份完成,點選「確定」。

image

17. 備份完畢,點選「結束」。

image

18. 點選「完成」退出精靈。

image

19. 再次點選「安裝Symantec Endpoint Protection Manager」。

image

20. 準備升級管理伺服器與主控台,點選「下一步」。

image

21. 確定下列應用程式已關閉,接著點選「下一步」。

image

22. 授權許可協議,點選「我同意」,接著點選「下一步」。

image

23. 安裝準備完成,接著點選「安裝」。

image

24. 正在安裝中。

image

25. 安裝完成,準備升級,點選「下一步」。

image

26. 確認升級伺服器至剛剛所安裝的版本,接著點選「下一步」。

image

27. 確認通訊埠號,接著點選「下一步」。

image

28. 確認升級伺服器時,是否執行LiveUpdate,接著點選「下一步」。

image

29. 伺服器升級中。

image

30. 升級成功,接著點選「下一步」。

image

31. 升級成功,確認是否要「啟動Symantec Endpoint Protection Manager」,接著點選「完成」。

image

32. 登入Symantec Endpoint Protection Manager。

image

33. 點選右上角「說明」,接著點選「關於」。

image

34. 可看到版本已經更新為12.1.5(12.1 RU5),代表更新完成。

image

Symantec DCS 如何修改 MSSQL DB Name

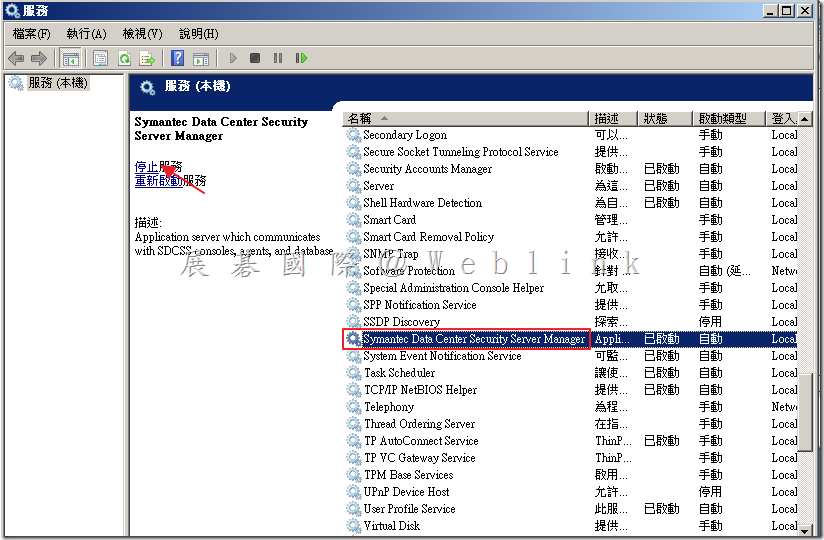
1. 點選「開始」,點選「系統管理工具」,點選「服務」。

image

2.  選取「Symantec Data Center Security Server Manager」,點選「停止服務」。

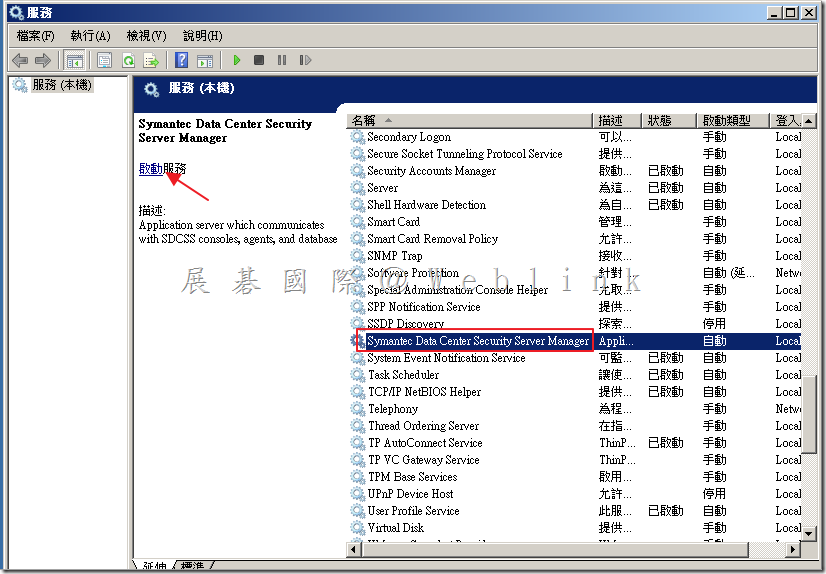
image

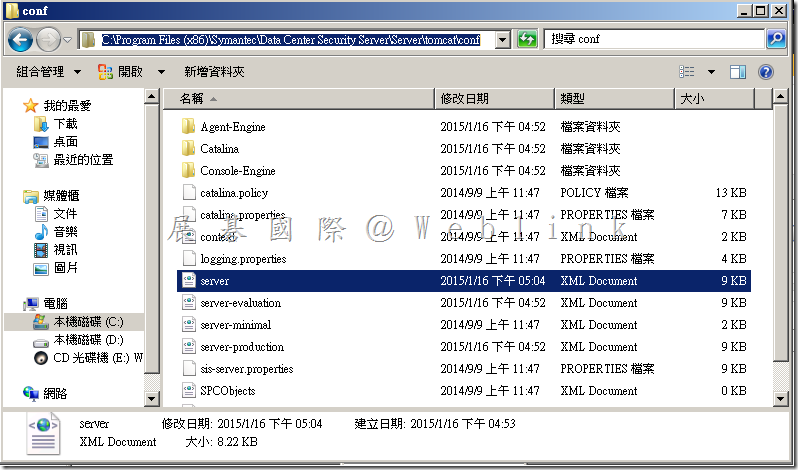
3. 開啟 Management server 資料夾「C:\Program Files (x86)\Symantec\Data Center Security Server\Server\tomcat\conf」,備份「sever.xml」。

image

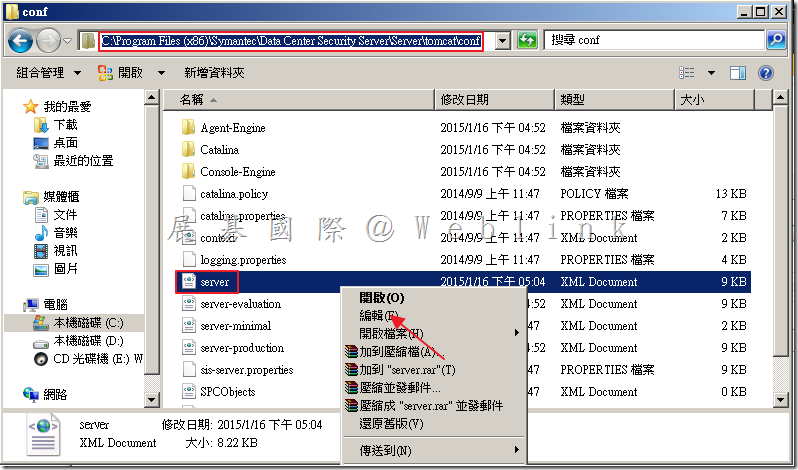
4. 以滑鼠右鍵點選「server.xml」,選取「編輯」。

image

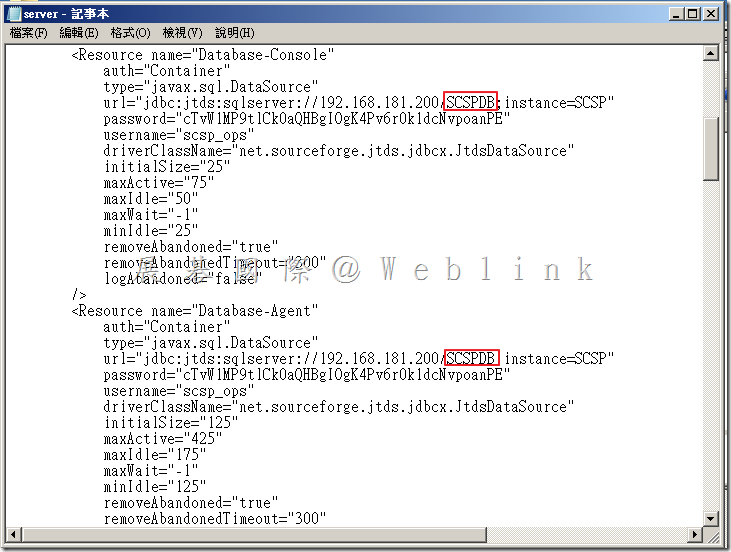
5. 可看到「url=”jdbc:jtds:sqlserver://XXX.XXX.XXX.XXX/XXXXXX;instamce=XXXX”」然後將兩個紅色部分更換為新的DB Name,儲存檔案。

image

6. 啟動「Symantec Data Center Security Server Manager」,即可正常登入。

image

Syamatec DCS MSSQL 帳號權限說明

SCSPDBA

(此帳號為安裝系統時需輸入之 SDCS Database Owner,可修改為其他名稱)

這是用於管理實際 SDCS 資料庫所有者帳戶。此帳戶具有「Owner」權限,並可以操縱在 SDCSDB 所有的結構和數據,只能夠控制 SDCS 資料庫。只有初始安裝和升級需要使用。

伺服器角色:

image

使用者對應:

image


SCSP_OPS

(此帳號為安裝系統時自動建立)

這是 SDCS 安裝 Tomcat 所使用的 MS SQL Server 資料庫的帳戶(自動產生密碼)。此帳戶可以讀取和寫入 SDCSDB 資料,但不能執行任何架構更改。SDCS 所有操作使用此帳戶。

伺服器角色:

image

使用者對應:

image


 SCSP_PLUGIN

(此帳號為安裝系統時自動建立)

這是 SDCS 所建立的提供第三方外掛工具(如 SSIM、ArcSight 等)的賬戶(自動建立密碼)。此帳戶具有只讀取 SDCS 資料庫。

伺服器角色:

image

使用者對應:

image

SCSPGuest

(此帳號為安裝系統時可選擇是否要建立)

在安裝過程中這是可選擇是否需要建立的帳戶,如果想建立一個可用於外部 ODBC/JDBC 連線至 SDCS 資料庫,僅有讀取功能。

伺服器角色:

image

使用者對應:

image

Symantec DCS 如何新增 User

1. 選取「Admin」頁籤,選取「Users」,點選「Add」。

image

2. 建立 User

2.1.  建立一般 User

2.1.1. 輸入「User name」,輸入「Description」,輸入「Password」,再次輸入「Confirm Password」。

image

2.1.2. 選取「Member Of」頁籤,點選「Add」。

image

2.1.3. 選取增加的 Role,點選「Add」。

image

2.1.4. 點選「OK」。

image

2.2.  建立 AD User

2.2.1. 輸入「User name」〈必須使用網域名稱\帳號的格式,例:local\user〉,輸入「Description」,勾選「Active Directory User」,接著選取「Active Directory User」。

image

2.2.2. 選取「Member Of」頁籤,點選「Add」。

image

2.2.3. 選取增加的 Role,點選「Add」。

image

2.2.4. 點選「OK」。

image

3. 新增完成。

image