【SEP12 如何解決 Hardware ID 重複的問題】

【SEP12 如何解決 Hardware ID 重複的問題】

請參考以下 KB

【Duplicate Hardware IDs result in only one client showing up in the Symantec Endpoint Protection Manager for multiple systems】

http://www.symantec.com/business/support/index?page=content&id=TECH97626

【詳細步驟如下】

1. 在所有重複的用戶端停止 SMC 服務

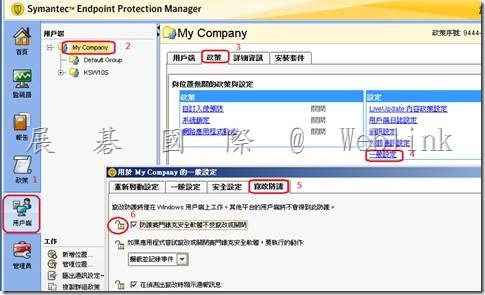
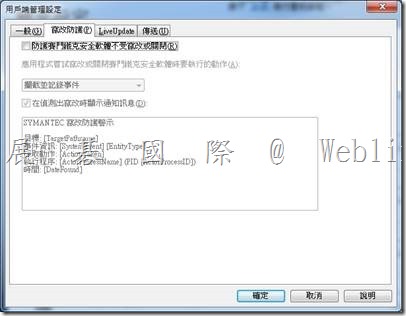
請先停用【竄改防護】→取消勾選【防護賽門鐵克安全軟體不受竄改或關閉】

clip_image002

※ 如果無法停用【竄改防護】,必須至 SEPM 管理主控台進行設定

鎖頭不要上鎖,用戶就可以停用【竄改防護】

clip_image004

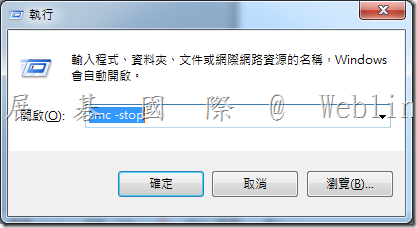
請按鍵盤上【Windows 鍵】+【R鍵】→會跳出【執行】視窗

※ XP 請按【開始】→【執行】

在出現的視窗中,輸入【smc –stop】,並按下【確定】

clip_image005

此時,您會發現右下角SEP12防毒軟體盾牌不見了

服務中的【Symantec Endpoint Protection】【Symantec Management Client】也停止了

clip_image006

2. 在 SEPM 刪除重複的用戶端

3. 開啟用戶端登錄編輯程式

clip_image007

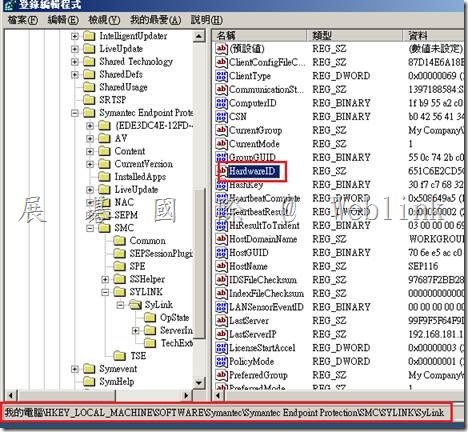
開啟至以下位置

HKLM\Software\Symantec\Symantec Endpoint Protection\SMC\Sylink\Sylink

4. 在右方找到 HardwareID,雙按 HardwareID

clip_image009

HKLM\Software\Wow6432Node\Symantec\Symantec Endpoint Protection\SMC\Sylink\Sylink

image

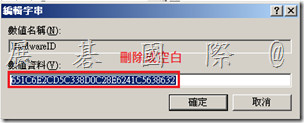
將 HardwareID 值刪除成空白

clip_image010

5. 在所有重複的用戶端將 sephwid.xml 更名為 sephwid.xml.bak

SEP 11 Location: 

C:\Program Files\Common Files\Symantec Shared\HWID

     SEP 12.1 Location: 
        Windows XP/2003: C:\Documents and Settings\All Users\Application Data\Symantec\Persisted Data
        Windows Vista/7/2008: C:\Program Data\Symantec\Symantec Endpoint Protection\Persisted Data

Windows 2008R2

C:\Documents and Settings\All Users\Application Data\Symantec\Symantec Endpoint Protection\PersistedData

Symantec\Symantec Endpoint Protection

clip_image011

C:\Users\All Users\Symantec\Symantec Endpoint Protection\PersistedData

image

6. 請到【服務】→【Symantec Endpoint Protection】→右鍵【啟動】

clip_image012

此時,您會發現右下角SEP12防毒軟體盾牌又出現了

服務中的【Symantec Endpoint Protection】【Symantec Management Client】也啟用了

7. 別忘了再將【竄改防護】項目勾回

clip_image014

9.  在SEPM 主控台確認電腦均報到回 SEPM,並且有各自的 HardWare ID

補充:

【Enterprise Support – Symantec Corp. – How to repair duplicate IDs on cloned Symantec Endpoint Protection 12.1 clients】

http://www.symantec.com/business/support/index?page=content&id=TECH163349

【Enterprise Support – Symantec Corp. – How to prepare a Symantec Endpoint Protection 12.1.x client for cloning】

http://www.symantec.com/business/support/index?page=content&id=HOWTO54706
【SEP12 如何手動移除各種 log files 讓用戶端管理介面各種日誌清空】

【SEP12 如何手動移除各種 log files 讓用戶端管理介面各種日誌清空】

手動移除各種 log files 讓用戶端管理介面各種日誌清空,必須以本機系統管理員群組的成員登入

各種日誌檔存放於以下兩個目錄

【C:\ProgramData\Symantec\Symantec Endpoint Protection\12.1.671.4971.105\Data\Logs】

clip_image002

【C:\ProgramData\Symantec\Symantec Endpoint Protection\12.1.671.4971.105\Data\Logs\AV】

clip_image004

步驟:【SEP12 用戶端如何手動移除各種 log 檔,讓用戶端介面上的各種日誌清空】

打開 SEP12 用戶端管理介面,發現有各項的日誌存在(例如:風險日誌)

clip_image005

以 Windows 7 為例

請先停用【竄改防護】→取消勾選【防護賽門鐵克安全軟體不受竄改或關閉】

clip_image007

※ 如果無法停用【竄改防護】,必須至 SEPM 管理主控台進行設定

鎖頭不要上鎖,用戶就可以停用【竄改防護】

clip_image009

請按鍵盤上【Windows 鍵】+【R鍵】→會跳出【執行】視窗

※ XP 請按【開始】→【執行】

在出現的視窗中,輸入【smc –stop】,並按下【確定】

clip_image010

此時,您會發現右下角SEP12防毒軟體盾牌不見了

服務中的【Symantec Endpoint Protection】【Symantec Management Client】也停止了

clip_image011

接著,請刪除以下兩個目錄中的 log 檔

【C:\ProgramData\Symantec\Symantec Endpoint Protection\12.1.671.4971.105\Data\Logs】

clip_image002[1]

【C:\ProgramData\Symantec\Symantec Endpoint Protection\12.1.671.4971.105\Data\Logs\AV】

clip_image004[1]

請到【服務】→【Symantec Endpoint Protection】→右鍵【啟動】

clip_image012

此時,您會發現右下角SEP12防毒軟體盾牌又出現了

服務中的【Symantec Endpoint Protection】【Symantec Management Client】也啟用了

再次打開 SEP12 用戶端管理介面,發現有各項的日誌已不存在(例如:風險日誌、掃描日誌)

clip_image013

clip_image014

別忘了再將【竄改防護】項目勾回

clip_image016

安裝 DLP Endpoint Agent 12.0.1 後 IE temp 目錄下產生了很多 DLP*.TMP 檔 造成 IE 開啟緩慢

image

  • 【安裝 DLP Endpoint Agent 12.0.1 後 IE temp 目錄 下產生了很多 DLP*.TMP 檔 造成 IE 開啟緩慢】

Example:Windows 7、Windows 8、Windows 8.1 目錄

(C:\Users\ [登入名稱] \AppData\Local\Microsoft\Windows\Temporary Internet Files)

  • 刪除 DLP*.TMP 後,IE 開起即恢復正常,但之後 DLP*.TMP 又會產生


  • 已確認此現象與 C:\Program Files\Manufacturer\Endpoint Agent\temp" file 過大無關


  • Forum 提到:這是一個 Symantec 目前已經發現的問題,不過 fix 檔目前沒有公開,需建案取得相關的 fix

以下是 Forum 的連結與內容 

http://www.symantec.com/connect/forums/dlp-endpoint-crea-demasiados-archivos-temporales-en-carpeta-temp

  • 請下載 Hotfix_12.0.1101_Windows.zip ,解壓後參照 Hotfix Readme 來執行用戶端 Endpoint Agent 的升級


  • Hotfix Readme

Fixes in this Hotfix:
———————
3411202 : Dlp temp files created by IE HTTPS hook are not deleted after scanning

    More infomation :
    The internet explorer hook generates false requests that never make it to agent. As agent is supposed to delete the requests, the temporary files created for those requests are never deleted.

     
    Contents:
    ————
    AgentInstall.msi
    AgentInstall64.msi
    Agent Tools (not listed here)
     
     
    Constraints:
    ————
    1. This hotfix can only be installed in place of Endpoint Agent 12.0.1. Also it is to be used with a 12.0.1 server.
    2. These files are from the Endpoint Agent 12.0.1 hotfix build 12.0.1101.01001


    To Install the Endpoint Agent Hotfix:
    —————————————-
     
    1. Find the appropriate Agent to install (in /Endpoint/Win32/ or /Endpoint/x64/)
     
    2. In the Software Distribution package give the following command line for fresh installation of DLP agent (新安裝的用戶)

    msiexec /i AgentInstall.msi /q INSTALLDIR="%ProgramFiles%\Manufacturer\Endpoint Agent\" ENDPOINTSERVER="hostname" PORT="8000″ KEY="" SMC="hostname" SERVICENAME="EDPA" WATCHDOGNAME="WDP"
     
    3. If you want to upgrade agent from 12.0.1 then in software distribution package command line you need to give following (已安裝的用戶)

    msiexec /i AgentInstall.msi /q INSTALLDIR=“%ProgramFiles%\Manufacturer\Endpoint Agent\" ENDPOINTSERVER="hostname" PORT="8000″ KEY="" SMC="hostname" SERVICENAME="EDPA" WATCHDOGNAME="WDP" REINSTALL=ALL REINSTALLMODE=vomus