【如何收到 PGP Universal Server Backup log 的 mail 通知】

【如何收到 PGP Universal Server Backup log 的 mail 通知】

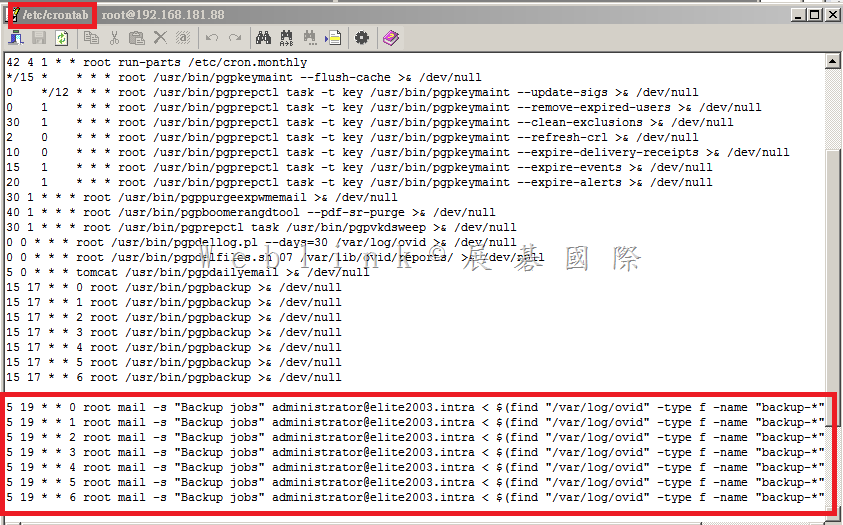
請編輯 /etc/crontab

在 crontab 加入以下命令

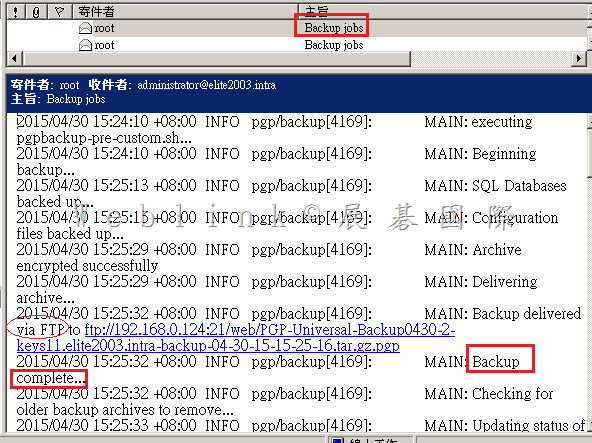
這樣每天 19:05 administrator@elite2003.intra 會收到當日的 Backup log

5 19 * * 0 root mail -s “PGP Backup jobs" administrator@elite2003.intra < $(find “/var/log/ovid" -type f -name “backup-*"|sort -r|head -n1)

5 19 * * 1 root mail -s “PGP Backup jobs" administrator@elite2003.intra < $(find “/var/log/ovid" -type f -name “backup-*"|sort -r|head -n1)

5 19 * * 2 root mail -s “PGP Backup jobs" administrator@elite2003.intra < $(find “/var/log/ovid" -type f -name “backup-*"|sort -r|head -n1)

5 19 * * 3 root mail -s “PGP Backup jobs" administrator@elite2003.intra < $(find “/var/log/ovid" -type f -name “backup-*"|sort -r|head -n1)

5 19 * * 4 root mail -s “PGP Backup jobs" administrator@elite2003.intra < $(find “/var/log/ovid" -type f -name “backup-*"|sort -r|head -n1)

5 19 * * 5 root mail -s “PGP Backup jobs" administrator@elite2003.intra < $(find “/var/log/ovid" -type f -name “backup-*"|sort -r|head -n1)

5 19 * * 6 root mail -s “PGP Backup jobs" administrator@elite2003.intra < $(find “/var/log/ovid" -type f -name “backup-*"|sort -r|head -n1)

clip_image001

clip_image002

Symantec DCS 如何啟用 Prevention Policy 以 Block 不允許之行為

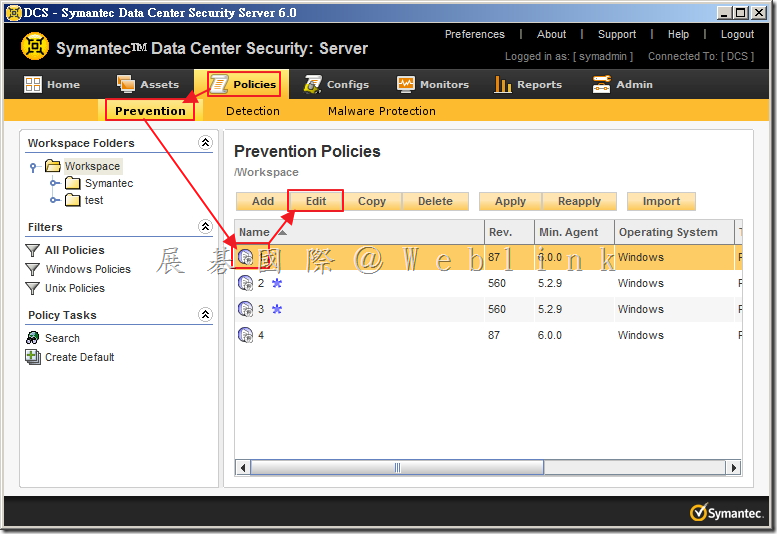
1. 選取「Policies」→「Prevention」,接著點選欲啟用的 Policy,接著點選「Edit」。

image

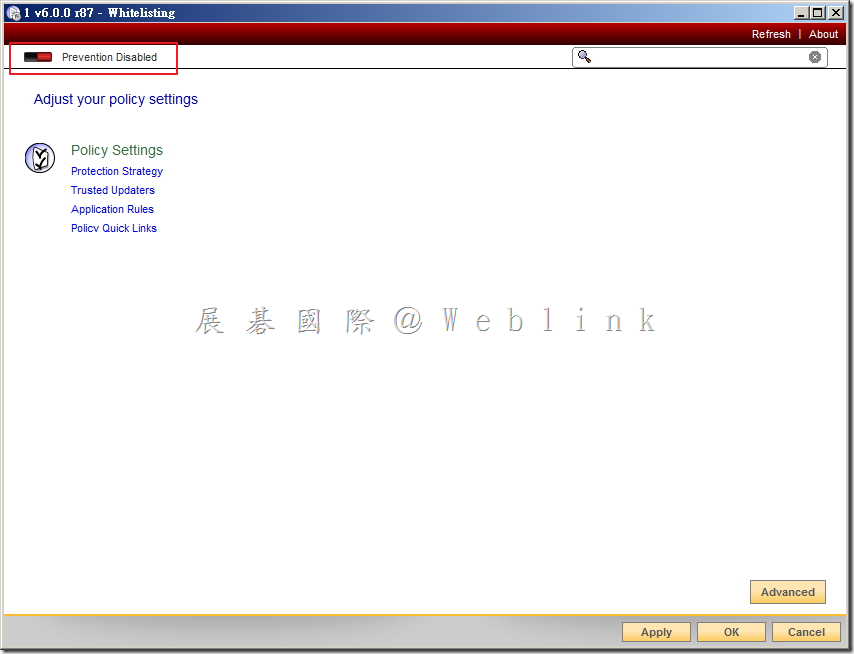
2. 可以從左上角看到「Prevention Disabled」字樣,並且為紅色。(代表目前 Prevention Policy 尚未啟用,僅會記錄 Event 並不會 Block)。

image

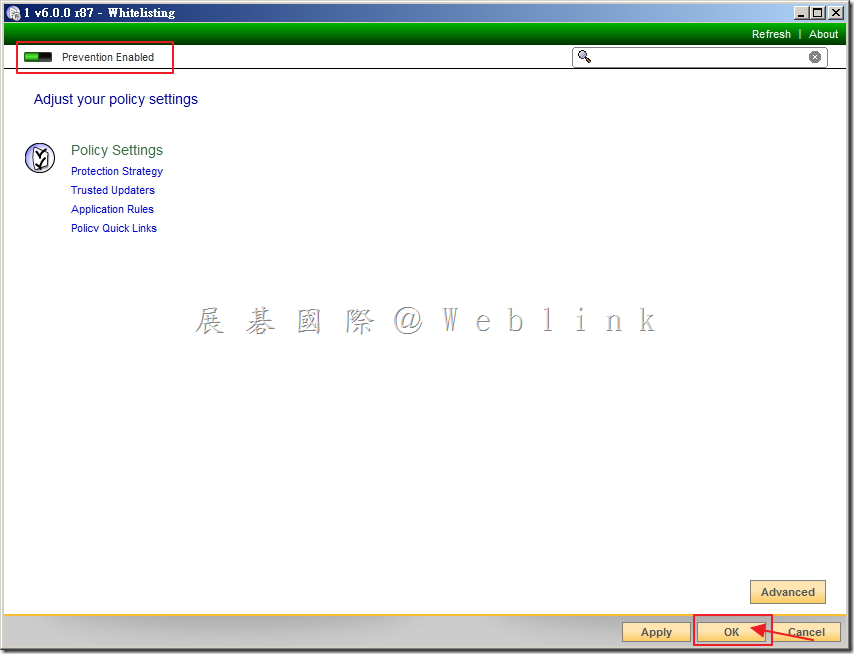
3. 點選左上角按鈕,此時字樣會變更為「Prevention Enabled」,並且為綠色,最後點選「OK」。(代表目前 Prevention Policy 已啟用,會記錄 Event 並且 Block)

image

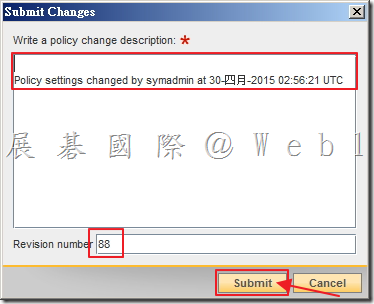
4. 輸入此次 Policy 修改說明,確定版號,接著點選「Submit」。

image

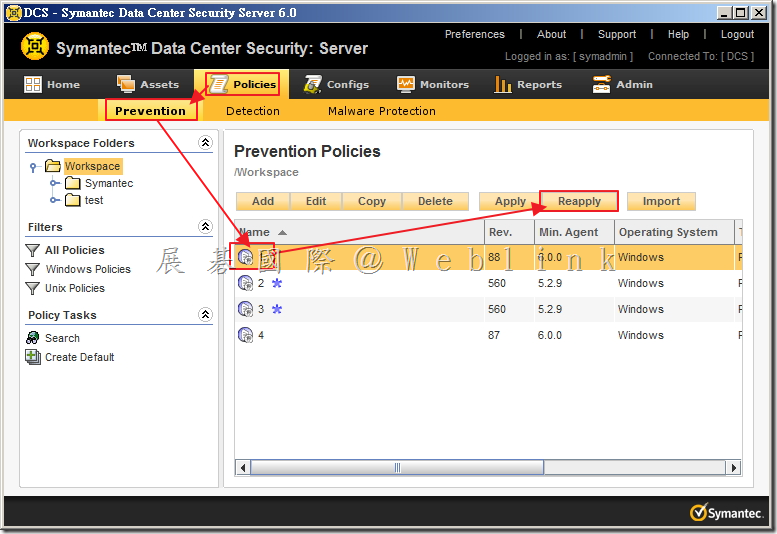
5. 選取「Policies」→「Prevention」,接著點選剛剛已啟用的 Policy,接著點選「Reapply」。

image

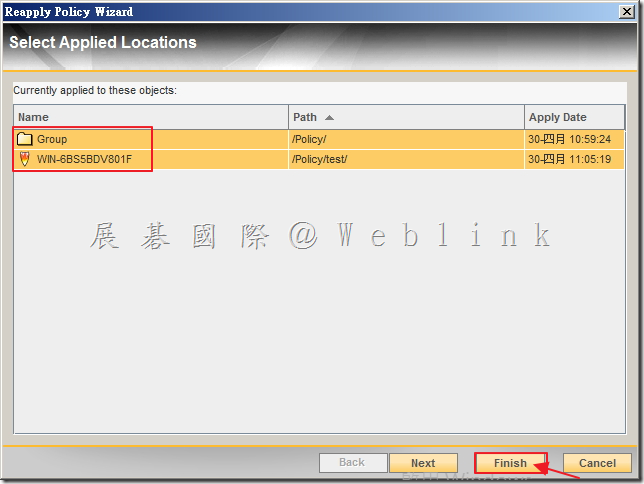
6. 可看到目前已 Apply 該 Prevention Policy 的 Group 或是 Agent,最後點選「Finish」,即可將該 Prevention Policy 套用至所選取的 Group 或是 Agent。

image

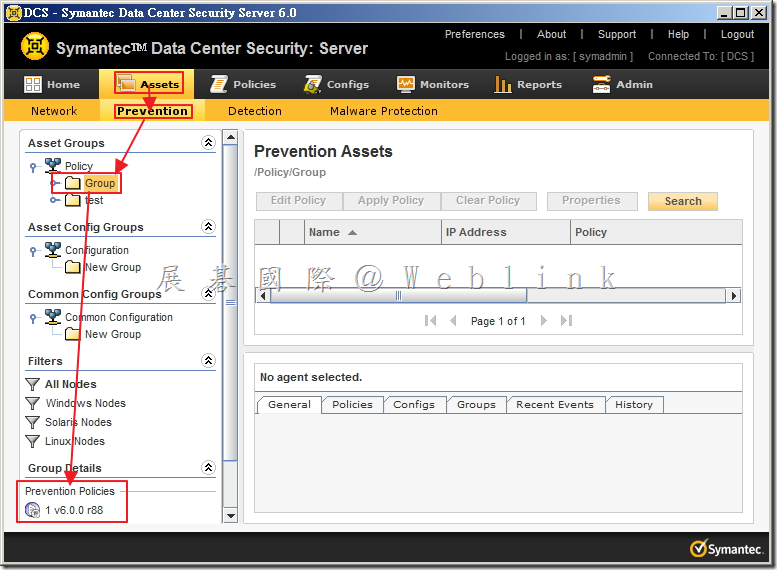
7. 選取「Assets」→「Prevention」,接著點選剛剛已套用 Prevention Policy 的 Group 可看到 「Prevention Policies」的部份有剛剛套用的已啟用的 Policy。

image

1.【如何確認 PGP 硬碟加密目前是採用 DES-128 或 DES-256】2. 【若將 PGP 硬碟加密政策由目前的 DES-256 改為 DES-128,該硬碟是否需先行解密後再進行加密】

【如何確認 PGP 硬碟加密目前是採用 DES-128 或 DES-256】

【若將 PGP 硬碟加密政策由目前的 DES-256 改為 DES-128,該硬碟是否需先行解密後再進行加密】

以上問題可參考官網 https://support.symantec.com/en_US/article.TECH224377.html

【如何確認 PGP 硬碟加密目前是採用 DES-128 或 DES-256】

請參考下圖於用戶端執行以下指令:

【64 位元電腦請切換至以下目錄】

C:\Program Files (x86)\PGP Corporation\PGP Desktop

【32 位元電腦請切換至以下目錄】

C:\Program Files\PGP Corporation\PGP Desktop

再執行

pgpwde –status –disk 0 –xml |find “alg”

※ for Mac → 執行 pgpwde –status –disk 0 –xml

image

在輸出的結果中,找到以下數值,若 alg=”9” 則該硬碟採用 DES-256 加密,若 alg=”7” 則該硬碟採用 DES-128 加密

<currentkey valid=”true” alg=”9”>

clip_image001

【若將 PGP 硬碟加密政策由目前的 DES-256 改為 DES-128,該硬碟是否需先行解密後再進行加密】

是的,請參考下方程序

clip_image002

clip_image003

Symantec DCS 如何設定刪除 Event

1. 如何刪除未來新增的 Events?

Ans:選取「Admin」頁籤,選取「Settings」,左邊選單選取「System Settings」,接著選取中間「General Settings」,可看到 Event Management,預設並無勾選設任何設定,請勾選「Purge Real-Time Events older than □ day(s)」。

image

※ 這裡勾選後,從設定之後的 Events,將依照設定的天數留存,但舊的 Events 並不會一併刪除!

2. 如何刪除已存在的 Events?

Ans:

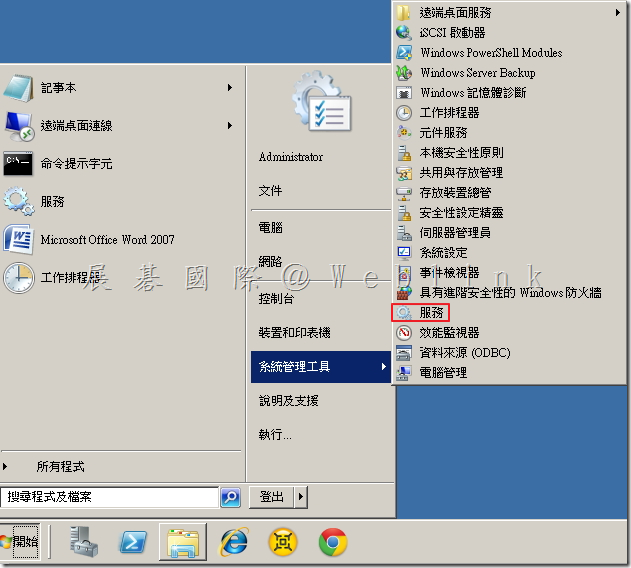
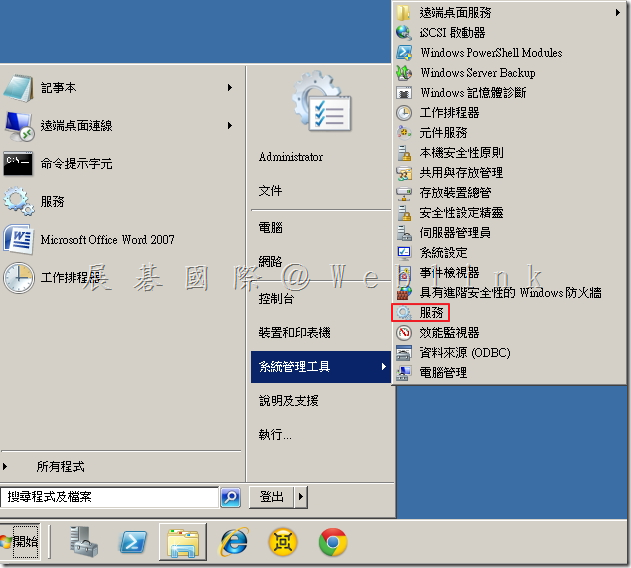
2.1「開始」→「系統管理工具」→「服務」。

image

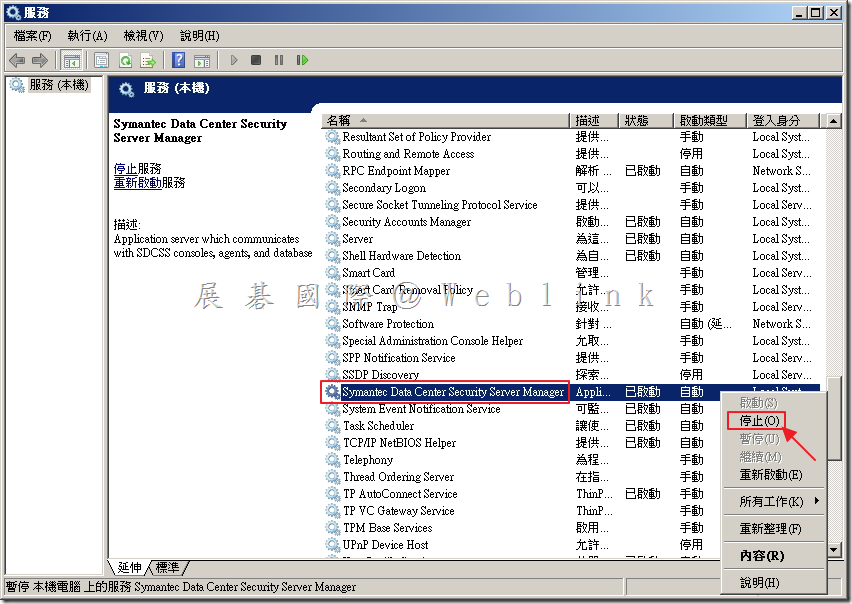
2.2 將「Symantec Data Center Security Server Manager」服務停止。

image

2.3 「Symantec Data Center Security Server Manager」服務停止中。

image

2.4 以滑鼠左鍵點擊兩下「Symantec Data Center Security Server Manager」服務。

image

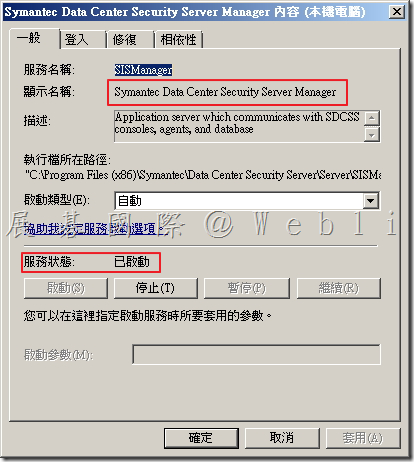
2.5 確定「Symantec Data Center Security Server Manager」服務狀態:已停止,接著點選「確定」。

image

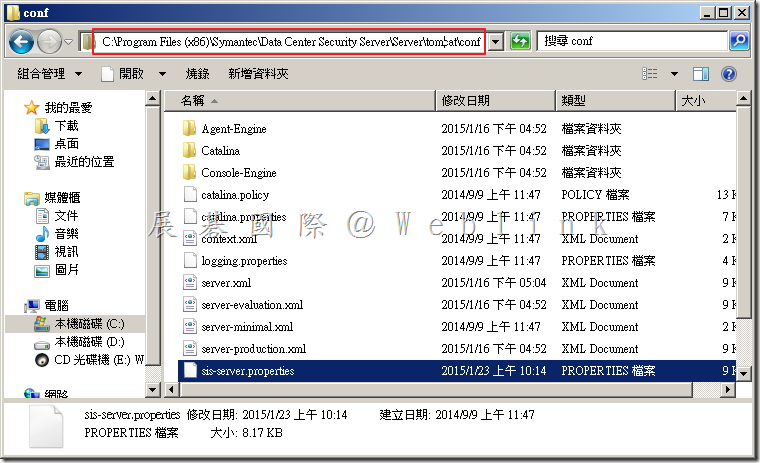
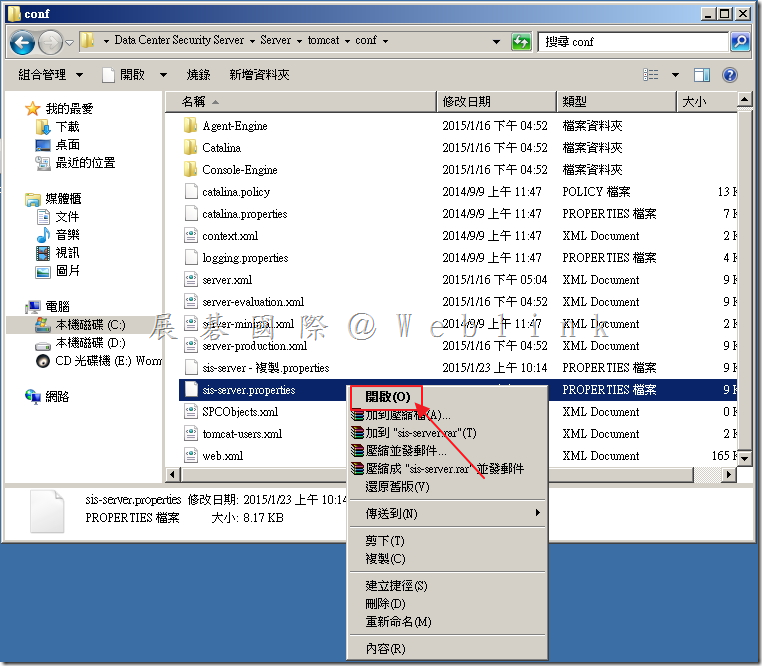
2.6 開啟資料夾「C:\Program Files (x86)\Symantec\Data Center Security Server\Server\tomcat\conf」。

image

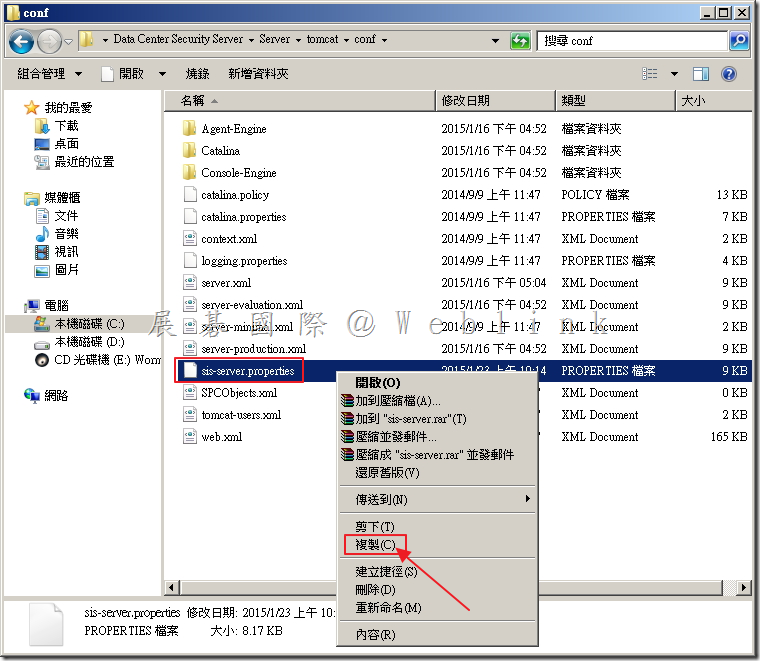
2.7 備份設定檔,以滑鼠左鍵點選檔案「sis-server.properties」,使用鍵盤選取「Ctrl c」。

image

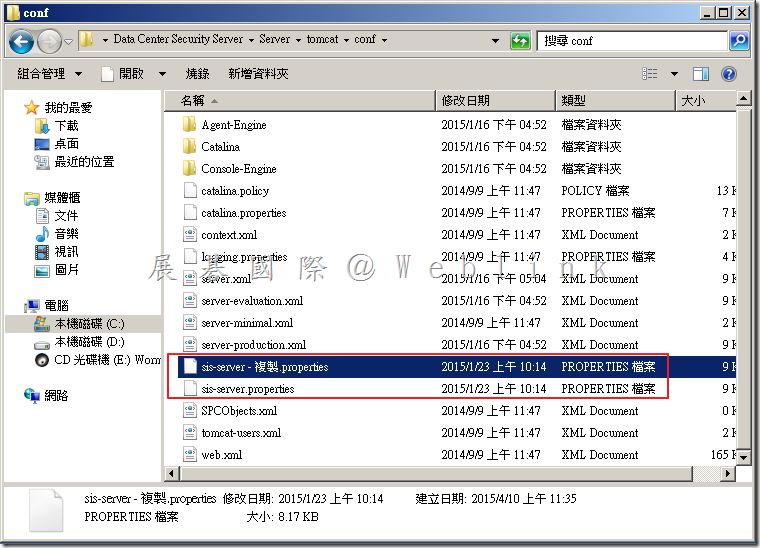
2.8 備份設定檔,以滑鼠左鍵點選檔案「sis-server.properties」,使用鍵盤選取「Ctrl v」。

image

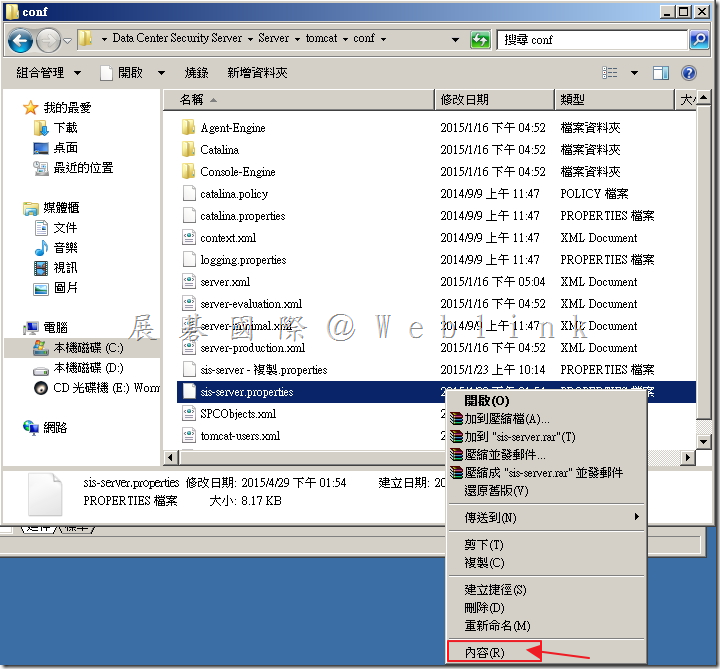
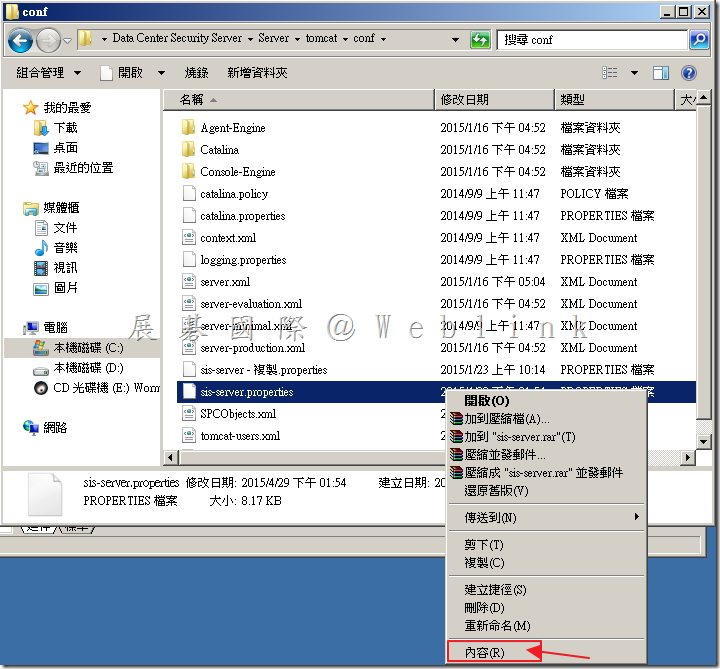
2.9 以滑鼠右鍵點選「sis-server.properties」。

image

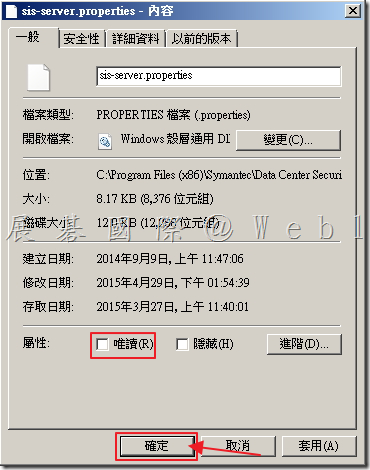
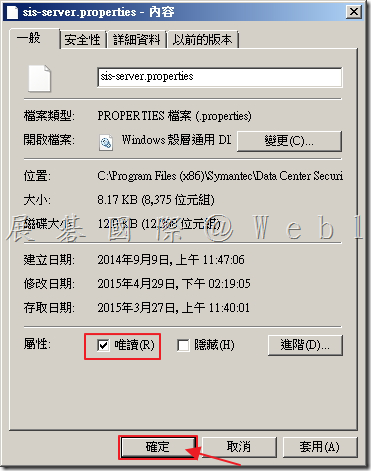
2.10 取消「唯讀」選項,接著點選「確定」。

image

2.11 以滑鼠右鍵點選「sis-server.properties」,選取「開啟」。

image

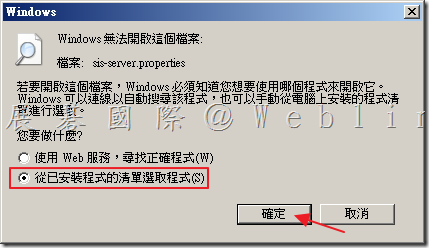
2.12 點選「從以安裝程式的清單選取程式(S),接著點選「確定」。

image

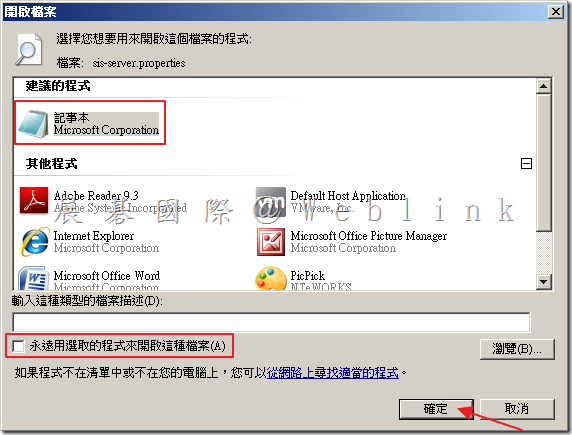
2.13 選取「記事本」,取消「永遠用選取的程式來開啟這種檔案(A)」,接著點選「確定」。

image

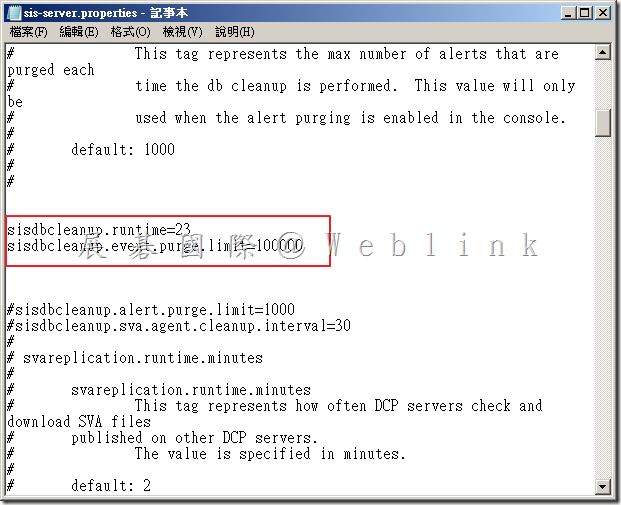
2.14 找到  #sisdbcleanup.runtime=23
                 #sisdbcleanup.event.purge.limit=100000

        並將 # 刪除

image

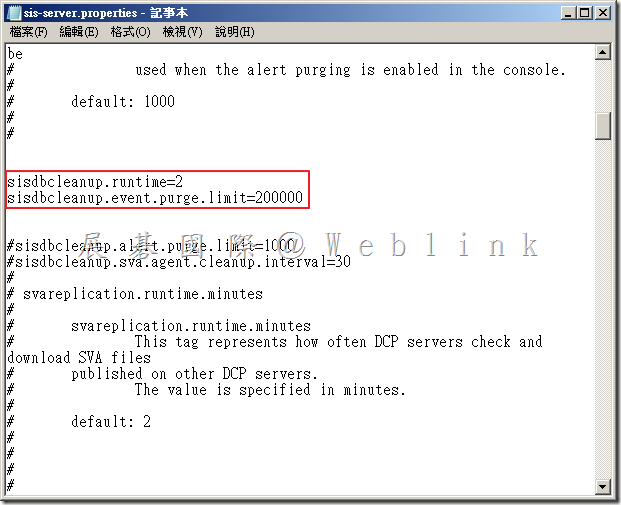
2.15  修改 sisdbcleanup.runtime=23、sisdbcleanup.event.purge.limit=100000,其中sisdbcleanup.runtime =「每幾個小時執行(預設為 24 小時)」;sisdbcleanup.event.purge.limit=「一次刪除的資料數量」(建議數量設定為 20 萬)。

假設:每兩小時執行,一次刪除 200000 筆資料。

image

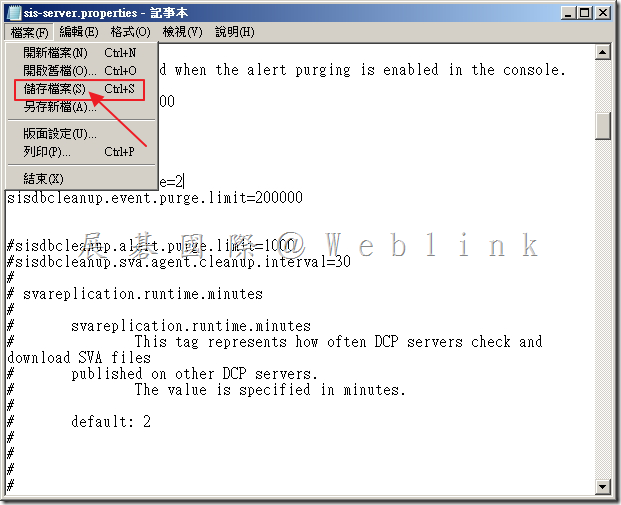
2.16  儲存檔案,接著關閉記事本。

image

2.17 以滑鼠右鍵點選「sis-server.properties」,選取「開啟」。

image

2.18 勾選「唯讀」選項,接著點選「確定」。

image

2.19 「開始」→「系統管理工具」→「服務」。

image

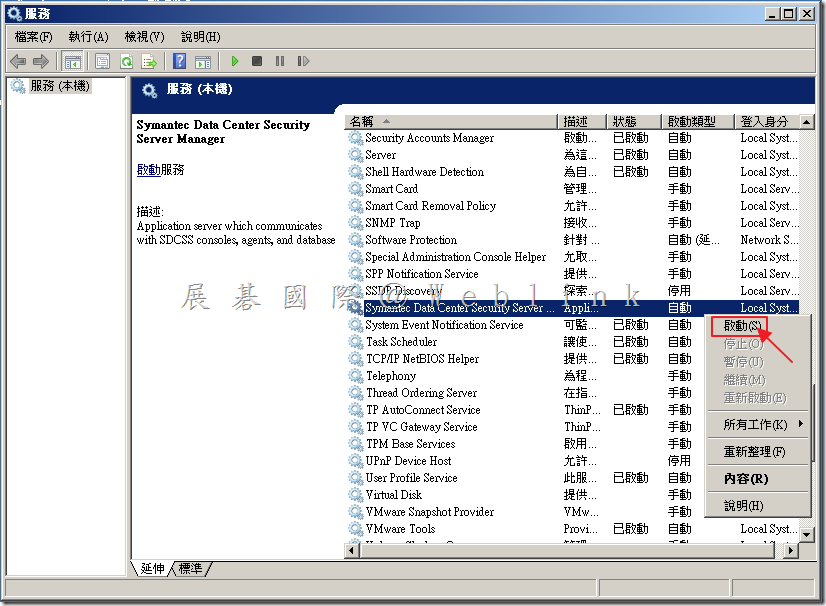
2.20 將「Symantec Data Center Security Server Manager」服務啟動。

image

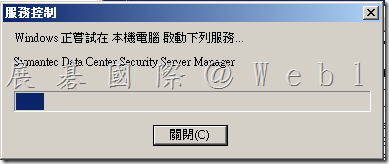
2.21 「Symantec Data Center Security Server Manager」服務啟動中。

image

2.22 以滑鼠左鍵點擊兩下「Symantec Data Center Security Server Manager」服務。

image

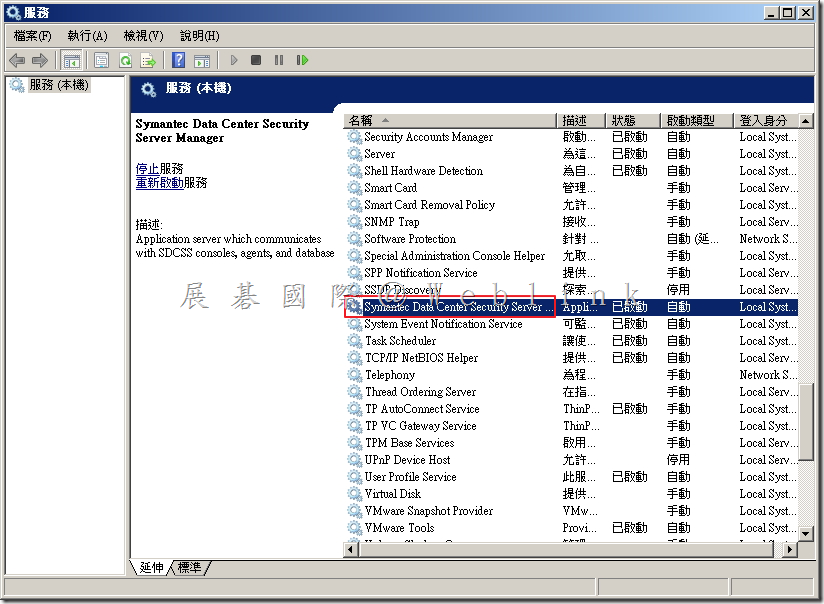
2.23 確定「Symantec Data Center Security Server Manager」服務狀態:已啟動,接著點選「確定」。

image

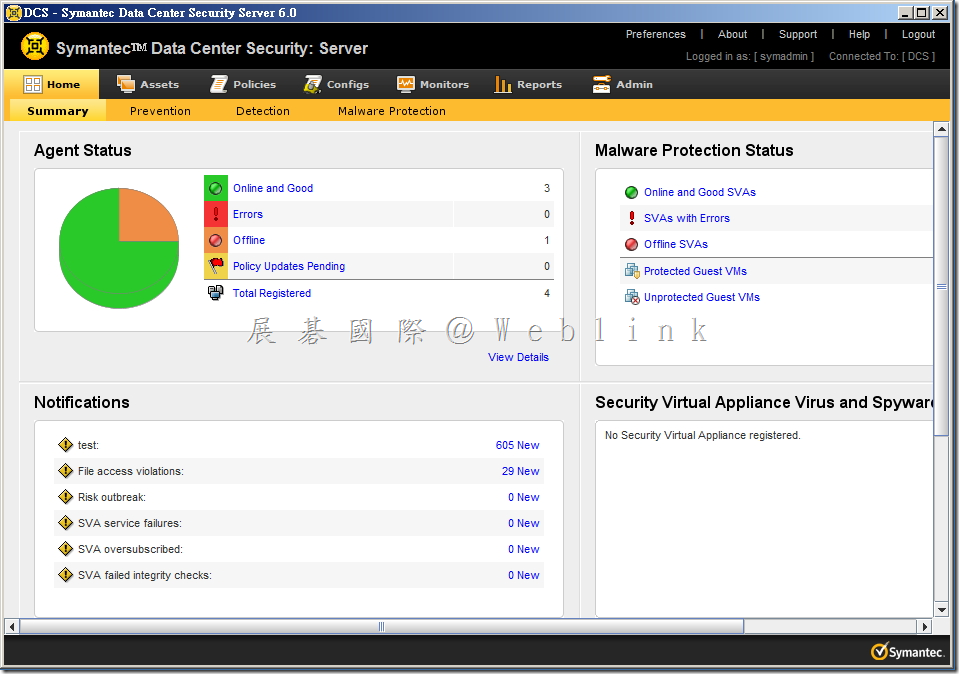
2.24 登入 DCS 代表服務已恢復,將會依照設定時間做刪除的動作。

image

Symantec DCS Apply Policy 至 Group 時,Agent 未套用新的 Policy

問題:

當 Apply Policy 至 Group 時,Agent 未套用新的 Policy

解決方案:

當 Agent 本身有 Policy 時,此時若將 Policy Apply 至 Group 時,Agent 將優先套用本身 Policy,若本身無 Policy,則將會判斷最靠近的 Group(若 Group 為多階層)。

# 如圖所示,可以看到

Agent:Q048 目前套用的 Policy 目前套用的 Policy 為 3 v5.2.9 r560

Group1 目前套用的 Policy 目前套用的 Policy 為 2 v5.2.9 r560

image

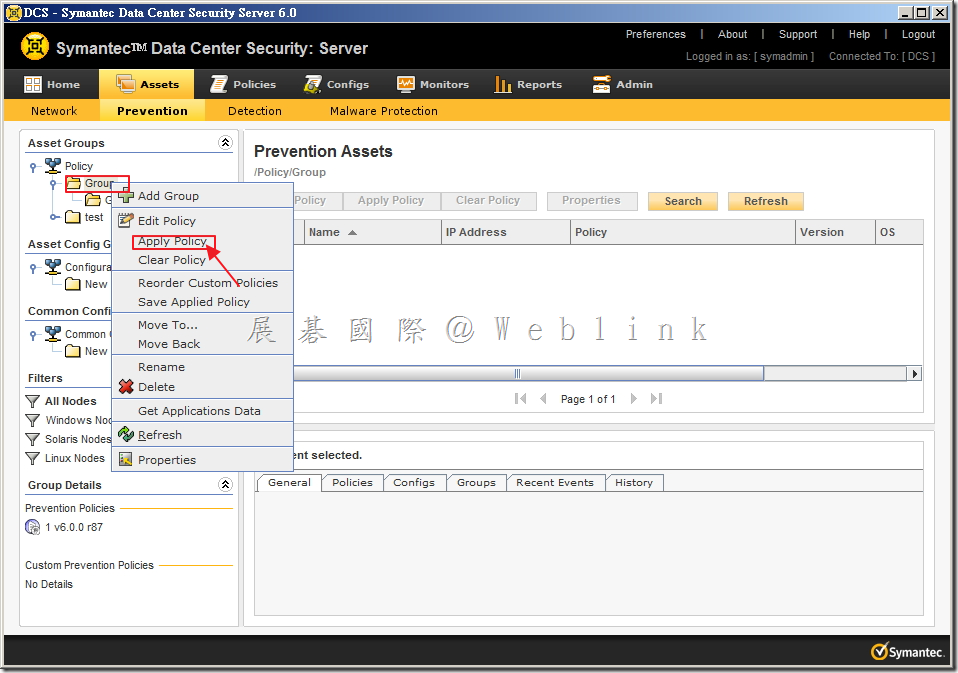
# 可以看到 Group 並沒有 Prevention Policies,此時 Apply Policy 至 Group。

image

image

image

# 此時會發現 Agent:Q048 並未套用新的 Policy

image

# 將 Agent:Q048 Clear Policy

image

# 此時發現 Agent:Q048 已套用新的 Policy:2 v5.2.9 r560(Group1的Policy)

image

# 再將Group1 Clear Policy

image

image

# 此時發現 Agent:Q048 已套用新的 Policy:1 v6.0.0 r87(Group的Policy),此時 Group 1 已無 Policy

image

# 再 Apply Policy 至 Group

image

image

# 可看到 Agent:Q048 已套用新的 Policy:4 v6.0.0 r87(Group的Policy)

image


※ 故,若 Apply Policy 至 Group 後發現並無套用至 Group 內的 Agent,請先檢查確認 Agent 是否已直接 Apply Policy 至 Agent 或是 於其他更靠近 Agent 階層的 Group 已 Apply 其他 Policy,此時請先其他無關 Policy 先行 Clear Policy,則一開始 Apply 的 Policy 會生效。

[SEP] 有確定疑似病毒檔案如何開啟 Case

※有確定疑似病毒檔案

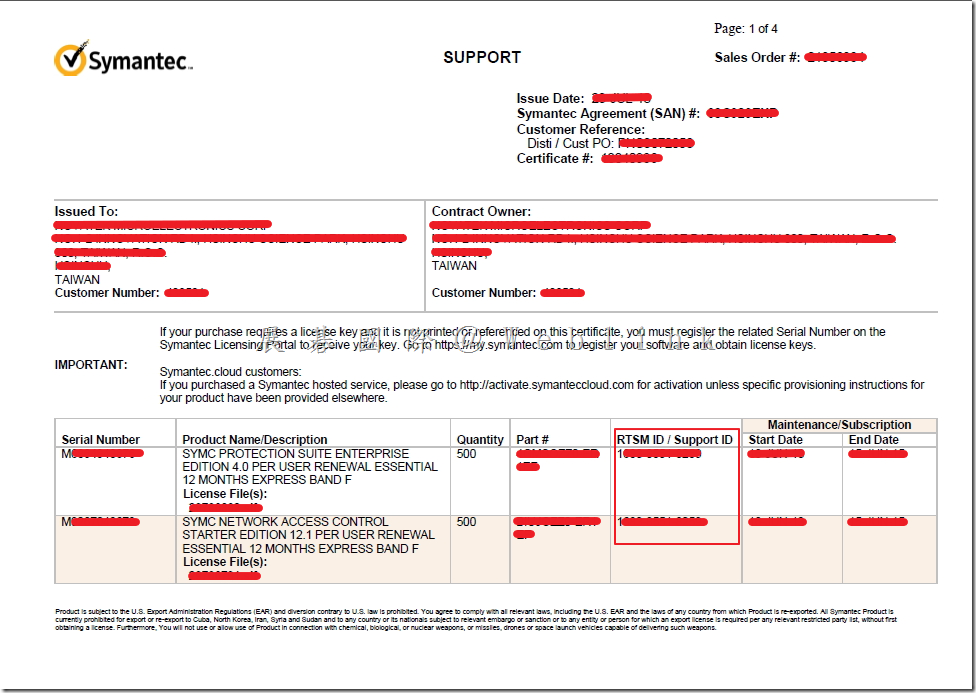
請先準備於授權書上查詢 Support ID

image_thumb15

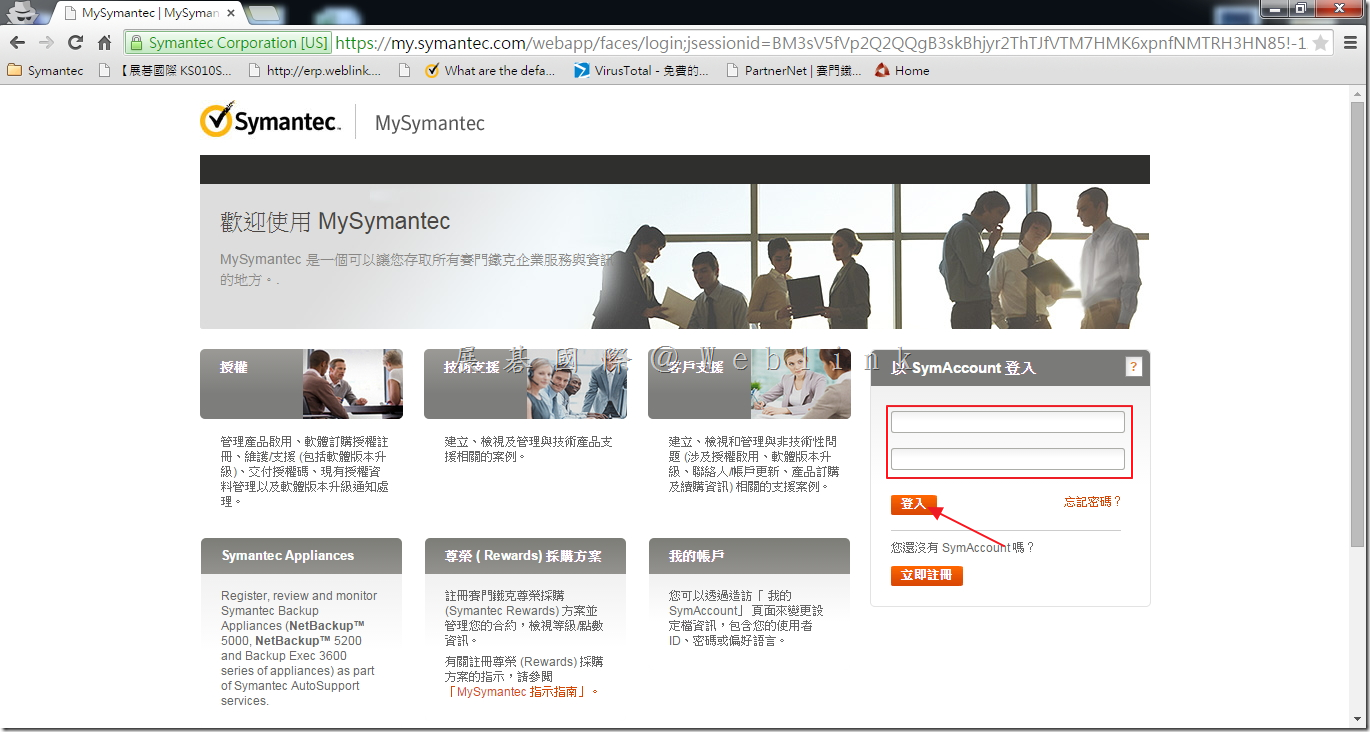
1. 開啟網頁 https://my.symantec.com,輸入帳號密碼,點選「登入」。

image_thumb

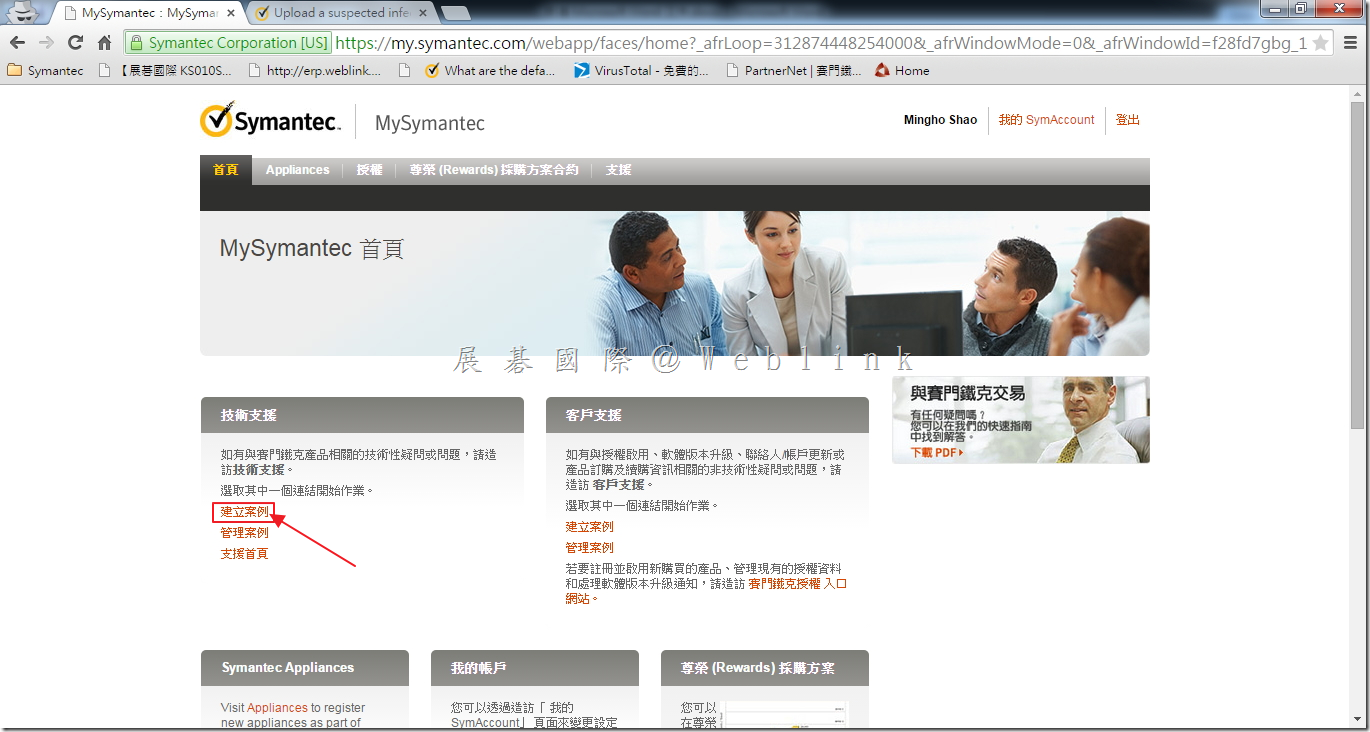
2. 點選「建立案例」。

image_thumb3

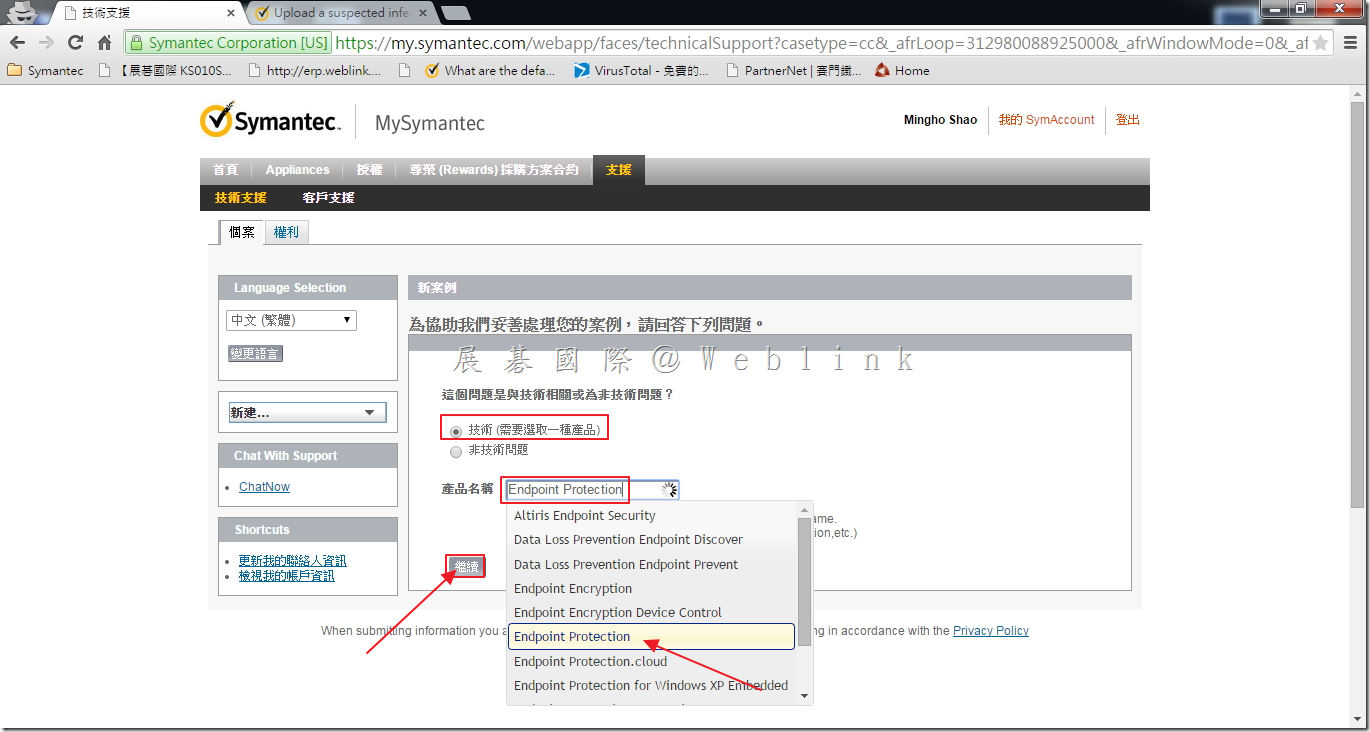
3. 選取「技術 (需要選取一種產品)」,於產品名稱輸入產品關鍵字,接著點選產品「Endpoint Protection」,最後點選「繼續」。

image_thumb5

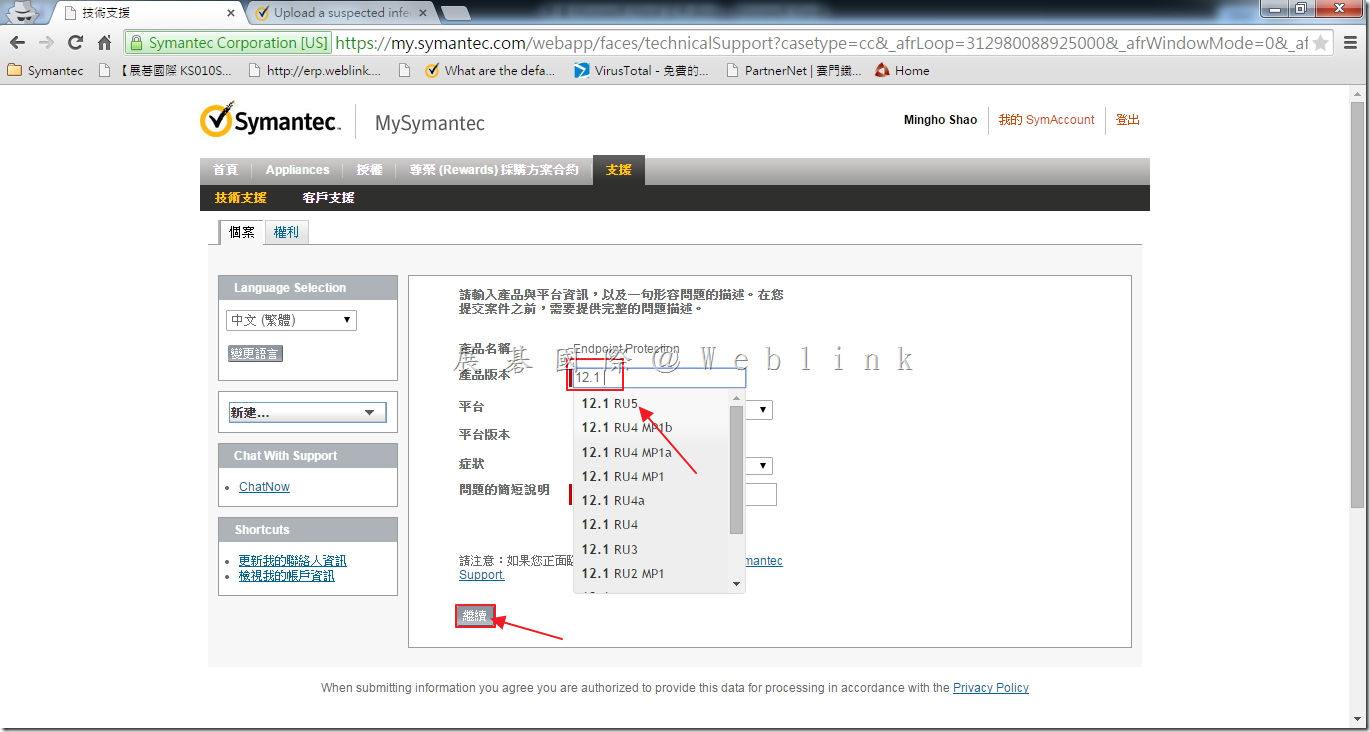
4. 於產品版本輸入版本關鍵字,接著選取版本,輸入其他資料,接著點選「繼續」。

image_thumb6

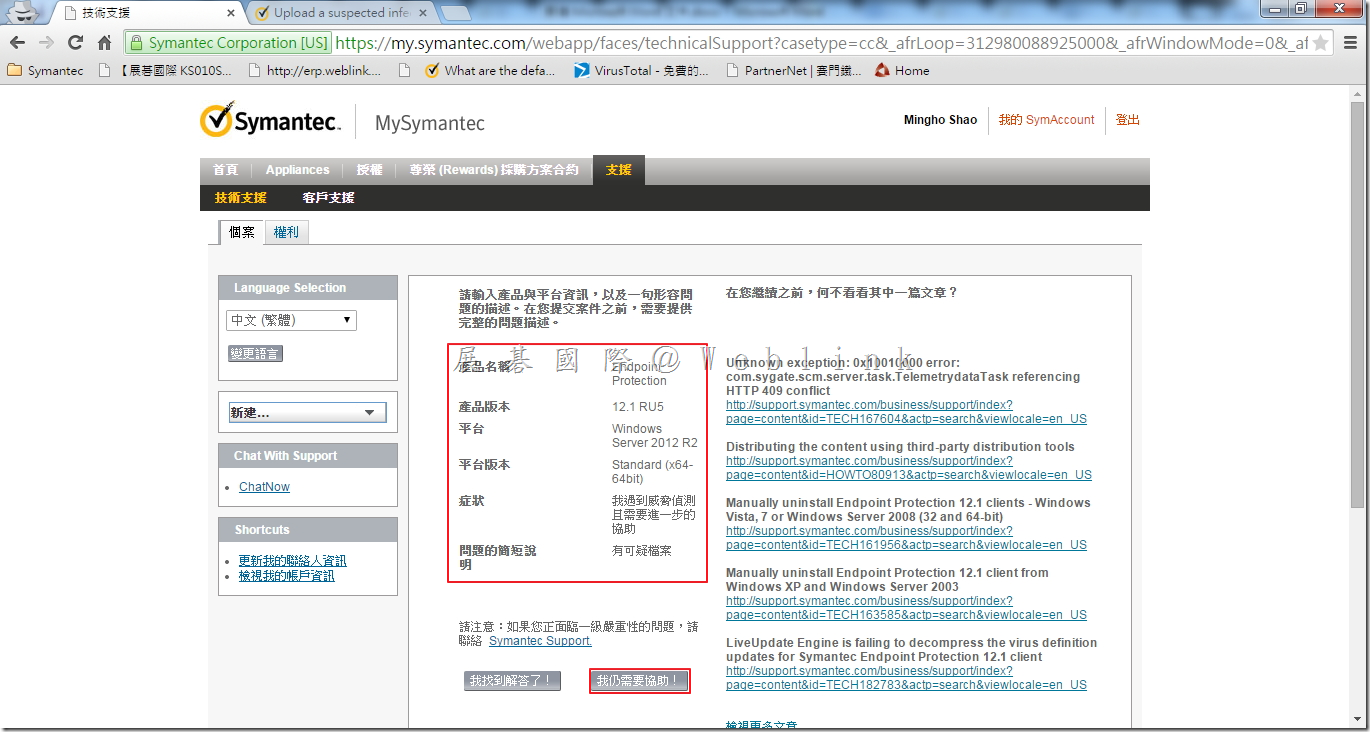
5. 確認輸入資料無誤,接著點選「我仍需要協助!」。

image_thumb7

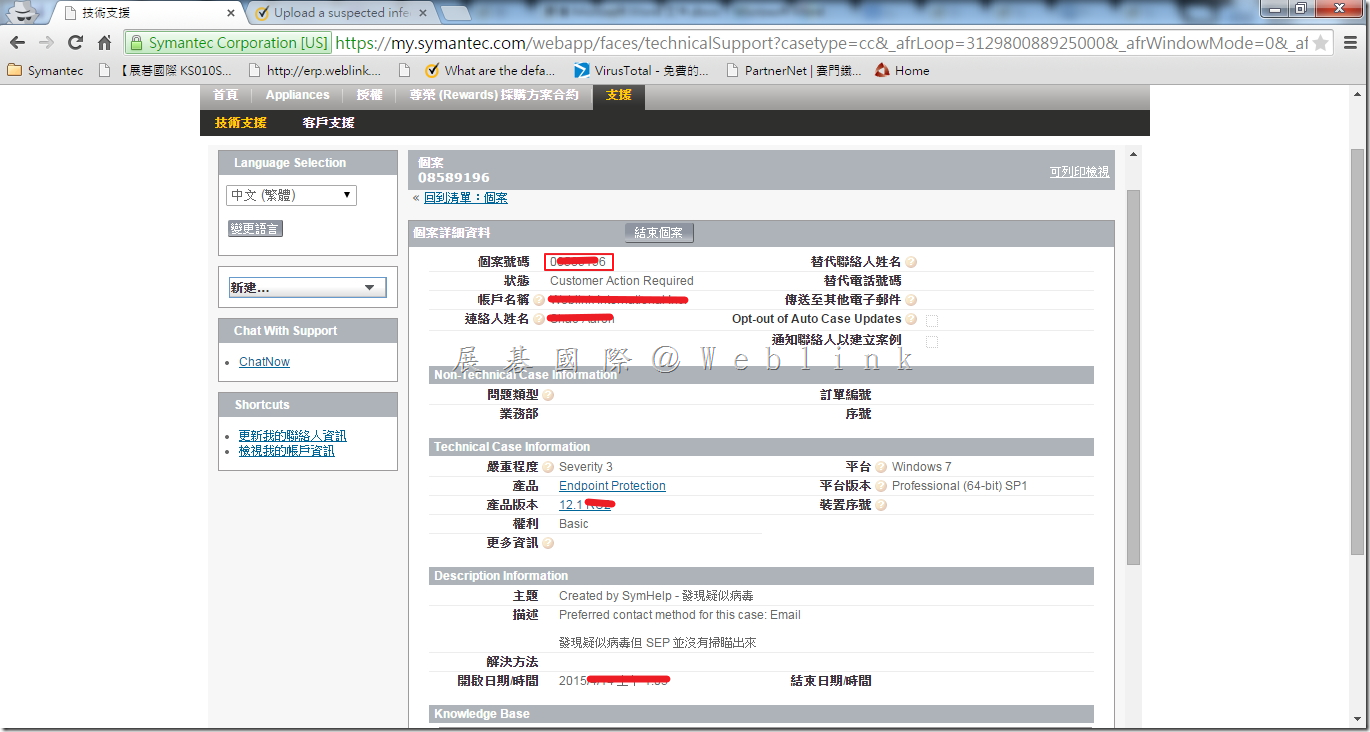
6. Case 開啟成功。

image_thumb8

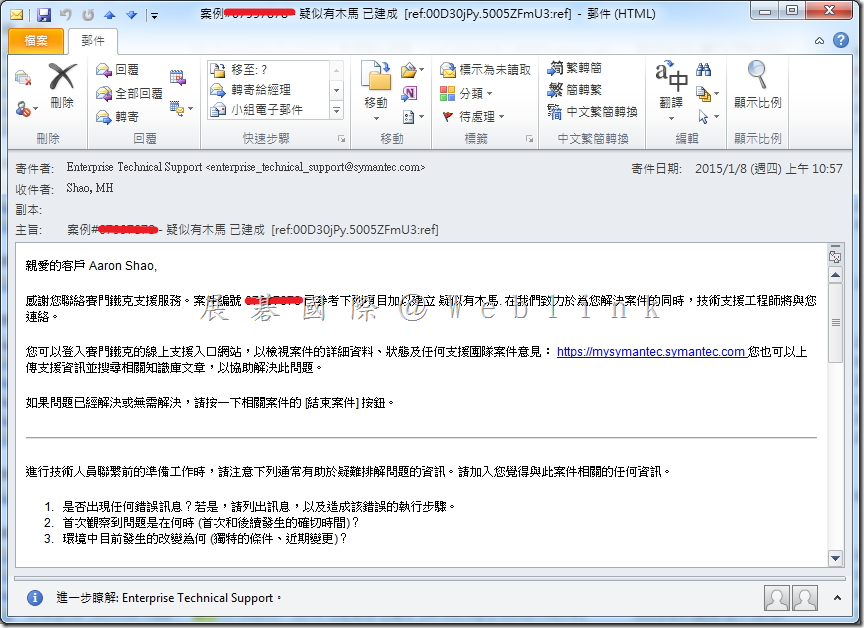
7. 接著會收到一封信件,代表 Case 已開啟。

image_thumb10

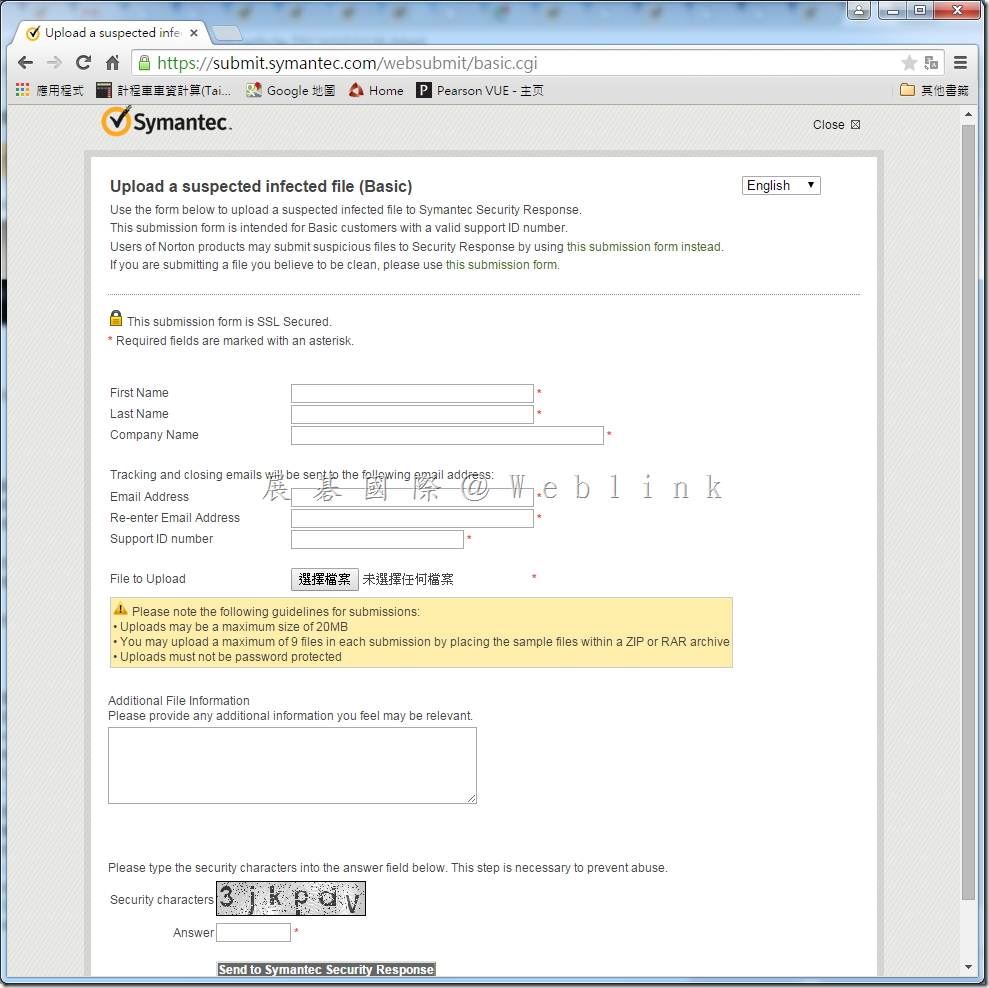
8. 開啟網頁https://submit.symantec.com/websubmit/basic.cgi

image_thumb2

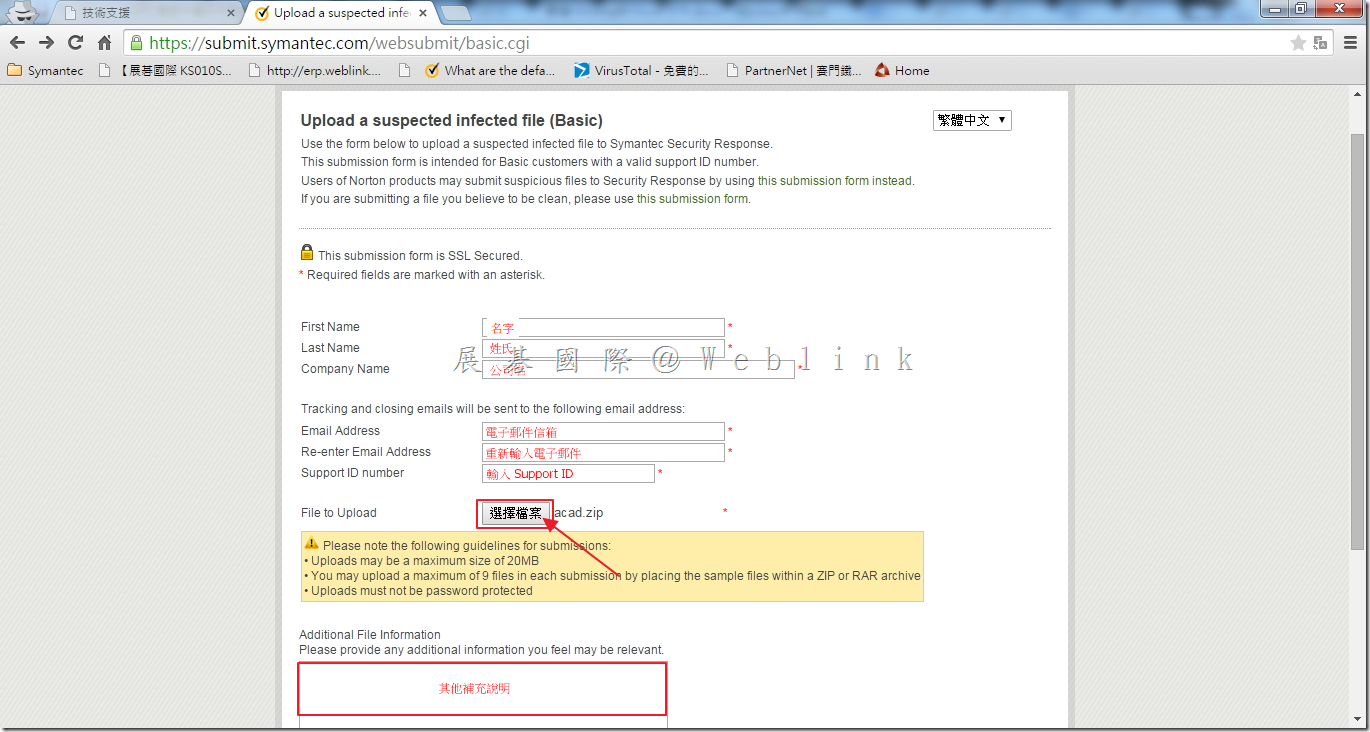
9. 輸入相關資訊,並上傳可疑檔案。

image_thumb12

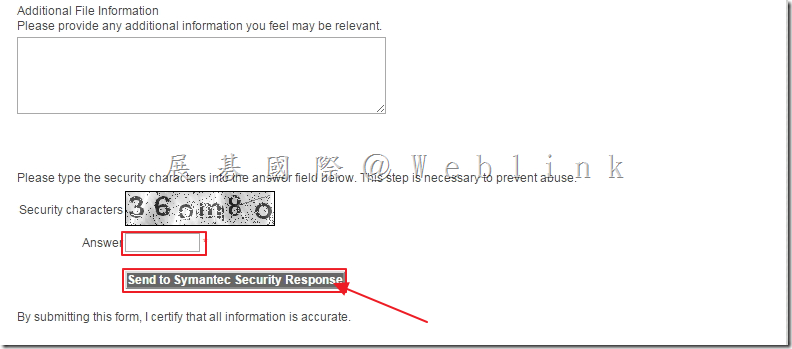
10. 接著輸入驗證碼,最後點選「Send to Symantec Security Response」。

image_thumb13

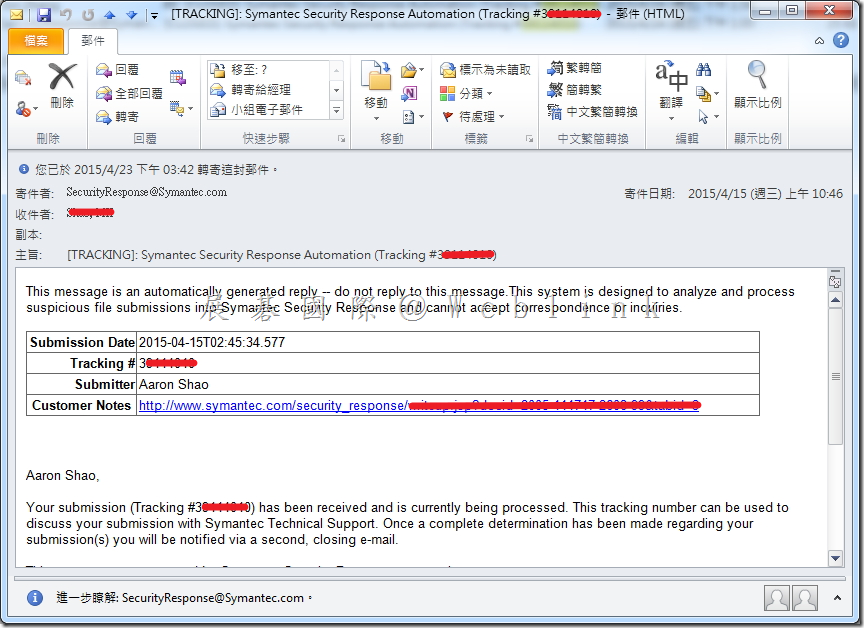
11. 完成後會收到信件,請記下「Tracking #」提供給 Support 負責人員或將該封信件轉寄給 Support 負責人員即可。

image_thumb14

[SEP] 無確定疑似病毒檔案如何開啟 Case

※無確定疑似病毒檔案

1. 開啟 SEP,點選「說明」接著點選「下載賽門鐵克說明工具…」。

image

2. 會開啟網頁,接著點選「Download SymHelp for Windows.」。

image

3. 執行「SymHelp.exe」。

image

4. 點選「我接受 EULA」。

image

5. 點選「收集數據已提供支持」。

image

6. 確定已安裝的產品,接著點選「下一步」。

image

7. 選取「所有數據」,接著點選「下一步」。

image

8. 正在收集數據。

image

9. 輸入相關資訊,點選「打開或更新支持案例」。

image

10.輸入登入資訊,接著點選「登錄」。

image

11. 接著依照畫面即可完成開啟 Case,並等待 Support 相關負責人員與您聯繫即可。

SEP 安裝或升級至 12.1.5(RU5)後,內嵌資料庫無法啟動

錯誤訊息

In the Windows event log:

SQLANYs_sem5
Can’t open Message window log file: D:\Program Files (x86)\Symantec\Symantec Endpoint Protection Manager\db\out.log

In the Upgrade-0.log:

The service SQLANYs_sem5 failed to be started.

In the Management Server Upgrade Wizard:

Setting
ACL…(100%)…Done
Error occurred

Cause

在 SEP 12.1.5 (RU5), Symantec changed the SemSrv and SemWebSrv services to use service virtual accounts. These services are set to an UNRESTRICTED SID type, but the SQLANYs_sem5 service remains under the RESTRICTED category.

Solution

Use the following workaround to change the SID type to UNRESTRICTED, since we are using a service virtual account for the Symantec Embedded Database service as well.

Check the SID type of the service
  1. On the computer where SEPM is installed, click Start > Run.
  2. Type CMD and click OK.
  3. Type sc qsidtype SQLANYs_sem5
  4. Verify that the following is returned:
    [SC] QueryServiceConfig2 SUCCESS
    SERVICE_NAME: SQLANYs_sem5
    SERVICE_SID_TYPE: RESTRICTED

image

Change the SID type of the SQLANYs_sem5 service to UNRESTRICTED
  1. On the computer where SEPM is installed, click Start > Run.
  2. Type CMD and click OK.
  3. Type cd “<Drive>:\Program Files (x86)\Symantec\Symantec Endpoint Protection Manager\bin"
    Note: Replace <Drive> with the drive that SEPM is installed on.
  4. Type ServiceUtil.exe -changeservicesidtype 1 -servicename “SQLANYs_sem5″
    Note: Running the command returns: “Change the semsrv service SID successfully." The string “semsrv" is hardcoded, but we are changing the SID type for the SQLANYs_sem5 service. Please disregard that message.

image

Verify that the SID type has changed to UNRESTRICTED
  1. On the computer where SEPM is installed, click Start > Run.
  2. Type CMD and click OK.
  3. Type sc qsidtype SQLANYs_sem5

image

Start services

After following the preceding steps, start the following services:

  • Symantec Embedded Database
  • Symantec Endpoint Protection Launcher
  • Symantec Endpoint Protection Manager
  • Symantec Endpoint Protection Manager Webserver


https://support.symantec.com/en_US/article.TECH225587.html

Unable to Encrypt Mac Systems on MAC Yosemite with Symantec Encryption Desktop 10.3.2 with error 116385 when Microsoft Office 2011 has been installed prior to Symantec Drive Encryption

http://www.symantec.com/business/support/index?page=content&id=TECH229178

Issue

In attempting to encrypt a Mac OS X 10.10 Yosemite system with Symantec Drive Encryption 10.3., the following error occurs:【PGPError :116385】

Error

“An error occurred while encrypting your disk:
PGPError :116385”

image

In addition to receiving the above error, a prompt will continuously pop up indicating changes are needed.  When Symantec Drive Encryption has been installed properly, this pop up should never be displayed:

image

Cause

The reason this happens is the permissions set for the /Library/PrivilegedHelperTools directory is not set according to what is needed for Symantec Drive Encryption 10.3.2.  This condition typically happens when Microsoft Office 2011 has been installed prior to Symantec Drive Encryption, but only on Yosemite.  Previous versions of Mac OS X (such as Mavericks), Office 2011 and Symantec Drive Encryption are unaffected by this issue.

Solution

The workaround for this is to run the following command via Terminal and then install Symantec Drive Encryption:

sudo chown 0:wheel /Library/PrivilegedHelperTools/

Once the above command is run, type in the Mac Admin password to allow the permission change to occur.  Once the command is completed successfully, the permissions for the group “wheel” will be assigned, instead of “Admin”.

To confirm the appropriate permissions have been set, run the following command:

ls -al /Library/PrivilegedHelperTools/

The following permissions will be displayed to confirm the correct permissions have been set:

image


Running the following command can also confirm proper permissions have been set::

stat /Library/PrivilegedHelperTools/

image

The permission of “root wheel" should be displayed as seen in the example.

If this entry still says “root admin”, the command did not work.  Check the syntax and retry the command.

Alternatively, checking the properties of the /Library/PrivilegedHelperTools/ properties via Finder will show the following correct permissions:

image

Once the permissions have been set properly, uninstall Symantec Drive Encryption if installed, and then install the application.  This time, Drive Encryption should succeed.

Symantec Development is currently working into this for a final resolution.  Subscribe to this article for any future updates with this issue.