Issue
To gain command line access to a Symantec Encryption Management Server (previously PGP Universal Server), you will need to create an SSH key. You can do this using a utility such as PuTTYgen to create an SSH key and PuTTY to log in to the command line interface. This article details how to utilize PuTTYgen and PuTTY to access Symantec Encryption Management Server (SEMS) .
PuTTY is a freeware suite of SSH tools. The PuTTY suite includes PuTTYgen, PuTTY, PSFTP, and Pageant the PuTTY authentication agent. The PuTTYgen and PuTTY.exe files are also available to be downloaded separately.
Accessing the server command line for read-only purposes (such as to view settings, services, logs, processes, disk space, query the database, etc) is supported. However, performing configuration modifications or customizations via the command line may void your Symantec Support agreement unless the following procedures are followed.
Any changes made to the server via the command line must be:
- Authorized in writing by Symantec Technical Support or published as an approved and documented process on the Symantec Knowledge Base.
- Implemented by a Symantec Partner, reseller or Symantec Technical Support.
- Summarized and documented in a text file in /var/lib/ovid/customization on the Symantec Encryption Management Server itself.
Note: Changes made through the command line may not persist through reboots and may be incompatible with future releases. Symantec Technical Support may also require reverting any custom configurations on the server back to a default state when troubleshooting new issues.
Solution
Using PuTTYgen
To create an SSH keypair using PuTTYgen
These steps assume the entire suite of PuTTY utilities is installed on the computer. The following steps may also be performed using the separately downloaded PuTTYgen.exe and PuTTY files.
- Open PuTTYgen.
- Confirm the Parameters (at the bottom of the PuTTY Key Generator window) for the type of key to generate. The parameters of the key must utilize one of the SSH2 options. We recommend that you choose SSH-2 RSA (the default). Set the Number of bits to 2048
- Create a key pair by clicking on the Generate button in the Actions section. Generate some randomness for the key by moving the mouse over the blank area.


4 .After the key generation is complete, copy the public key block from PuTTY window into a SEMS admin account by performing the following:
5. Copy the public key from the clipboard window in the PuTTY Key Generator where it says “Public key for pasting into OpenSSH authorized_keys file:"

6. Log in as a superuser to the server admin interface.

7. Select the System > Administrators card then click on a superuser account. Note: It does require the user to be a superuser administrator to use SSH access. Other roles are not supported to use SSH access.

8. Click the plus + sign at the end of the SSHv2 Key line. This will bring up a window that displays Update SSH Public Key.

9. Click the Import Key Block radio button and paste the public key block that you just generated with PuTTYgen directly into this block and click the Import button.


10. After you upload the key block you will notice the hex fingerprint of the key will now show up in SSHv2 Key line. You can verify that the fingerprint matches the fingerprint found in the Key fingerprintt line on PuTTY Key Generator to verify that the key was imported succesfully


11. Click Save and close the administrative interface.
12. Next go back to your desktop and save the public and private key within PuTTYgen.


Note: The minimum key size when generating a key is 1024-bit. Intermittently PuTTYgen may generate a 1024-bit key as a 1023-bit key due to a bug in PuTTYgen. Thereby causing the key not to work properly. The best practice is to generate a key of at least 1025-bit to avoid the potential problem. We recommend generating a key 2048-bit in length to solve this issue.
Access SEMS using PuTTY
Use the following steps to access the command line interface.
- Open PuTTY from the Start menu.
Enter the SEMS hostname (keys.domain.com) or IP address in the hostname field
- If not already entered, change the Port field to use port 22.
- Select the SSH radio button as the protocol.

- Click Auth (under Category>Connection>SSH)
- Browse to the private key and add the file that you saved and click Open to start a session. You will be prompted to enter a username.

- Type: root and press Enter.


【一些 postgres SQL 指令】
show all postpres SQL table
SELECT table_name FROM information_schema.tables WHERE table_schema = ‘public’;
select * from internal_user_name;
select * from whole_disk_recovery_token;
select * from internal_user where desktop_lastseen < NOW() – INTERVAL’1 months’;
select * from internal_user_name;

select * from whole_disk_recovery_token;

【如何從資料庫中查詢某使用者的 WDRT token】
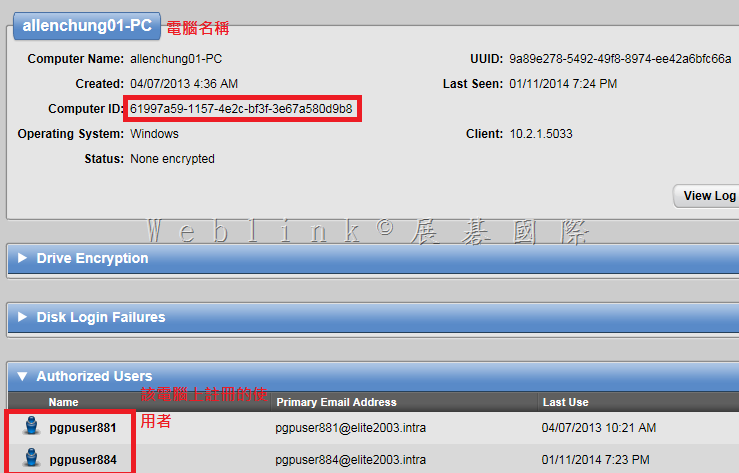
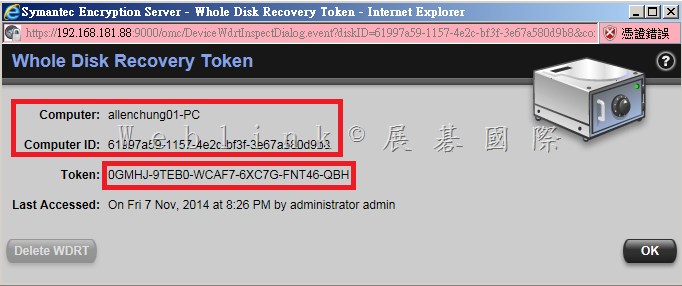
查詢使用者的 WDRT token,並非透過使用者名稱去查詢,而是要透過電腦名稱來查詢,該電腦上若有多個使用者註冊 PGP Universal Server,則每個人的 WDRT token 是相同的


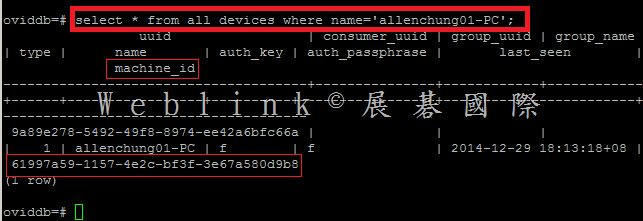
select * from all_devices where name=’allenchung01-PC’;
會查詢到 ‘allenchung01-PC’ 的 machine_id 是 ‘61997a59-1157-4e2c-bf3f-3e67a580d9b8’

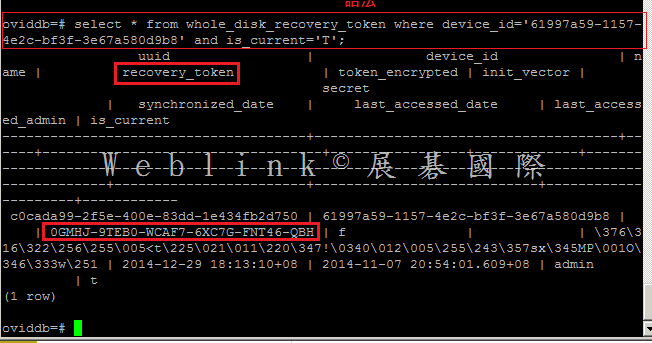
select * from whole_disk_recovery_token where device_id=’61997a59-1157-4e2c-bf3f-3e67a580d9b8′ and is_current=’T’;
查到 Token: 0GMHJ-9TEB0-WCAF7-6XC7G-FNT46-QBH
※ 如果想匯出相關資訊可使用以下指令
psql oviddb ovidr -c “SELECT * FROM whole_disk_recovery_token" > /tmp/WDRT.csv

- If your public key is not accepted by SEMS when you are trying to paste it in from the PuTTYgen window, make sure you are not accidentally adding whitespace when pasting the keyblock. If it still doesn’t work go through the entire key generation process again. From within Puttygen make sure you have clicked at the very bottom: SSH-2 for the type of key to generate.
- If your public key is not being accepted and you receive an error stating that the SSH key is not valid when importing to SEMS, this may be due to you saving the key file using the Save public key option in the PuTTY Key Generator utility. This uses a format that SEMS doesn’t support. Be sure to copy the key from the portion of the clipboard as described in Step 5 above.
- The first time you log into SEMS with PuTTY, you will be given a security warning, this is normal. Just click yes and proceed as above.
- Saving your session for future use:
You may want to go back to the (Category > session) tab and type a descriptive name in the box directly under the words Saved Sessions. If you do this and click Save you will notice that the name you typed appears in the larger box as a Saved Session. Now you will be able to access your configured login for SEMS in the future just by double-clicking on the saved session name.


