[PGP] Encryption Server 3.3.2 安裝

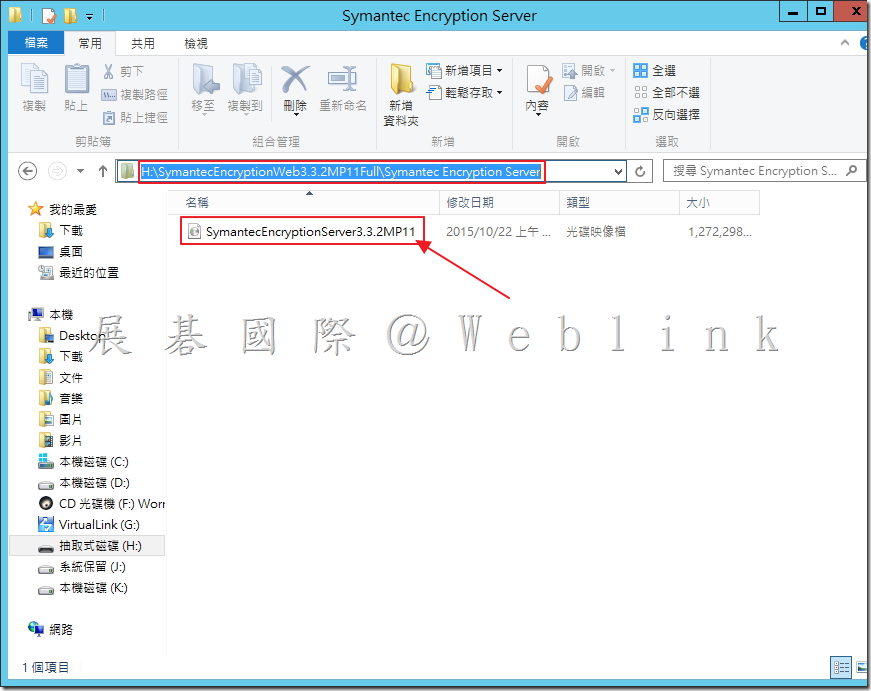
1.   解壓縮「SymantecEncryptionWeb3.3.2MP11Full.zip」。

image


2.   打開「Symantec Encryption Server」,可看到一個 ISO 檔案。

image


3.   掛載之後,進行安裝,輸入鍵盤「Enter」。

image


4.   選擇「Continue」,接著輸入鍵盤「Enter」。

image


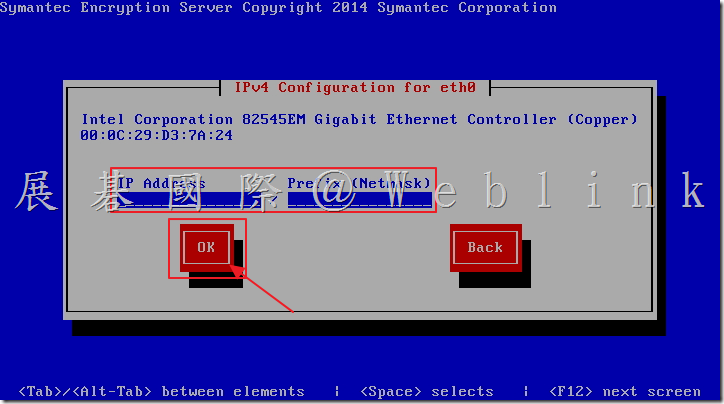
5.   輸入「IP Address」、「Netmask」,接著選取「OK」,接著輸入鍵盤「Enter」。

image


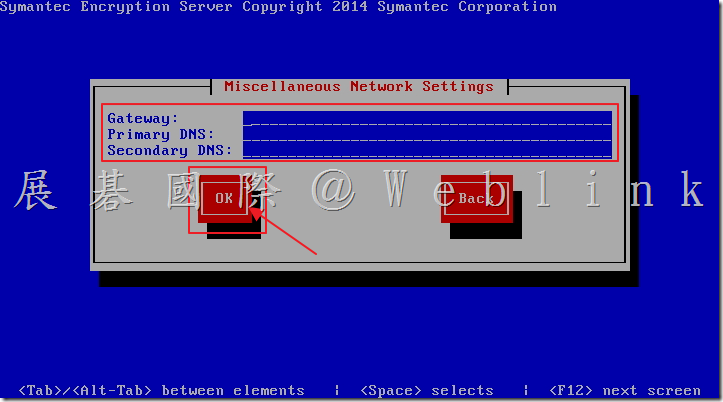
6.   輸入「Gateway」、「Primary DNS」、「Secondary DNS」,接著輸入鍵盤「Enter」。

image

7.   輸入「Hostname」,必須為FQDN,接著輸入鍵盤「Enter」。

image


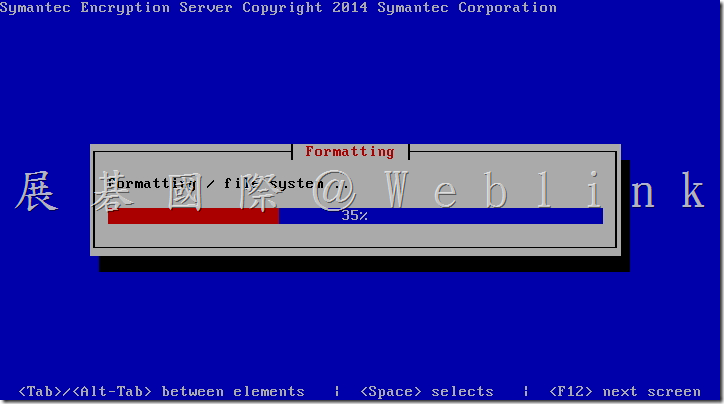
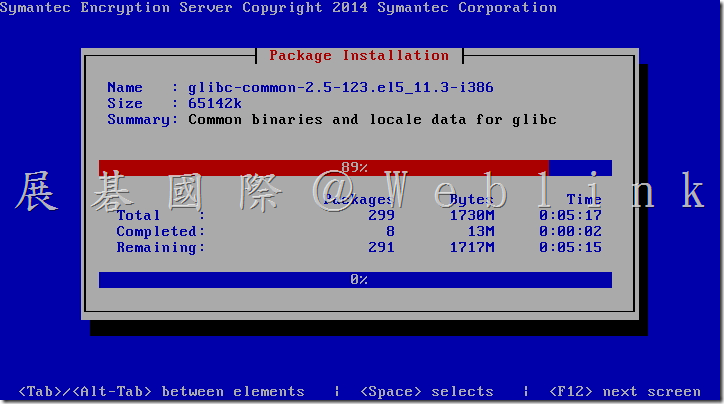
8.   安裝中。

image

image

image

image


9.    安裝完成,請登入下列網址。

image


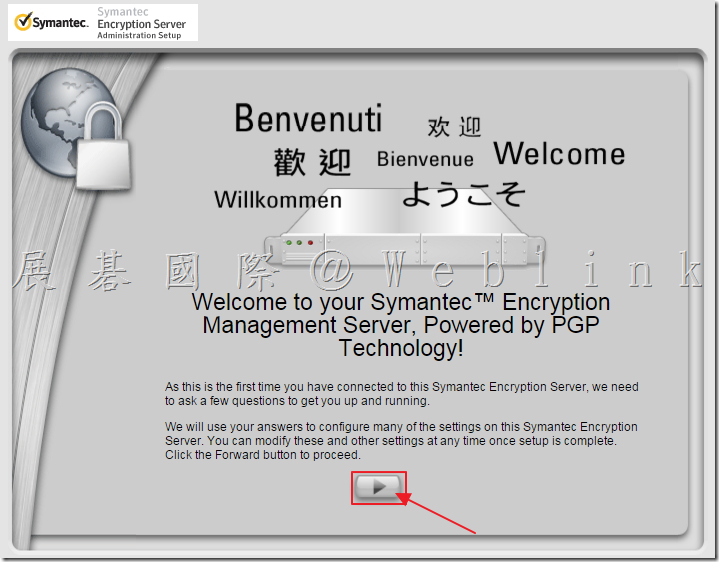
10.   點選畫面中間下面「箭頭」。

image


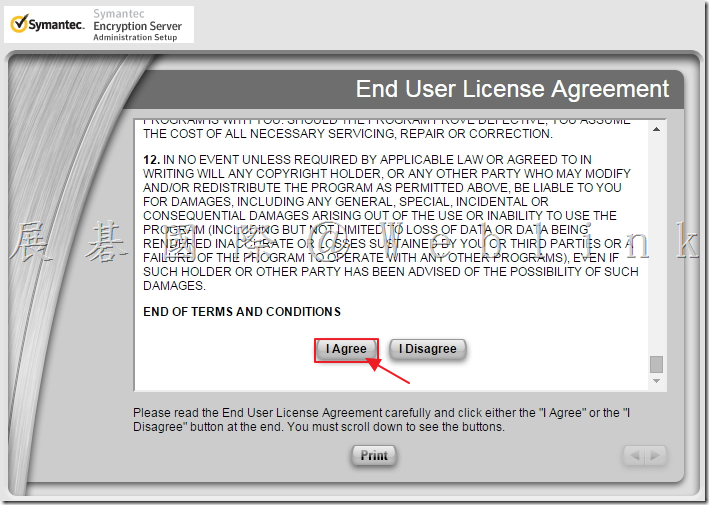
11.   將「License Agreement」拉至最底,點選「I Agree」。

image


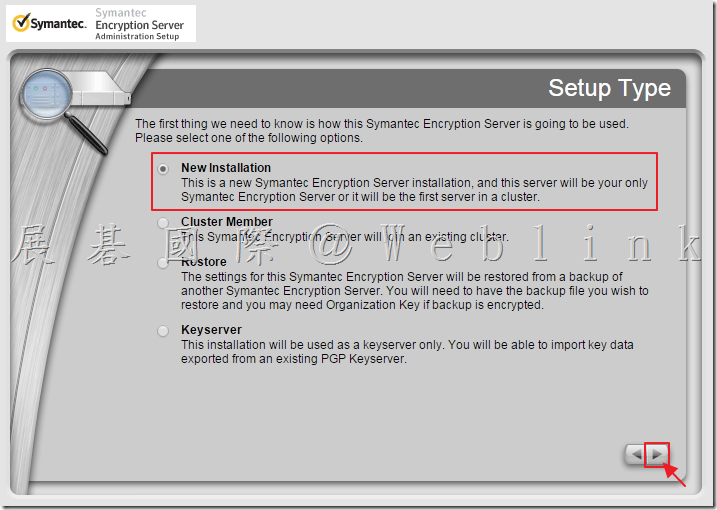
12.   點選「New Installation」,接著點選畫面右下角箭頭。

image


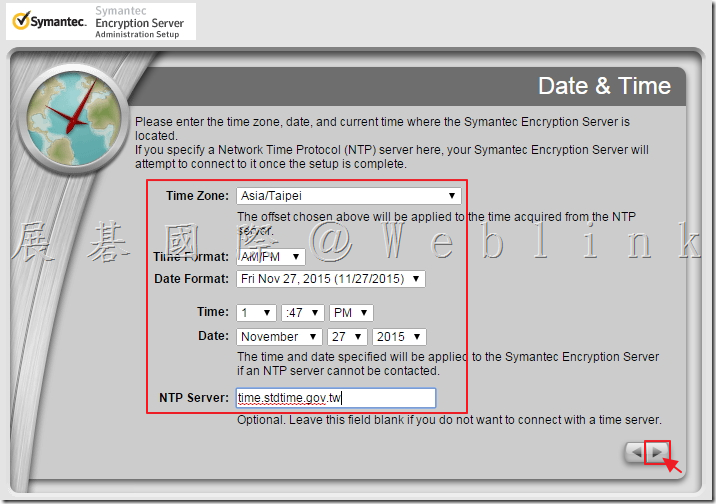
13.   輸入時區相關資訊,接著點選畫面右下角箭頭。

image


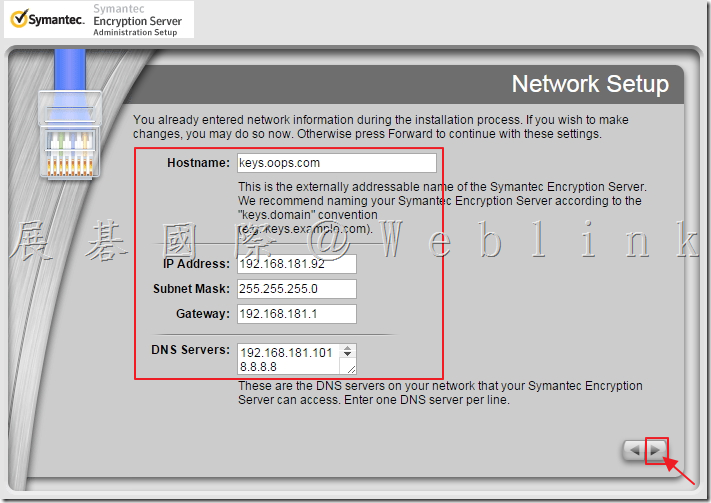
14.   確認資料無誤後,接著點選畫面右下角箭頭。

image


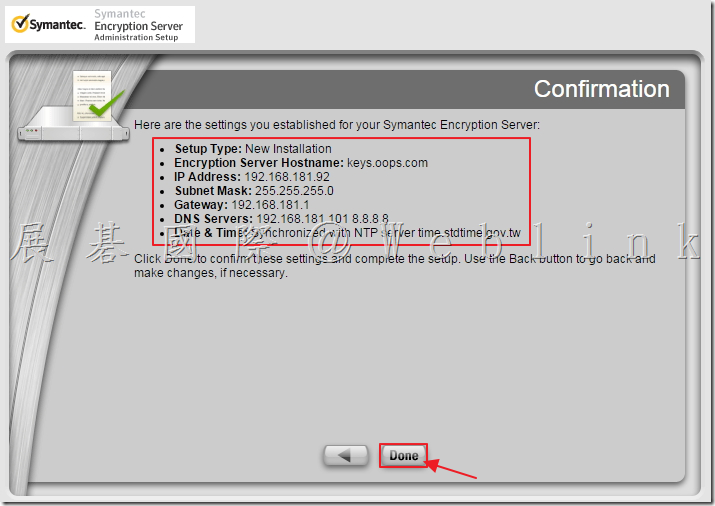
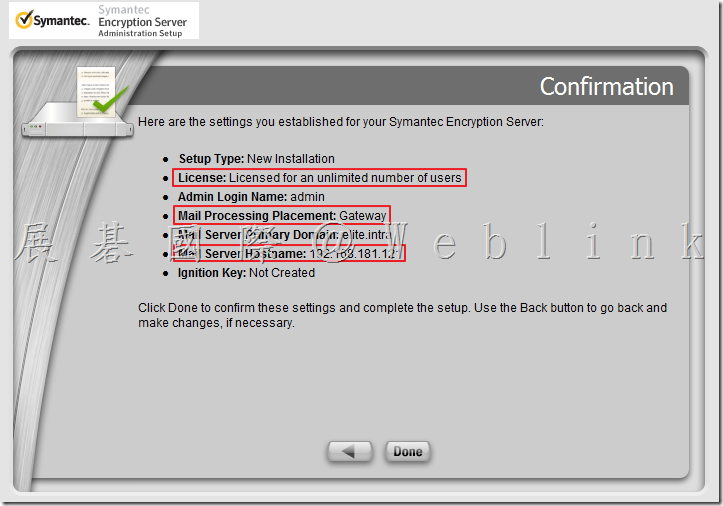
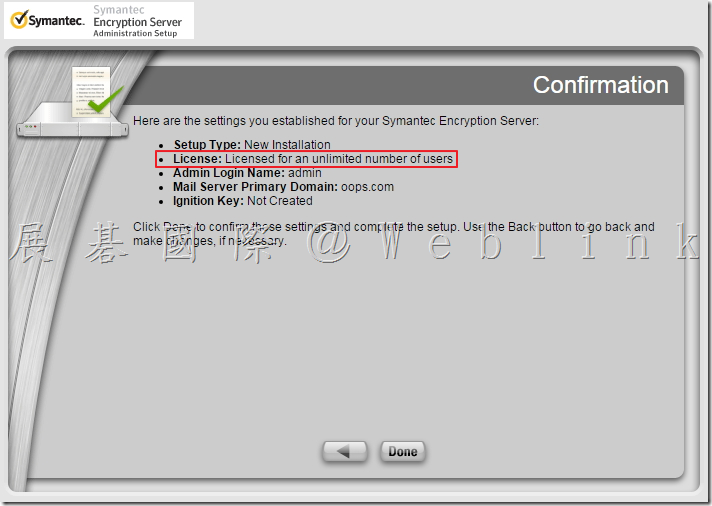
15.   確認上述資訊無誤,接著點選「Done」。

image


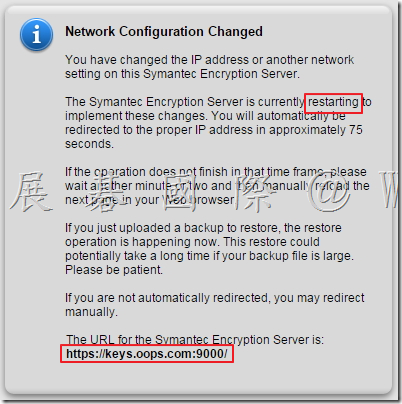
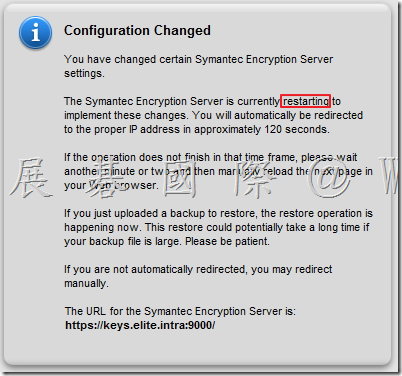
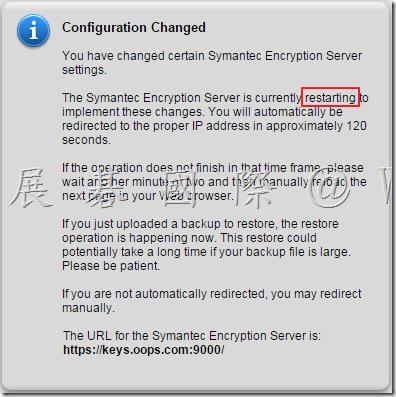
16.   Server 重新啟動中,並且使用新的 URL 登入系統。

image


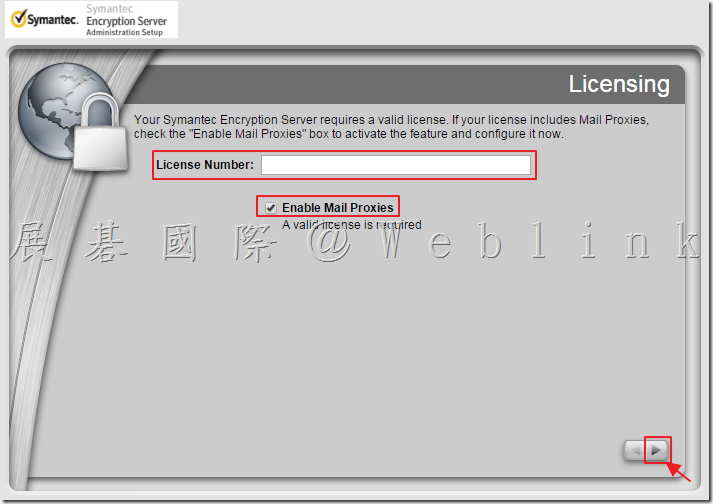
17.   輸入「License Number」,勾選「Enable Mail Proxies」(若僅使用全硬碟加密可不勾選)接著點選畫面右下角箭頭。

image


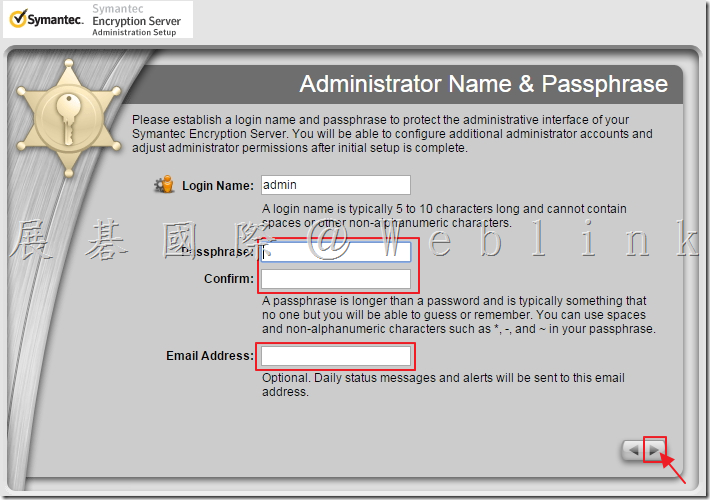
18.   輸入密碼(需符合複雜度原則),輸入Email,接著點選畫面右下角箭頭。

image


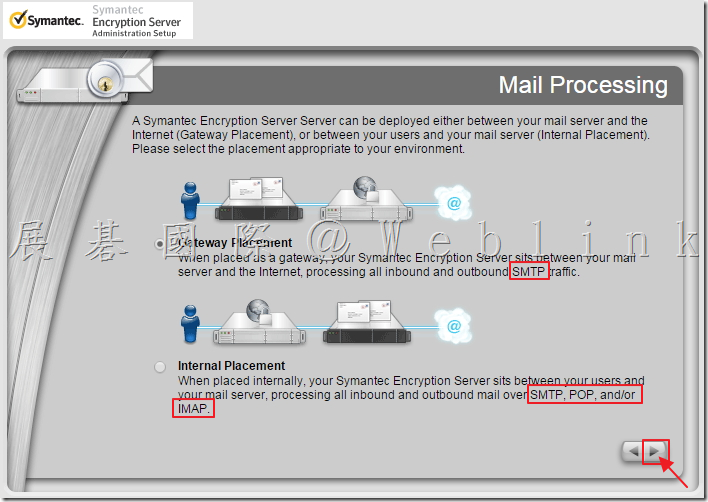
19.   選取模式,接著點選畫面右下角箭頭。(若啟用 Enable Mail Proxies 需設定)

image


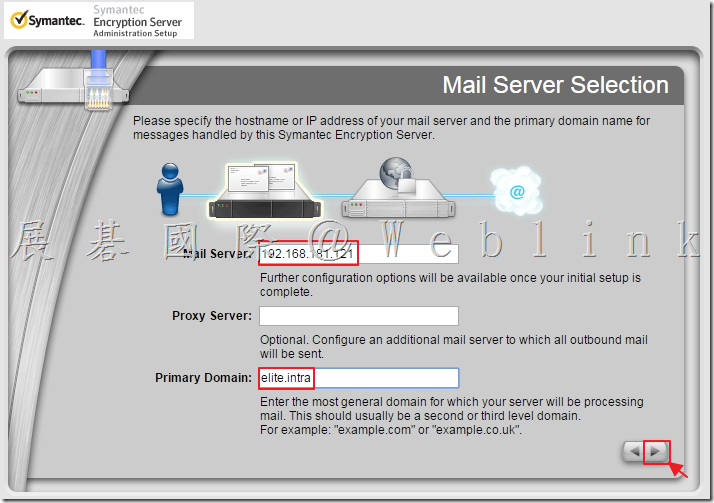
20.   輸入「Mail Server」、「Primary Domain」,接著點選畫面右下角箭頭。(若啟用 Enable Mail Proxies 需設定)

image


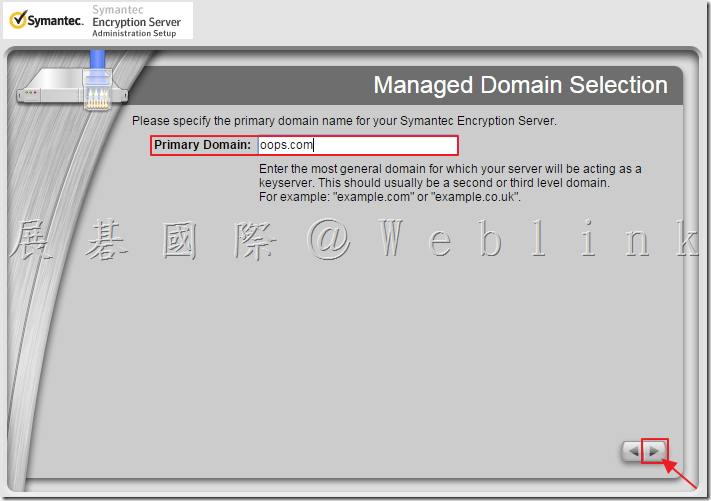
21.   設定「Primary Domain」,接著點選畫面右下角箭頭。(若無啟用 Enable Mail Proxies 需設定)

image


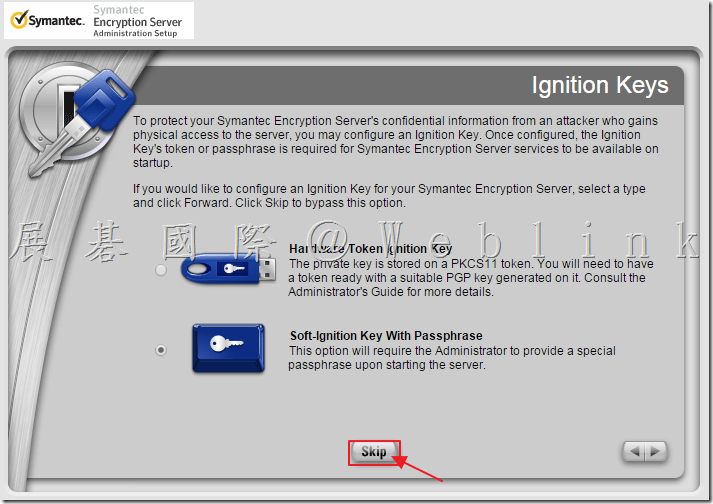
22.  點選「Skip」。(啟用 Enable Mail Proxies 才需設定)

image


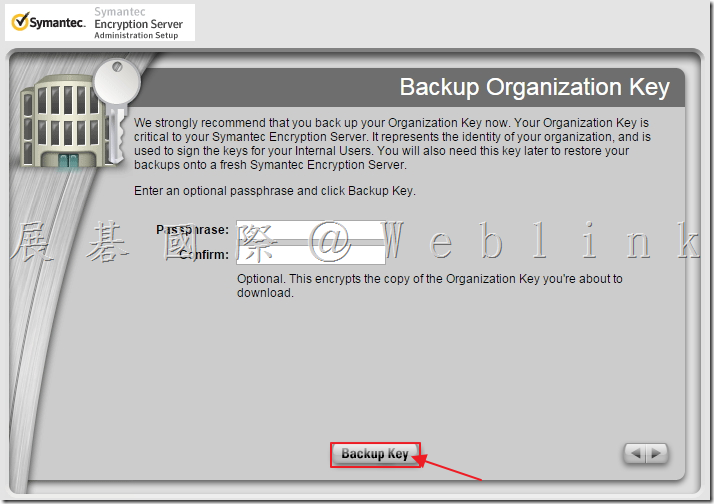
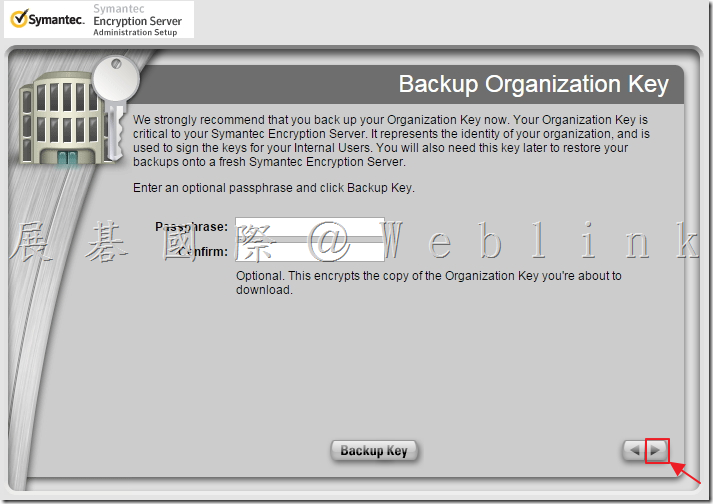
23.   點選「Backup Key」。

image  


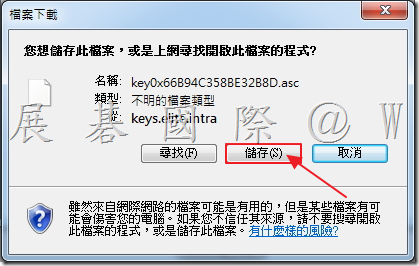
24.   儲存 Key。

image


25.   備份 Key 完成後,接著點選畫面右下角箭頭。

image


26.   安裝完成,點選「Done」。

image

image


27.   重新啟動中。

image

image


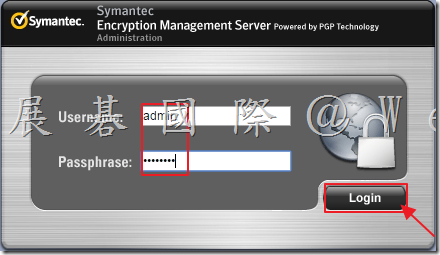
28.   輸入剛剛安裝時所設定的帳號密碼、接著點選「Login」。

image


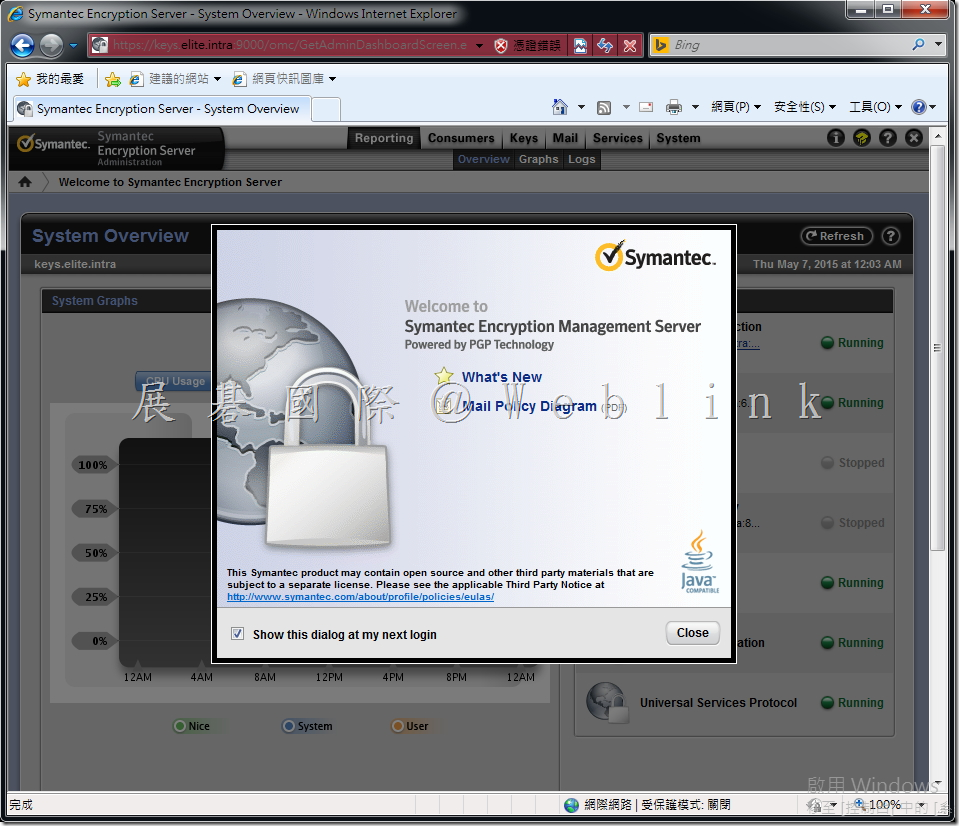
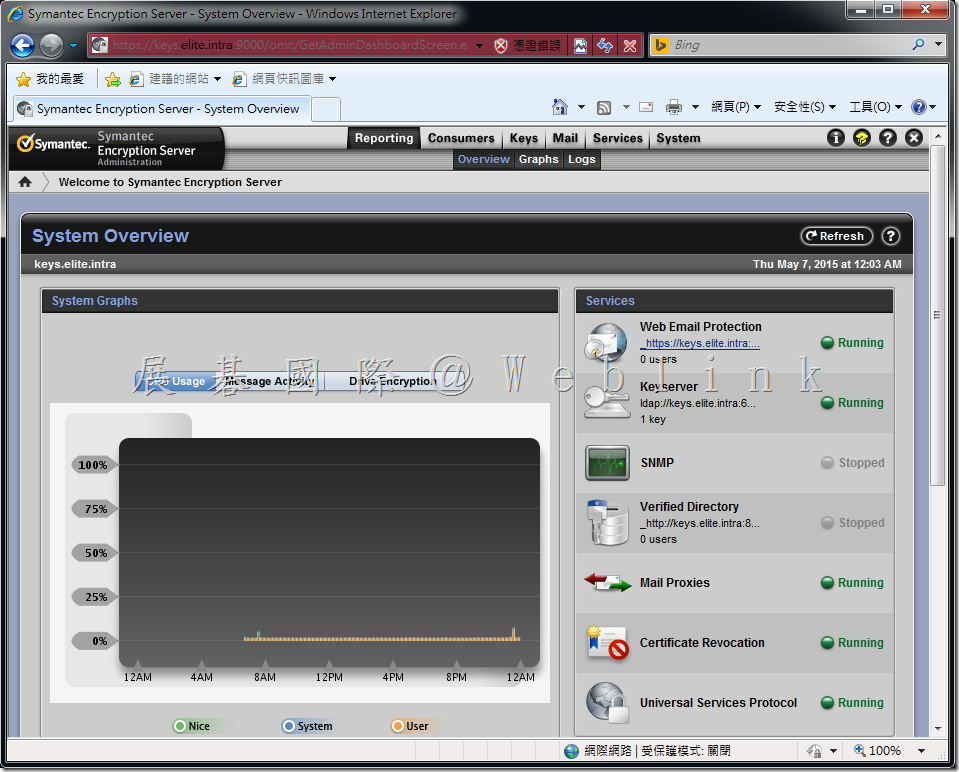
29.   登入系統。

image

image

密碼變更後 boot-guard的密碼都還是舊的

這與變更密碼的方式有關
請參考以下網頁說明,請透過 Ctrl + Alt + Del 來變更密碼,這樣才能立即同步
Symantec – Changing Your Windows Password with PGP WDE With Single Sign-On
https://support.symantec.com/en_US/article.HOWTO79569.html

Description
To synchronize your Windows password changes with PGP Whole Disk Encryption (PGP WDE), you must change your password for Single Sign-On using the Change Password feature in the Windows Security dialog box, which you access by pressing Ctrl+Alt+Del.
Note: You may also change your password when prompted by Windows that your password will expire during logging in.
To change your passphrase
1.  Press Ctrl+Alt+Delete.
2. Type your old password.
3. Type and confirm your new password.
4. Click OK.
Single Sign-On automatically and transparently synchronizes with this new password with your PGP WDE passphrase. You can use the new password immediately, in your next login attempt.

Caution: If you change your password in any other manner—via Domain Controller, the Windows Control Panel, via the system administrator, or from another system—your next login attempt on the PGP BootGuard screen will fail. You must then supply your old Windows password. Successful login on the PGP BootGuard screen using your old Windows password then brings up the Windows Login username/password screen. You must then log in successfully using

P.S.

Symantec – How to change-update the SSO passphrase over the PGP WDE command line, if it has not synched with the PGP Bootguard.

https://support.symantec.com/en_US/article.TECH149263.html

If your Windows password has not synchronized with your PGP BootGuard passphrase, you can synchronize your new Windows password with the PGP BootGuard passphrase using the pgpwde tool.

To use the pgpwde tool:

Windows XP

  1. Click Start>Run.
  2. Type cmd in the Open field and click OK.
  3. Change to the Program Files\PGP Corporation\PGP Desktop directory.
    • Type the following at the command prompt (non-domain):
      pgpwde –change-passphrase –disk 0 –user username –passphrase ‘yourpassphrase’ –new-passphrase ‘yournewpassphrase’
    • Type the following at the command prompt (domain):
      pgpwde –change-passphrase –disk 0 –user username –domain ‘domainname’ –passphrase ‘yourpassphrase’ –new-passphrase ‘yournewpassphrase’
  4. Press Enter.

Windows Vista & Windows 7 32-bit

  1. Click Start>Run.
  2. Type cmd in the Start Search field.
  3. Click cmd from the list of Programs.
  4. Change to the Program Files\PGP Corporation\PGP Desktop directory.
    • Type the following at the command prompt (non-domain):
      pgpwde –change-passphrase –disk 0 –user username –passphrase ‘yourpassphrase’ –new-passphrase ‘yournewpassphrase’
    • Type the following at the command prompt (domain):
      pgpwde –change-passphrase –disk 0 –user username –domain ‘domainname’ –passphrase ‘yourpassphrase’ –new-passphrase ‘yournewpassphrase’
  5. Press Enter.

Windows Vista & Windows 7 64-bit

  1. Click Start>Run.
  2. Type cmd in the Start Search field.
  3. Click cmd from the list of Programs.
  4. Change to the Program Files (x86)\PGP Corporation\PGP Desktop directory.
    • Type the following at the command prompt (non-domain):
      pgpwde –change-passphrase –disk 0 –user username –passphrase ‘yourpassphrase’ –new-passphrase ‘yournewpassphrase’
    • Type the following at the command prompt (domain):
      pgpwde –change-passphrase –disk 0 –user username –domain ‘domainname’ –passphrase ‘yourpassphrase’ –new-passphrase ‘yournewpassphrase’
  5. Press Enter.

Your PGP WDE passphrase is synchronized with your new Windows password.

Symantec Drive Encryption (Managed by SMES) upgrade to 3.3.2 MP10 issue

Our company used the Symantec Drive Encryption (managed by Symantec Encryption Management Server (SEMS) and integrate with AD authentication and single sign on).

We always upgrad the Symantec Encryption Management Server (SEMS) to the latest version and it almost works normally.

This time we upgrad the Symantec Encryption Management Server (SEMS) to the (3.3.2 MP10) version.

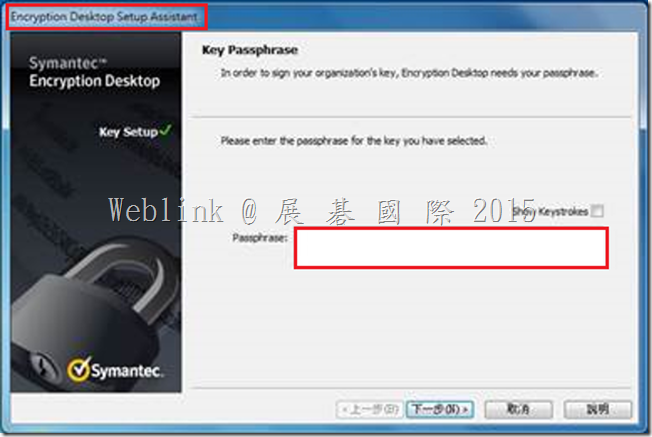
We found if we install a new PC and use the user account (existed in SEMS) to enroll to the SEMS and the Encryption Deaktop Setup Assistant wizard asked to enter the passphrase.

But we can not enter the current domain password (it display “The passprase did not match of the key” ).

It must enter the old domain password (when the user account enrolled to the SEMS first time).

clip_image001

If we didn’t enter the match passphrase we can not press next button.

clip_image002

clip_image003

clip_image004

We refered to the URL below.

It says:

If using Silent Enrollment, we recommend using SKM mode only. Otherwise, a GKM key will be created, using their current Windows passphrase when they first enroll, but the passphrase on that key will not change, so after several Windows passphrase changes, the user will likely not remember the GKM key passphrase.

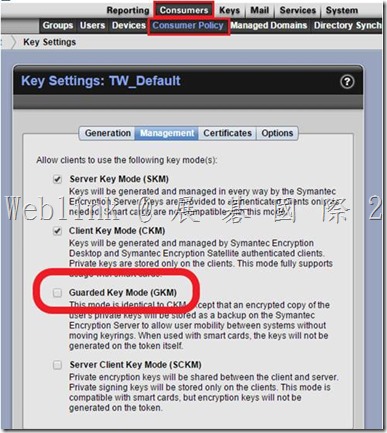
So we unchecked the Guarded Key Mode (GKM) in the key mode setting Under the LAB and the issue solved.

http://www.symantec.com/connect/forums/single-user-issue-multiple-machines

clip_image006

The key mode change to CKM.

clip_image007

1.We want to know why the (3.3.2 MP10) version has this issue?

Our company used the Symantec Drive Encryption (managed by Symantec Encryption Management Server (SEMS) and integrate with AD authentication and single sign on).

【We use the GKM mode】

If we install a new PC and use the user account (existed in SEMS) to enroll to the SEMS and the Encryption Deaktop Setup Assistant wizard asked to enter the passphrase.

The passphrase must be the original one,not the current domain password.
clip_image001

(1) In ( 3.3.2 MP10 )

It display “The passprase did not match of the key”.

And we can not press 【next】 to ignore it,and we can not do any configuration on PGP client.

image

(2) In ( 3.3.2 MP7 and earlier version )

It display “The passprase did not match of the key”.

But we can press 【next】 to ignore it,so we can encrypt th disk.

image

(3) If we unchecked the GKM then the user key change to CKM.

We install a new PC and use the user account (existed in SEMS) to enroll to the SEMS .

It doesn’t ask to enter the passphrase.

We don’t unchecked the GKM in the production environment because we are not sure what effects will be occured.
clip_image006

2.What different between check and uncheck the Guarded Key Mode (GKM)?

3.Any effects if we uncheck the Guarded Key Mode (GKM) in the production environment?

4.What is the correct setting for our environment?

【Information form Symantec Connect】

https://www-secure.symantec.com/connect/forums/symantec-drive-encryption-managed-smes-upgrade-332-mp10-issue#comment-form

1. During initial enrollment the users domain password is not used in GKM key mode. The PGP key and passphrase do not have the ability to use SSO(single sign on), the passphrase is assigned to the key in GKM mode when the user manually types their passphrase in the key generation wizard box. This passphrase for the PGP key does not sync with users Windows passwords. If you want to change the passphrase you must do so manually by selecting Symantec Encryption Desktop>PGP Key> Select the key>Change passphrase. It will ask for the old passphrase if it’s not cached and then it will let you update the passphrase. 

2. If you are only using Symantec Drive Encryption for your environment, then I would suggest using SKM key mode as this keymode requires that the users don’t need to maintain and remember their passphrase. The Server manages the key and never asks for a passphrase to use these keys. PGP keys have nothing to do with Symantec Drive Encryption unless you manually put them on a Smart Card or Token and then use that for authentication. By default Symantec Drive Encryption uses passphrase user for access and doesn’t require a PGP key to do the intial encryption.

I would recommend you open a support ticket so they can help you figure out a solution to get the users off of GKM key mode. GKM keymode will be problematic since the users don’t use the PGP key. They will forget the passphrase and you will run into an issue attempting to re-enroll or enroll on new machines. I always recommend SKM keymode for Drive Encryption only environments. 

I would not recommend you just select CKM keymode since it’s not fixing the issue. It will just add to the confusion in the future. The user will have a keypair that they don’t know or remember the passphrase. There are certain operations that require the users know the passphrase to function properly. I’m very suprised that the enrollment wizard allows you to bypass this section without knowing the passphrase to the key even in CKM mode. That seems like a defect to me since the users will have broken keys if they don’t know the passphrase. 

PGP 憑證過期

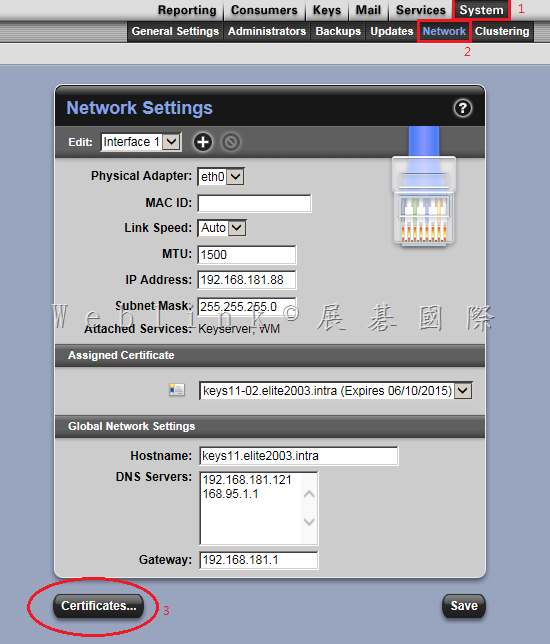
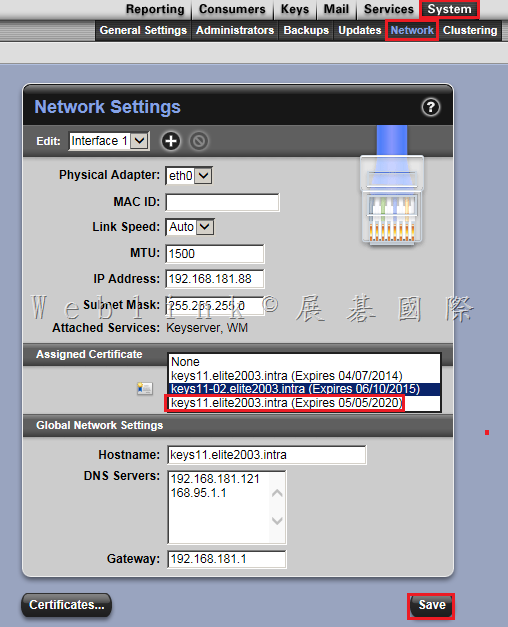
1.登入 PGP 主控台,【System】→【Network】→【Certificates】

clip_image001

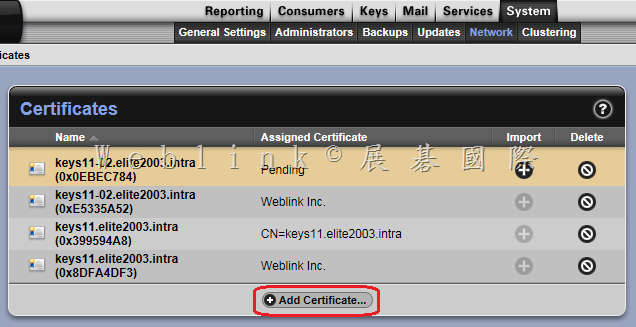
2.【Add Certificates】

clip_image002

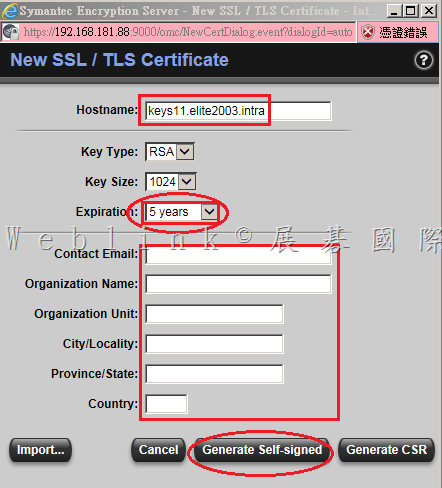
3.輸入憑證相關資訊 ( Expiration 請下拉選擇 5 年 ) 並按下【Generate Self-signed】

clip_image003

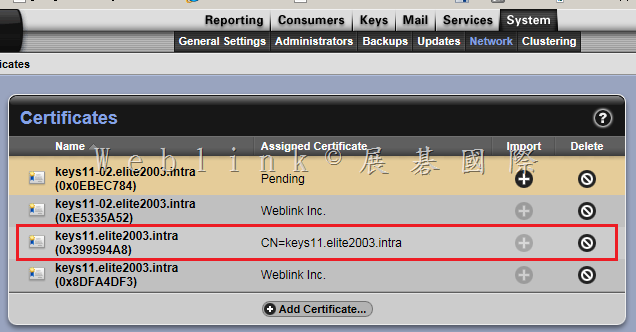
4.這是新增的憑證

clip_image004

5.回到 【System】→【Network】→【Assigned Certificate】,下拉選擇到期日最久的憑證,並按下【Save】

clip_image005

6.PGP 正重啟以套用變更

image

7.重新登入即可

image

8.之後用戶端會出現以下畫面,請按下【Always Allow for This Site】

image

透過 PGP command 來解密硬碟

透過 PGP加密過的硬碟因故無法開機,接到另一台裝有 PGP 的機器時,可進行以下操作:

登入後會要求輸入 passphrase,若發現怎麼輸入都不行

請登出電腦,再使用另外那位故無法開機使用者的帳號與密碼登入,登入後會要求輸入 passphrase,這時候輸入密碼就OK了

若仍有問題,請嘗試以下的 command 來解密

1. 命令提示字元,切換至以下路徑

Windows XP: C:\Program Files\PGP Corporation\PGP Desktop

Windows Vista/Windows 7: C:\Program Files\PGP Corporation\PGP Desktop

Windows Vista/Windows 7 (64-bit): C:\Program Files (x86)\PGP Corporation\PGP Desktop

2. pgpwde –enum 來列舉機器上的硬碟,通常後來接的硬碟是 Disk 1 ( 是兩個- )

clip_image001

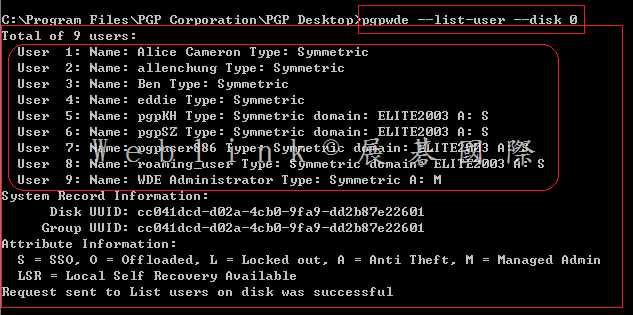
3. pgpwde –list-user –disk 1 來列舉機器上的加密硬碟的使用者 ( 通常後來接的硬碟是 Disk 1 ) ( 是兩個- ) ( -user是一個- )

clip_image002

4. pgpwde –status –disk 1 來查看硬碟的加密狀態 ( 通常後來接的硬碟是 Disk 1) ( 是兩個- )

clip_image003

※ pgpwde –status –disk 1 來查看硬碟的加密狀態 ( 此例為 Disk 1 尚未通過 passphase 驗證) ( 是兩個- )

clip_image004

5. 如果狀態顯示硬碟正在加密中或加密到一半,請透過 pgp –stop –p passw0rd –disk 1停止加密程序 ( 是兩個- ) ( -p是一個- ) ( 這樣才能透過下一步驟的指令來解密硬碟 )

clip_image005

6. 如果持續無法在 UI 上通過 passphrase驗證,請以 pgp –decrypt –p p@ssw0rd –disk 1進行解密 ( 是兩個- ) ( -p是一個- ) p@ssw0rd 是密碼 (任何一個人的密碼都可以,如果有 WDE admin 的密碼就先用)

clip_image006

上方指令執行成功後,會發現已在進行解密

clip_image007

PGP for Mac client 安裝前確認事項

1.Boot Camp check
We must check whether the Mac client use the Boot Came dual boot,otherwise it may boot fail.

2.Check Mac FileVault
We must check whether the Mac client use the FileVault encryption,otherwise it will not see any disk can encrypted by PGP.(Error 69749 or 69700)

3.Disable CoreStorage if the Mac is 10.10.x We must disable CoreStorage on Mac 10.10,otherwise the Mac client cannot be recovered.(Error -12000)
http://www.wellife.com.tw/symantec/?p=7864

4.Run command (sudo chown 0:wheel /Library/PrivilegedHelperTools/) change the permission for group wheel instead of Admin Attempting to encrypt a Mac OS X 10.10.x Yosemite system with Symantec Drive Encryption 10.3 if Microsoft Office 2011 has been installed prior to Symantec Drive Encryption,it will get the error.(Error :116385)
http://www.symantec.com/business/support/index?page=content&id=TECH229178

【如何收到 PGP Universal Server Backup log 的 mail 通知】

【如何收到 PGP Universal Server Backup log 的 mail 通知】

請編輯 /etc/crontab

在 crontab 加入以下命令

這樣每天 19:05 administrator@elite2003.intra 會收到當日的 Backup log

5 19 * * 0 root mail -s “PGP Backup jobs" administrator@elite2003.intra < $(find “/var/log/ovid" -type f -name “backup-*"|sort -r|head -n1)

5 19 * * 1 root mail -s “PGP Backup jobs" administrator@elite2003.intra < $(find “/var/log/ovid" -type f -name “backup-*"|sort -r|head -n1)

5 19 * * 2 root mail -s “PGP Backup jobs" administrator@elite2003.intra < $(find “/var/log/ovid" -type f -name “backup-*"|sort -r|head -n1)

5 19 * * 3 root mail -s “PGP Backup jobs" administrator@elite2003.intra < $(find “/var/log/ovid" -type f -name “backup-*"|sort -r|head -n1)

5 19 * * 4 root mail -s “PGP Backup jobs" administrator@elite2003.intra < $(find “/var/log/ovid" -type f -name “backup-*"|sort -r|head -n1)

5 19 * * 5 root mail -s “PGP Backup jobs" administrator@elite2003.intra < $(find “/var/log/ovid" -type f -name “backup-*"|sort -r|head -n1)

5 19 * * 6 root mail -s “PGP Backup jobs" administrator@elite2003.intra < $(find “/var/log/ovid" -type f -name “backup-*"|sort -r|head -n1)

clip_image001

clip_image002

1.【如何確認 PGP 硬碟加密目前是採用 DES-128 或 DES-256】2. 【若將 PGP 硬碟加密政策由目前的 DES-256 改為 DES-128,該硬碟是否需先行解密後再進行加密】

【如何確認 PGP 硬碟加密目前是採用 DES-128 或 DES-256】

【若將 PGP 硬碟加密政策由目前的 DES-256 改為 DES-128,該硬碟是否需先行解密後再進行加密】

以上問題可參考官網 https://support.symantec.com/en_US/article.TECH224377.html

【如何確認 PGP 硬碟加密目前是採用 DES-128 或 DES-256】

請參考下圖於用戶端執行以下指令:

【64 位元電腦請切換至以下目錄】

C:\Program Files (x86)\PGP Corporation\PGP Desktop

【32 位元電腦請切換至以下目錄】

C:\Program Files\PGP Corporation\PGP Desktop

再執行

pgpwde –status –disk 0 –xml |find “alg”

※ for Mac → 執行 pgpwde –status –disk 0 –xml

image

在輸出的結果中,找到以下數值,若 alg=”9” 則該硬碟採用 DES-256 加密,若 alg=”7” 則該硬碟採用 DES-128 加密

<currentkey valid=”true” alg=”9”>

clip_image001

【若將 PGP 硬碟加密政策由目前的 DES-256 改為 DES-128,該硬碟是否需先行解密後再進行加密】

是的,請參考下方程序

clip_image002

clip_image003

Unable to Encrypt Mac Systems on MAC Yosemite with Symantec Encryption Desktop 10.3.2 with error 116385 when Microsoft Office 2011 has been installed prior to Symantec Drive Encryption

http://www.symantec.com/business/support/index?page=content&id=TECH229178

Issue

In attempting to encrypt a Mac OS X 10.10 Yosemite system with Symantec Drive Encryption 10.3., the following error occurs:【PGPError :116385】

Error

“An error occurred while encrypting your disk:
PGPError :116385”

image

In addition to receiving the above error, a prompt will continuously pop up indicating changes are needed.  When Symantec Drive Encryption has been installed properly, this pop up should never be displayed:

image

Cause

The reason this happens is the permissions set for the /Library/PrivilegedHelperTools directory is not set according to what is needed for Symantec Drive Encryption 10.3.2.  This condition typically happens when Microsoft Office 2011 has been installed prior to Symantec Drive Encryption, but only on Yosemite.  Previous versions of Mac OS X (such as Mavericks), Office 2011 and Symantec Drive Encryption are unaffected by this issue.

Solution

The workaround for this is to run the following command via Terminal and then install Symantec Drive Encryption:

sudo chown 0:wheel /Library/PrivilegedHelperTools/

Once the above command is run, type in the Mac Admin password to allow the permission change to occur.  Once the command is completed successfully, the permissions for the group “wheel” will be assigned, instead of “Admin”.

To confirm the appropriate permissions have been set, run the following command:

ls -al /Library/PrivilegedHelperTools/

The following permissions will be displayed to confirm the correct permissions have been set:

image


Running the following command can also confirm proper permissions have been set::

stat /Library/PrivilegedHelperTools/

image

The permission of “root wheel" should be displayed as seen in the example.

If this entry still says “root admin”, the command did not work.  Check the syntax and retry the command.

Alternatively, checking the properties of the /Library/PrivilegedHelperTools/ properties via Finder will show the following correct permissions:

image

Once the permissions have been set properly, uninstall Symantec Drive Encryption if installed, and then install the application.  This time, Drive Encryption should succeed.

Symantec Development is currently working into this for a final resolution.  Subscribe to this article for any future updates with this issue.

如何設定 PGP 用戶端郵件加密

1. 開啟「Symantec Encryption Desktop」。

image

2. 點選「PGP Keys」,接著點選「All Keys」,接著以滑鼠右鍵點選您所製作的 Private Key,接著點選「Send To」→「Mail Recipient」,將 Private Key 寄給收件者。

image

3. 輸入收件者信箱,點選傳送。

image

4. 待收到 PGP Key 時,來進行匯入,選取「File」,接著點選「Import」,開始匯入 PGP Key。

image

5. 選取所收到的 Private Key,點選「開啟舊檔」。

image

6. 可看到欲匯入的 PGP Key 資訊,點選「Import」。

image

7. 匯入完成,可看到多了一組剛剛所匯入的 Key。

image

8. 選取「PGP Messaging」,接著點選「所設定欲加密的信箱」,點選「Edit Policies」。

image

9. 點選勾勾,以取消所有預設 Policies。

image

10. 取消完成,點選「New Policy」。

image

11. 輸入 Policy 名稱,選取條件。

image

If any

以下條件滿足任一項

If all

以下條件全部滿足

If none

沒有以下條件

12. 輸入 Policy 名稱,選取條件。

image

Recipient(收件者)

郵件到指定的收件者

Recipient Domain(收件者網域)

通過電子郵件發送指定的收件者網域的郵件

Sender(寄件者)

具有指定寄件者地址的郵件

Message(信息)

已指定的簽名和/或加密狀態信息

Message Subject(信件標題)

使用指定的信件標題

Message Header(信件標頭)

為其指定的標頭符合指定標準的訊息。

Message Body(信件內容)

使用指定的信件內容

Message Size(信件大小)

指定大小的郵件(以bytes為單位)

Message Priority(信件優先級)

使用指定的消息優先級的信件

Message Sensitivity(信件靈敏度)

使用指定的消息敏感性信件

13. 選取條件。

image

is(是)

與輸入內容相同

is not(不是)

與輸入內容不同

contains(包含)

包含輸入的內容

does not contain(不包含)

不包含輸入的內容

begins with(開始於)

開始於輸入的內容

ends with(結束於)

結束於輸入的內容

matches pattern(匹配模式)

第一個條件字段文本鍵入文本框中模式匹配

greater than(大於)

大於輸入的內容

less than(少於)

少於輸入的內容

14. 設定符合條件後,將執行的動作。

image

Send In Clear

不加密模式

Sign

指定的信件應該簽章

Encrypt to

指定的信件應該被加密

15. 設定指定動作後的第二動作欄位設定。

image

recipient’s verified key

收件者的驗證密鑰。確保該信件只對預期收件者的驗證密鑰加密。

recipient’s unverified key

收件者的未經驗證的密鑰。允許該信件被加密到既定收件者的未經驗證的密鑰。

a list of keys

指定的信件只能被所選取的密鑰加密

16. 設定完成,點選「OK」。

image

17. 可看到剛剛所設定的 Policy,接著點選「Done」。

image

18. 假設指定特定的密鑰來加密。

Ø   假設收件者包含:aaron_weblink@mail.com

Ø   假設信件標題包含:會議記錄

Ø   假設使用指定密鑰:Aaron_weblink


image


Ø   寄送符合條件的信件。


image


Ø   可看到寄送郵件後的 LOG


image


Ø   切換至收件者電腦,可看到信件已透過 PGP 加密。


image


Ø   可看到收到信件的 LOG。


image


Ø   登入 Web Mail,可看到無密鑰及無法瀏覽信件內容和附件。


image


19. 假設發送的郵件增加簽章。

Ø   假設收件者網域包含:mail.com

Ø   假設信件標題包含:通知


image


Ø   寄送符合條件之信件


image


Ø   寄送信件時的 LOG。


image


Ø   切換至收件者電腦,可看到信件已透過 PGP 簽章。


image


Ø   可看到收到信件的 LOG。


image


Ø   登入 Web Mail,可看到簽章。


image