[SEP] 每天掃描出大量 DWH*.tmp 檔案,如何處理?

問題:

Symantec Endpoint Protection(SEP)將 DWH * .tmp 檔案建立並標記為惡意程式。

  • 通常檔案名稱通常為 DWHxxxx.tmp
  • 檔案路經通常為:%App Data%\Symantec\ 或是 %TEMP% 資料夾。

解決方案:

※ 從管理主控台修改設定

1.   開啟「政策」→「病毒和間諜軟體防護」,開啟使用中的政策。

image


2.   於「Windows 設定」→「進階選項」→「隔離」,選取「一般」頁籤,於當新的病毒定義檔到達時,選取「不執行任何動作。

image


3.   選取「清理」頁籤,於修復的檔案勾選「啟用自動刪除修復的檔案」,並設定天數,接著勾選「刪除最舊的檔案,將資料夾大小限制在 MB」(預設為 50  MB),接著點選「確定」。

image


4.   重新開機進入安全模式,清空 %App Data%\Symantec\ 和 %TEMP% 資料夾。


※ 清空 Client .DWH files 檔案

1.   停止 Symantec Endpoint Protection service。

  • 開啟 Windows 中「執行」。

image

  • 輸入「smc –stop」

image

  • 點選「確定」。


◎ 以下指令請使用「命令提示字元」執行,或手動執行

2.   刪除使用者 Temp 資料夾內容

(請依照使用者名稱更改 " NAMEOFUSER “)

Windows 2000/XP/2003:
DEL /F /Q “C:\Documents and Settings\NAMEOFUSER\Local Settings\Temp"

Windows Vista/7/2008:
DEL /F /Q “C:\Users\NAMEOFUSER\AppData\Local\Temp"


3.   刪除 C:\ 底下的 Temp 資料夾內容

DEL /F /Q C:\temp 


4.   刪除 Windows Temp 資料夾內容

DEL /F /Q C:\WINDOWS\Temp 


5.   刪除 xfer 和 xfer_temp 資料夾內容
(請對照 Symantec Endpoint Protection 版本號輸入 “silo“)

image

Windows 2000/XP/2003:
Symantec Endpoint Protection 12.1
DEL /F /Q “C:\Documents and Settings\All Users\Application Data\Symantec\Symantec Endpoint Protection\silo\Data\xfer_tmp\"
DEL /F /Q “C:\Documents and Settings\All Users\Application Data\Symantec\Symantec Endpoint Protection\silo\Data\xfer\"

Symantec Endpoint Protection 11.x
DEL /F /Q “C:\Documents and Settings\All Users\Application Data\Symantec\Symantec Endpoint Protection\xfer_tmp\"
DEL /F /Q “C:\Documents and Settings\All Users\Application Data\Symantec\Symantec Endpoint Protection\xfer\"

Windows Vista/7/2008:
Symantec Endpoint Protection 12.1
DEL /F /Q “C:\ProgramData\Symantec\Symantec Endpoint Protection\silo\Data\xfer_tmp\"
DEL /F /Q “C:\ProgramData\Symantec\Symantec Endpoint Protection\silo\Data\xfer\"

Symantec Endpoint Protection 11.x
DEL /F /Q “C:\ProgramData\Symantec\Symantec Endpoint Protection\xfer_tmp\"
DEL /F /Q “C:\ProgramData\Symantec\Symantec Endpoint Protection\xfer\"


6.   刪除隔離區資料夾
(請對照 Symantec Endpoint Protection 版本號輸入 “silo“)

image

Windows 2000/XP/2003:
Symantec Endpoint Protection 12.1
DEL /F /Q “C:\Documents and Settings\All Users\Application Data\Symantec\Symantec Endpoint Protection\silo\Data\Quarantine\"
RD /S /Q “C:\Documents and Settings\All Users\Application Data\Symantec\Symantec Endpoint Protection\silo\Data\Quarantine\"

Symantec Endpoint Protection 11.x
DEL /F /Q “C:\Documents and Settings\All Users\Application Data\Symantec\Symantec Endpoint Protection\Quarantine\"
RD /S /Q “C:\Documents and Settings\All Users\Application Data\Symantec\Symantec Endpoint Protection\Quarantine\"

Windows Vista/7/2008:
Symantec Endpoint Protection 12.1
DEL /F /Q “C:\ProgramData\Symantec\Symantec Endpoint Protection\silo\Data\Quarantine\"
RD /S /Q “C:\ProgramData\Symantec\Symantec Endpoint Protection\silo\Data\Quarantine\"

Symantec Endpoint Protection 11.x
DEL /F /Q “C:\ProgramData\Symantec\Symantec Endpoint Protection\Quarantine\"
RD /S /Q “C:\ProgramData\Symantec\Symantec Endpoint Protection\Quarantine\"


7.   重新建立隔離區資料夾
(請對照 Symantec Endpoint Protection 版本號輸入 “silo“)

image

Windows 2000/XP/2003:

Symantec Endpoint Protection 12.1
MD “C:\Documents and Settings\All Users\Application Data\Symantec\Symantec Endpoint Protection\silo\Data\Quarantine\"

Symantec Endpoint Protection 11.x
MD “C:\Documents and Settings\All Users\Application Data\Symantec\Symantec Endpoint Protection\Quarantine\"

Windows Vista/7/2008:

Symantec Endpoint Protection 12.1
MD “C:\ProgramData\Symantec\Symantec Endpoint Protection\silo\Data\Quarantine\"

Symantec Endpoint Protection 11.x
MD “C:\ProgramData\Symantec\Symantec Endpoint Protection\Quarantine\"


8.   啟動 Symantec Endpoint Protection service。

  • 開啟 Windows 中「執行」。

image

  • 輸入「smc –start」

image

  • 點選「確定」。

image


參考來源:https://support.symantec.com/en_US/article.TECH102953.html

[SEP] 安裝於 Win7 出現亂碼,該如何設定

1. 「控制台」→「時鐘、語言和區域」→「地區及語言」→「變更位置」→「位置」,將目前位置修改為「台灣」。

image

2. 「控制台」→「時鐘、語言和區域」→「地區及語言」→「變更位置」→「系統管理」,將非Unicode程式目前使用的語言,修改為「中文 (繁體,台灣)」。

image

3. 開啟「登錄編輯程式」找到「HKEY_CURRENT_USER\Control Panel\International」,檢查「locale」值是否為「409」,若是請修改為「404」。(修改登錄值前,請自行做好備份)

image

4. 重新開機應可恢復正常。

[SEP] SEP 12.1.6 MP1 支援 Windows 10

版本:12.1.6 MP1

Symantec Endpoint Protection(SEP)12.1.6 MP1 / MP1A 增加支援 Windows 10。

升級到 Windows 10 與 SEP 安裝

當安裝 Symantec Endpoint Protection 12.1.6 MP1 或 12.1.6 MP1A 時,可以升級至 Windows 10 但必須先更新病毒和間諜軟件防護的病毒定義檔為 2015年 7 月 27 日之後的版本。

image

以及,消除程式版本為:115.1.1.10

image


若,未完成上述事項,當升級時如果它檢測到的 Symantec Endpoint Protection 的舊版本操作系統升級停止。則必須先卸載舊版的 Symantec Endpoint Protection。

image


以下系統升級安裝 12.1.6 MP1 或 12.1.6 MP1A 支援。 

Windows 8.1 到 Windows 10
Windows 8 到 Windows 10
Windows 7 到 Windows 10

※升級從 Windows 7 到 Windows 10 時的限制

Windows 7 中不包括提前啟動反惡意軟件(ELAM)。因此,Symantec Endpoint Protection ELAM 組件未啟用,並且不支持升級後到  Windows 10 與安裝 Symantec Endpoint Protection。

要允許 Symantec Endpoint Protection 承認 ELAM 並啟用 Symantec Endpoint Protection ELAM 組件,您必須卸載並重新安裝的Symantec Endpoint Protection。修復安裝無法修復這個問題。


https://support.symantec.com/en_US/article.INFO2746.html

[SEP] 防毒主控台匯入授權操作說明和授權檔問題解決


問題:

  • 賽門鐵克防毒主控台匯入授權操作說明
  • 授權檔問題排解

版本:

  • 12.1.X

解決方法:

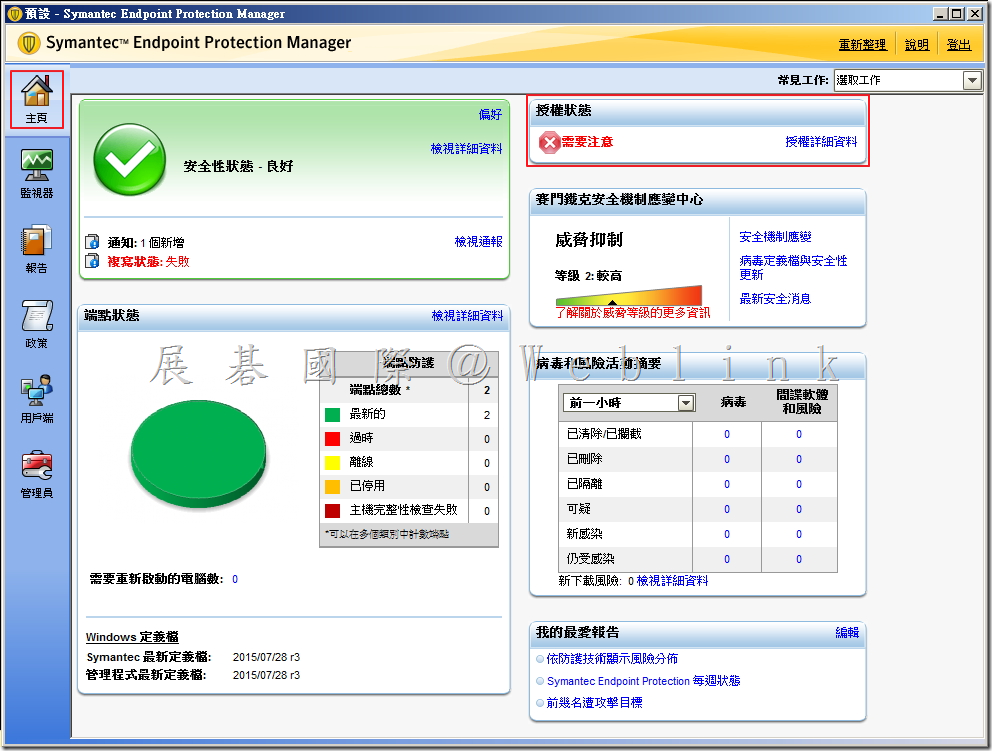
1.   當授權到期或過度部署時,於「主頁」會出現授權狀態「需要注意」。

image


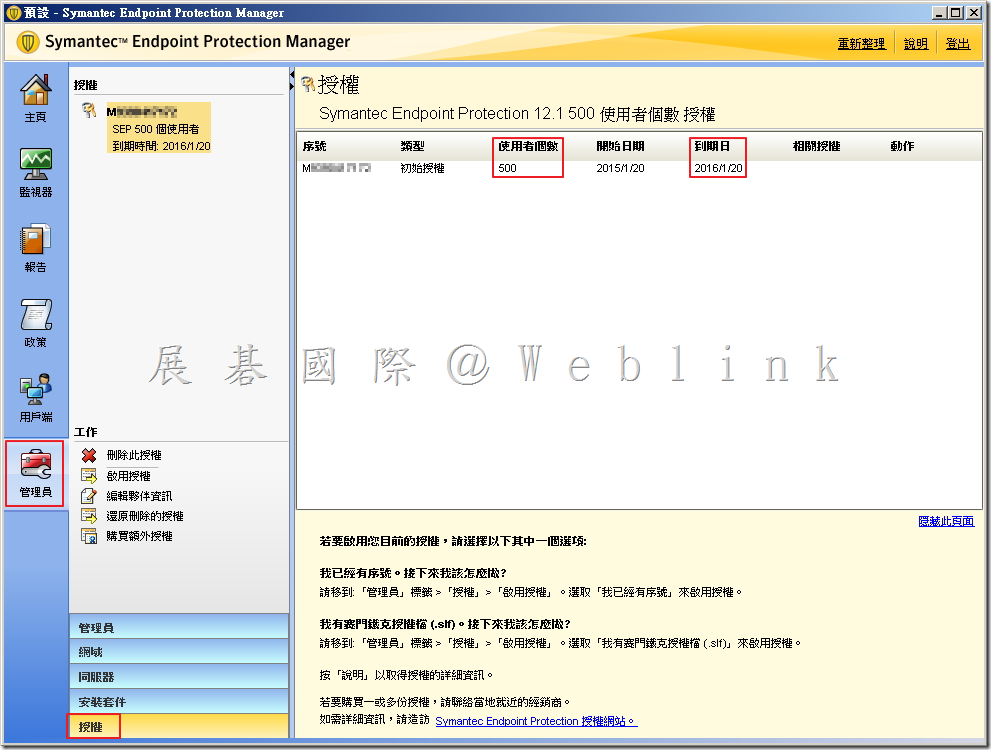
2.   從「管理者」→「授權」可看到目前授權狀況。

image


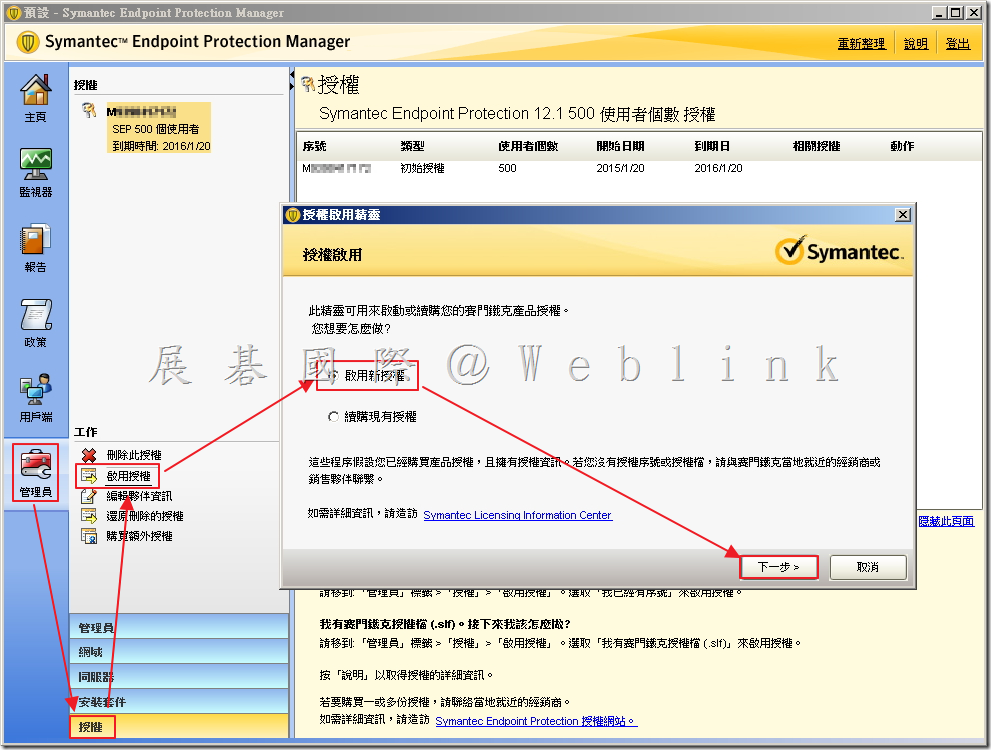
3.   當收到續約或是新購的授權書以及 .slf 時,請至「管理員」→「授權」,點選「啟用授權」,接著點選「啟用新授權」,最後點選「下一步」。

image


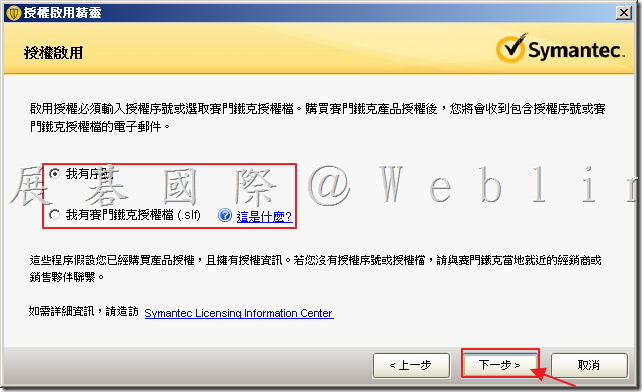
4.   可選擇「我有序號」或是「我有賽門鐵克授權檔(.slf),接著點選「下一步」。需注意,若是點選「我有序號」,需要網路可以對外。

image


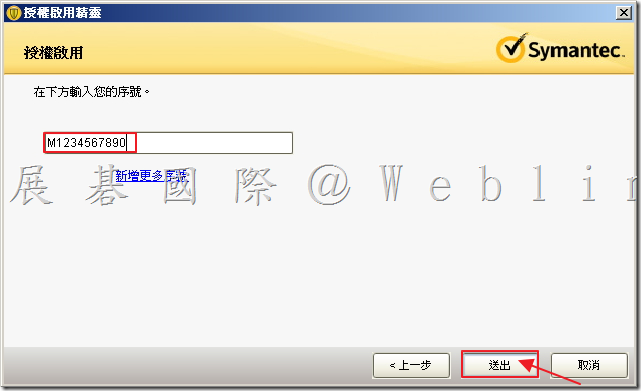
5.   使用序號啟用。

5.1   請輸入序號,接著點選「送出」。

image


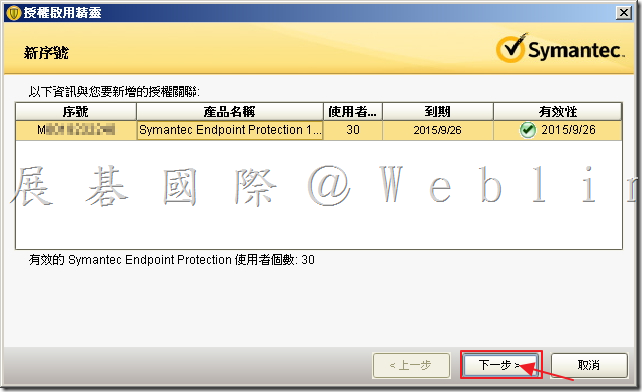
5.2   確認輸入序號資訊,接著點選「下一步」。

image


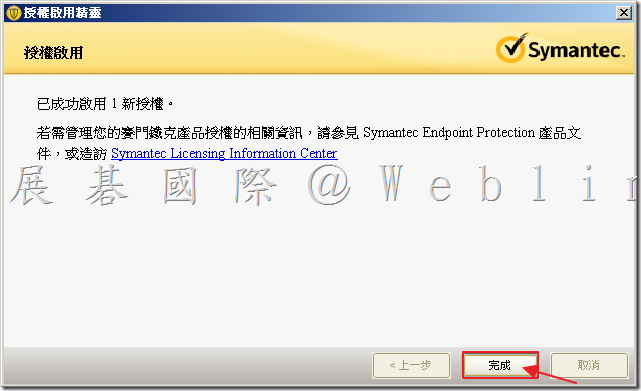
5.3   接著點選「完成」。

image


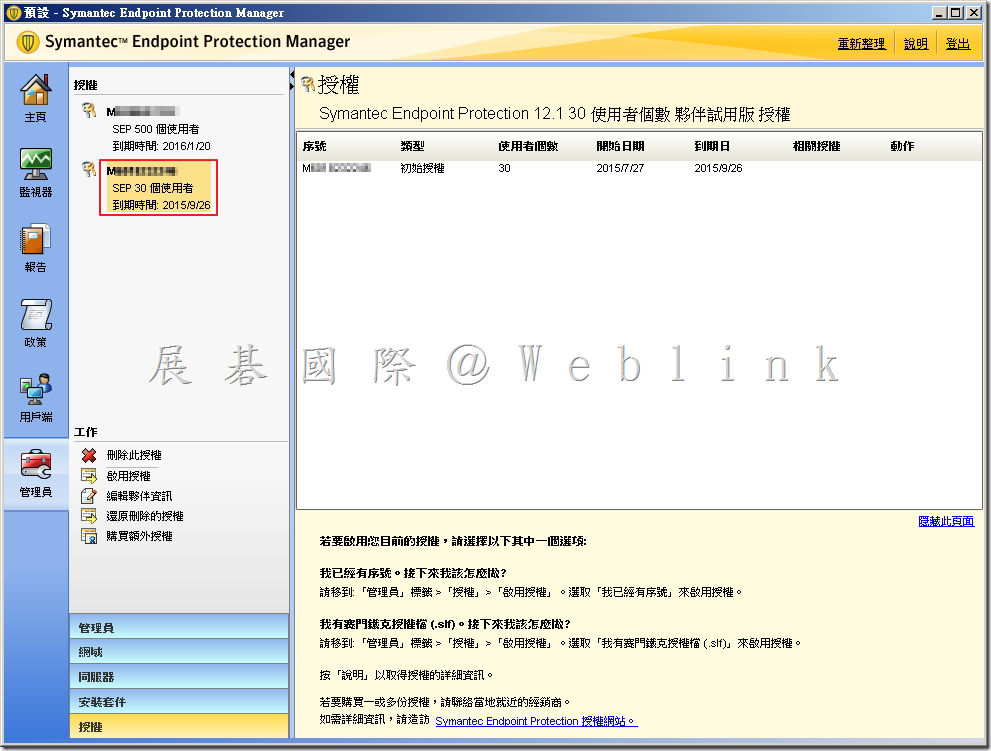
5.4   即可看到剛剛所輸入的授權資訊。

image


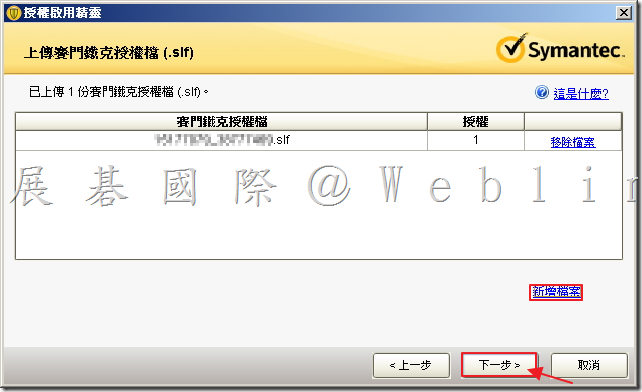
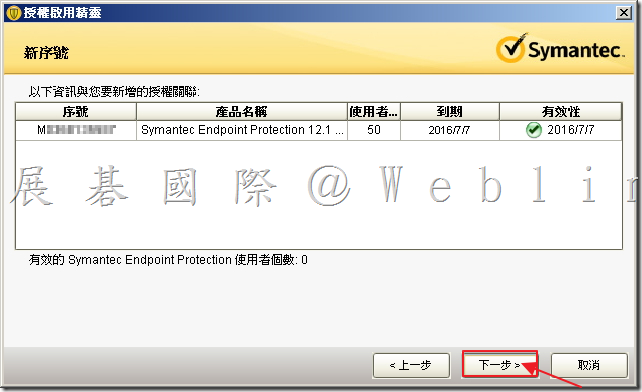
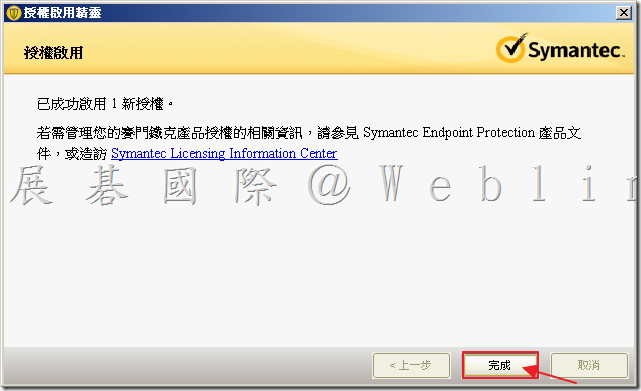
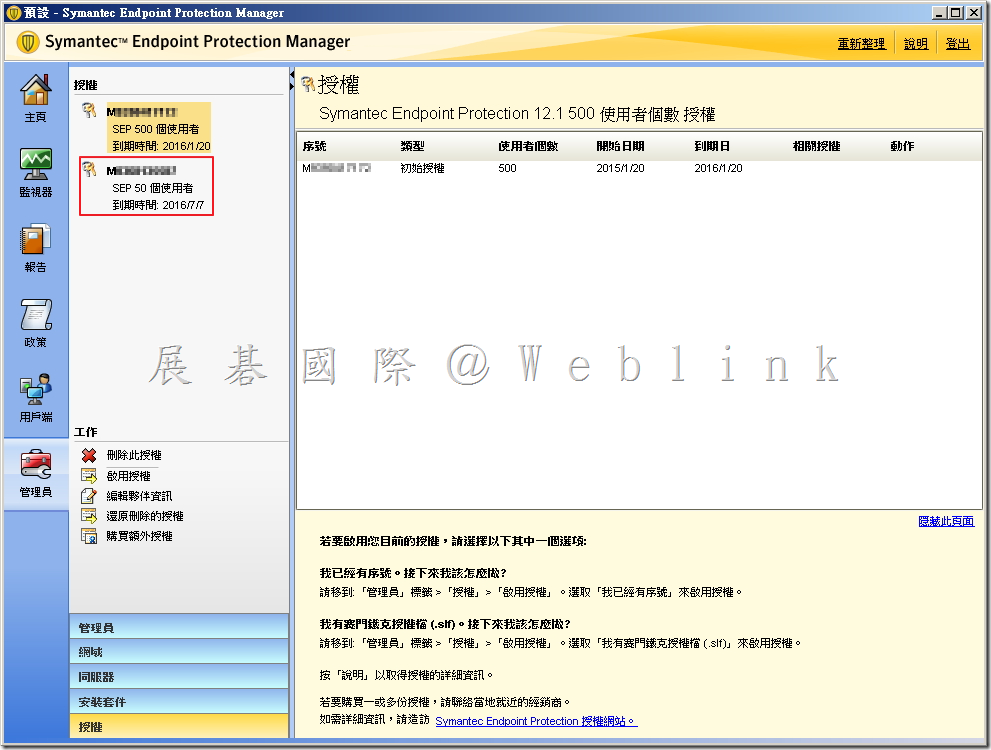
6.   使用賽門鐵克授權檔(.slf)啟用

6.1   點選「新增檔案」新增賽門鐵克授權檔(.slf),接著點選「下一步」。

image


6.2   可看到授權資訊,接著點選「下一步」。

image


6.3   接著點選「完成」。

image


6.4   即可看到剛剛所輸入的授權資訊。

image


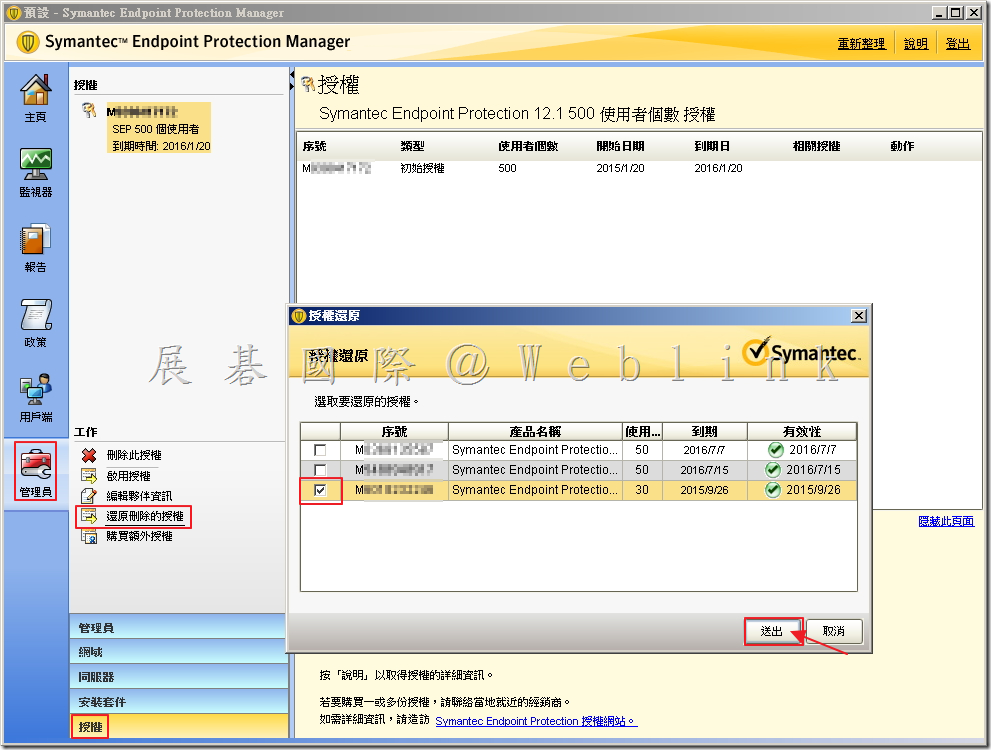
問題解決:一般常見問題,匯入授權檔案有多筆時,僅呈現新購授權(續約授權並無更新數量)

此時請點選「還原刪除的授權」將隱藏的續約授權勾選後按下『送出』即可。

image

[SEP] 安裝 SEP 後用戶端無法執行 VirtualBox

問題

When trying to start a Virtual Machine (VM) in VirtualBox with Symantec Endpoint Protection (SEP) Application and Device Control installed, the VM will not start and eventually times out. Additionally, when you try and restart the host machine, it hangs on shutting down.

錯誤訊息

VirtualBox pops up a window saying Starting VM: Creating process for virtual machine “VMname" (GUI/Qt)…(1/2) and will either hang on this window or may eventually throw a time out error after approximately 10 minutes.

原因

Oracle has been hardening the security on the application VirtualBox. SEP Application and Device Control injects it’s DLL into all running processes which in turn conflicts with the hardened security in VirtualBox. Oracle is working to address the compatibility issues with many AV products caused by the hardening of VirtualBox.

解決方案

創建一個應用程式控制資料夾排除在賽門鐵克端點保護經理 (SEPM) 目錄,和它是 VirtualBox 安裝到的位置的子資料夾。預設情況下這是: C:\Program Files\Oracle\VirtualBox\。
這將導致應用程式和設備控制不注入從該目錄中運行的應用程式或子目錄。

創建排除步驟:

1) 在 SEPM 去分配給受影響的用戶端是在組排除政策並打開要編輯它的策略

2) 編輯例外政策

3) 按一下新增-> Windows 例外-> 資料夾

4) 指定排除此資料夾的掃描類型選定 “應用程式控制的類型"

5) 設定 VirtualBox 的路徑安裝路徑,預設情況下它是 C:\Program Files\Oracle\VirtualBox\,請依照實際安裝路徑修改

6) 勾選包括子資料夾

7) 點擊「確定」以保存例外和確定再次關閉政策

8) 更新用戶端上的政策,並驗證它有新的政策

9) 將用戶端重新開機。

10) 重新開機後,請驗證 VirtualBox 是否正常運行。


適用于

賽門鐵克的端點保護 12.1

Windows 7 主機 (可能影響到其他主機)

任何訪客作業系統

VirtualBox 4.3.14-4.3.18 (某些測試版本可能或不可能展現這一問題,因為這正在處理)


https://support.symantec.com/en_US/article.TECH225620.html

[SEP] 如何手動移除 Client 安裝程式

問題:

  • 發現無法正常移除 SEP Client 程式

版本:

  • 11.0.X
  • 12.1.X

解決方案:

Symantec Endpoint Protection 12.1

Symantec Endpoint Protection Small Business Edition 12

Symantec Endpoint Protection 11

Other

參考:

https://support.symantec.com/en_US/article.TECH96924.html

About Symantec Endpoint Protection and the Poodle SSL 3.0 vulnerability (CVE-2014-3566)

Problem


A security bug affecting SSL 3.0 was released on October 14, 2014.


Solution


The management console for Symantec Endpoint Protection Manager (SEPM) prior to SEP 12.1.6 does use SSL 3.0. As a result, Symantec Endpoint Protection (SEP) is affected.


Impacted versions

  • 12.1.x Symantec Endpoint Protection Windows client
  • 12.1.5 and earlier Symantec Endpoint Protection Manager
  • 12.1 Symantec Network Access Control Windows client
  • 12.1.x Symantec Network Access Control Windows On-Demand client
  • 12.1.x Symantec Network Access Control Mac On-Demand client
  • 12.1.x Symantec Network Access Control Gateway Enforcer
  • 12.1.x Symantec Network Access Control LAN Enforcer
  • 12.1.x Symantec Network Access Control Integrated Enforcer
  • 12.1.x RU5 Security Virtual Appliance (SVA)
  • 12.1.x Symantec Endpoint Protection for Mac
  • 12.1.5 Symantec Endpoint Protection Linux client
  • 12.1.x Symantec Antivirus for Linux
  • LiveUpdate Administrator 2.3.3 and 2.3.4


Mitigation: Secure the communication between SEPM Java console and SEPM

Note: Due to the version of Java that shipped with SEP 12.1 RTM, 12.1 RU1 and 12.1 RU1 MP1, there are some limitations to the functionality should these steps be followed.

  1. In a text editor, open the following file:
    C:\Program Files\Symantec\Symantec Endpoint Protection Manager\apache\conf\ssl\ssl.conf
  2. Change the following line:
    SSLProtocol all -SSLv2
    to:
    SSLProtocol all -SSLv2 -SSLv3
    If the line does not exist, create it.
  3. Restart the Symantec Endpoint Protection Manager Webserver service.
  4. In a text editor, open the following file:
    C:\Program Files\Symantec\Symantec Endpoint Protection Manager\tomcat\conf\server.xml
  5. In the <Connector> section for port 8443, locate the following line:
    sslProtocol="TLS"
    Note: 8443 is the default port used for SEPM console / SEPM server communication. If you have changed the configuration, this port may be different.
  6. Do one of the following:
    • If you are using SEP 12.1 RTM, RU1, or RU1 MP1, add the following line after sslProtocol="TLS":
      Protocols="TLSv1,TLSv1.1,TLSv1.2″
    • If you are using a version of SEP later than RU1 MP1, add the following line after sslProtocol="TLS":
      sslEnabledProtocols="TLSv1,TLSv1.1,TLSv1.2″
  7. Restart the Symantec Endpoint Protection Manager service.
  8. If you use the Web console, ensure that the browser has TLS enabled.

Additional information for 12.1 RTM, RU1 and RU1 MP1

  • The web console will fail to connect. This is a known issue with that version of JRE. The only workaround is to update to a newer version of SEP.
  • The local Java console will fail to connect. To work around this problem:
    1. Install the latest JRE.
    2. Edit the file C:\Program Files\Symantec\Symantec Endpoint Protection Manager\bin\sesm.bat to replace the path of javaw.exe with the new JRE path.
  • The Remote Java console (including running locally) is not impacted.
  • If at any time you upgrade SEPM to a 12.1 version that is older than RU5, follow the steps in this document again.


Mitigation: Secure the communication between SEP client and SEPM

This section is only applicable if SSL has been enabled on SEPM for client communication.

Configure SEPM to accept only TLS connections


  1. In a text editor, open the following file:
    C:\Program Files\Symantec\Symantec Endpoint Protection Manager\apache\conf\httpd.conf
  2. Remove the “#” character at the beginning of the following line:
    #Include conf/ssl/sslForClients.conf
  3. In a text editor, open the following file:
    C:\Program Files\Symantec\Symantec Endpoint Protection Manager\apache\conf\ssl\sslForClients.conf
  4. Change the following line:
    SSLProtocol all -SSLv2
    to:
    SSLProtocol all -SSLv2 -SSLv3
  5. Restart the Symantec Endpoint Protection Manager Webserver service.

If at any time you upgrade SEPM to a 12.1 version that is older than RU5, follow the steps in this document again.


Enable TLS on communication between SEP client and SEPM

On Windows XP or 2003 clients that use Internet Explorer (IE) 6.x, enable TLS manually. All other operating systems have TLS enabled by default.

Note: This is an operating system change. Please consult Microsoft documentation should there be any questions. Also, ensure that any applicable testing is conducted to ensure no negative results with third party applications.

Enable all SSL versions and TLS1.0 for the local system account

  1. In the Windows registry, go to the following key:
    HKEY_USERS\S-1-5-18\Software\Microsoft\Windows\CurrentVersion\Internet Settings
  2. Change the DWORD value SecureProtocols to 0xa8.
  3. Restart the SEP service.


Mitigation: Secure the communication between Symantec Network Access Control Windows On-Demand Client and SEPM


The following changes should be made to enable TLS before using Symantec Network Access Control (SNAC) Windows On-Demand Client (WODC) on Windows XP or 2003 clients that use IE 6.x.

Note: This is an operating system change. Please consult Microsoft documentation should there be any questions. Also, ensure that any applicable testing is conducted to ensure no negative results with third party applications.

  1. On the client computer, log on to Windows as the user that will run WODC.
  2. In the Windows registry on the client computer, do one of the following:
    • If the user account that runs WODC is part of the local administrators group, go to HKEY_USERS\S-1-5-18\Software\Microsoft\Windows\CurrentVersion\Internet Settings, and set the SecureProtocols value to 0xa8.
    • If the user account that runs WODC is not part of the local administrators group, go toHKEY_CURRENT_USER\Software\Microsoft\Windows\CurrentVersion\Internet Settings, and set the SecureProtocols value to 0xa8.


Mitigation: Secure the communication between SEPM Remote Management Application (RMM) and SEP clients


If you do not use the RMM feature, you can disable the RMM port.

Note: Once SSL 3.0 is disabled for RMM web service ports, any client that uses this service will have to use TLS to connect. If the client does not support TLS, the connection to RMM web service will fail.

  1. In a text editor, open the following file:
    C:\Program Files\Symantec\Symantec Endpoint Protection Manager\tomcat\conf\server.xml
  2. In the <Connector> section for port 8446, after the line sslProtocol="TLS", add the following line:
    sslEnabledProtocols="TLSv1,TLSv1.1,TLSv1.2″
    Note: 8446 is the default port used for SEPM RMM communication. If you have configured the port, this value might be different Check your configuration settings to see the actual value.
  3. Restart the Symantec Endpoint Protection Manager service.

If at any time you upgrade SEPM to a 12.1 version that is older than RU5, follow the steps in this document again.


Mitigation: Disable web services for Symantec Protection Center (SPC)


Disable web services for SPC. SEPM port 8444 is used for SPC communication. This port has hard-coded support for SSLv3.

Disabling web services may impact the function of SPC.


Mitigation: Secure LiveUpdate Administrator communications


If LiveUpdate Administrator is installed, disable SSL communications.

Disable SSL

  1. In the LiveUpdate Administrator installation folder, go to \tomcat\conf\.
  2. Open server.xml in a text editor.
  3. Find the line that begins with:
    <Connector port="7073″ maxHttpHeaderSize="8192″ clientAuth="false" SSLEnabled="true" keystoreFile="../jre/bin/server-cert.ssl" …
  4. Change
    sslProtocol="TLS"
    to
    sslEnabledProtocols = “TLSv1,TLSv1.1,TLSv1.2″
  5. Save and close server.xml.
  6. Restart the Tomcat services.


Poodle variant CVE 2014-8730


Symantec Endpoint Protection is not affected by the Poodle variant CVE 2014-8730.


References


https://support.symantec.com/en_US/article.TECH225689.html

各地的 SEPM Server,都遇到不知不覺就塞滿,硬碟空間約100G。 除了編輯資料庫屬性外,還可透過哪些設定來避免硬碟成長過大呢?

另外目前各地的 SEPM Server,都遇到不知不覺就塞滿,硬碟空間約100G。
除了編輯資料庫屬性外,還可透過哪些設定來避免硬碟成長過大呢?
 
Ans:這絕大多數是因為使用的是 12.1.4 (含)以前的版本,如果下圖保留版本設定為3,大約會佔去10G,依貴公司環境應該是設成30,那就佔了 80 90 G;又或是 log 的相關設定
 
也可以參考以下網頁來釋放空間
Enterprise Support – Symantec Corp. – How to free up disk space on a Symantec Endpoint Protection Manager server
http://www.symantec.com/business/support/index?page=content&id=TECH163063
 
 image


建議您將 SEPM 升級為 12.1.5,並依照下圖設定保留版本數,12.1.5可縮減 content 空間60%
 
Enterprise Support – Symantec Corp. – Disk space management for Endpoint Protection Manager
http://www.symantec.com/business/support/index?page=content&id=TECH96214
 
 image

SEP 安裝或升級至 12.1.5(RU5)後,內嵌資料庫無法啟動

錯誤訊息

In the Windows event log:

SQLANYs_sem5
Can’t open Message window log file: D:\Program Files (x86)\Symantec\Symantec Endpoint Protection Manager\db\out.log

In the Upgrade-0.log:

The service SQLANYs_sem5 failed to be started.

In the Management Server Upgrade Wizard:

Setting
ACL…(100%)…Done
Error occurred

Cause

在 SEP 12.1.5 (RU5), Symantec changed the SemSrv and SemWebSrv services to use service virtual accounts. These services are set to an UNRESTRICTED SID type, but the SQLANYs_sem5 service remains under the RESTRICTED category.

Solution

Use the following workaround to change the SID type to UNRESTRICTED, since we are using a service virtual account for the Symantec Embedded Database service as well.

Check the SID type of the service
  1. On the computer where SEPM is installed, click Start > Run.
  2. Type CMD and click OK.
  3. Type sc qsidtype SQLANYs_sem5
  4. Verify that the following is returned:
    [SC] QueryServiceConfig2 SUCCESS
    SERVICE_NAME: SQLANYs_sem5
    SERVICE_SID_TYPE: RESTRICTED

image

Change the SID type of the SQLANYs_sem5 service to UNRESTRICTED
  1. On the computer where SEPM is installed, click Start > Run.
  2. Type CMD and click OK.
  3. Type cd “<Drive>:\Program Files (x86)\Symantec\Symantec Endpoint Protection Manager\bin"
    Note: Replace <Drive> with the drive that SEPM is installed on.
  4. Type ServiceUtil.exe -changeservicesidtype 1 -servicename “SQLANYs_sem5″
    Note: Running the command returns: “Change the semsrv service SID successfully." The string “semsrv" is hardcoded, but we are changing the SID type for the SQLANYs_sem5 service. Please disregard that message.

image

Verify that the SID type has changed to UNRESTRICTED
  1. On the computer where SEPM is installed, click Start > Run.
  2. Type CMD and click OK.
  3. Type sc qsidtype SQLANYs_sem5

image

Start services

After following the preceding steps, start the following services:

  • Symantec Embedded Database
  • Symantec Endpoint Protection Launcher
  • Symantec Endpoint Protection Manager
  • Symantec Endpoint Protection Manager Webserver


https://support.symantec.com/en_US/article.TECH225587.html

針對 SEPM 弱點掃描 CVE-2007-6750

問題:

  • 針對 SEPM 進行弱點掃描發現 CVE-2007-6750

版本:

  • 12.1.2 ~ 12.1.3

解決方案:

如果無法立即升級,可先進行下述設定。這種解決方法僅適用於上面提到的版本(12.1.2 ~ 12.1.3)。

如果版本屬於 12.1.2 以前,應該升級直接到 12.1.4 或更高版本。

1. 請先行下載 mod_reqtimeout.so

2. 將文件複製到 %SEPM_Install_Dir%\apache\modules。
(注 ​​:在大部份的系統中,預設的 SEPM 安裝路徑是 C:\Program Files(x86)\Symantec\Symantec Endpoint Protection Manager)

3. 用記事本開啟 %SEPM_Install_Dir%\apache\conf\httpd.conf,於檔案最後修改並增加下面內容

LoadModule reqtimeout_module modules/mod_reqtimeout.so
<IfModule reqtimeout_module>
RequestReadTimeout header=20-30,MinRate=256 body=100-120,MinRate=512
</IfModule>

4. 重新啟動 Symantec Endpoint Protection Manager Webserver 的服務。

可參考 http://www.symantec.com/business/support/index?page=content&id=TECH205208