WinPE 4.0 5.0 5.1整合 PGP 光碟製作

1.    關於新版 WinPE 整合 PGP 光碟製作請參考以下網址
How to Customize Windows PE 4.0 and above using Symantec Encryption Desktop 10.3.2 and PGPRecoveryGUI.exe
http://www.symantec.com/business/support/index?page=content&id=HOWTO95227
內容包含
(1)    Customizing Windows PE 4.0/5.0 for 32-bit Windows Environment
(2)    Customizing Windows PE 4.0/5.0 for 64-bit Windows Environment
(3)    How to make customized WinPE as a bootable .iso file or CD/UFD

2.    Download 適用於 Windows 8.1 更新的 Windows 評定及部署套件 (Windows ADK) from Official Microsoft Download Center
http://www.microsoft.com/zh-tw/download/details.aspx?id=39982

3.   
適用於 Windows 8 的 WinPE:Windows PE 5.0
https://technet.microsoft.com/zh-tw/library/hh825110.aspx

將 WinPE 5.0 更新為 WinPE 5.1
https://technet.microsoft.com/zh-tw/library/dn613859.aspx


Enterprise Support – Symantec Corp. – Windows PE customization for Symantec Encryption (PGP) – Index of documents

http://www.symantec.com/business/support/index?page=content&id=TECH215515

Symantec DCS 如何修改 MSSQL DB Name

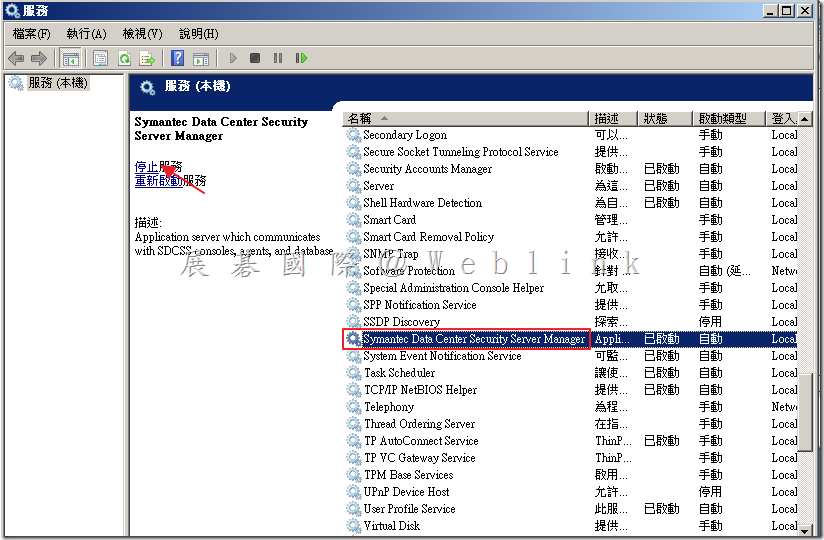
1. 點選「開始」,點選「系統管理工具」,點選「服務」。

image

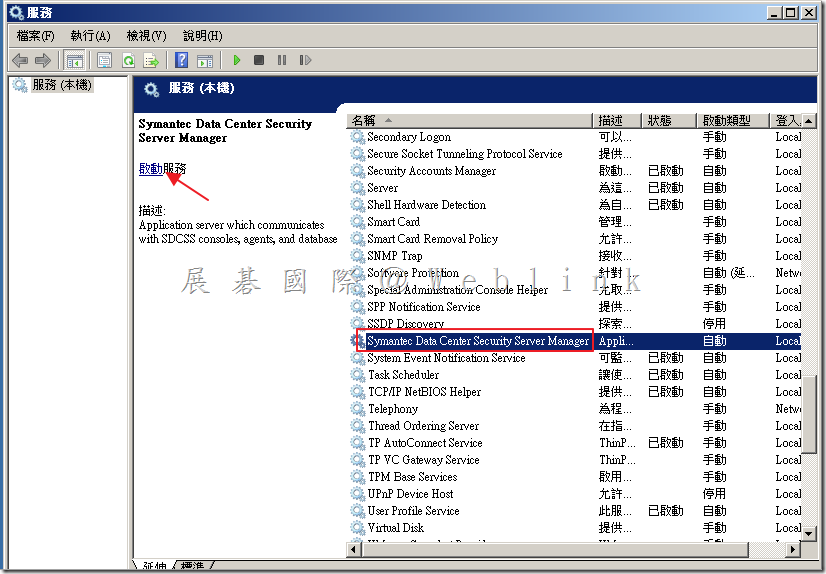
2.  選取「Symantec Data Center Security Server Manager」,點選「停止服務」。

image

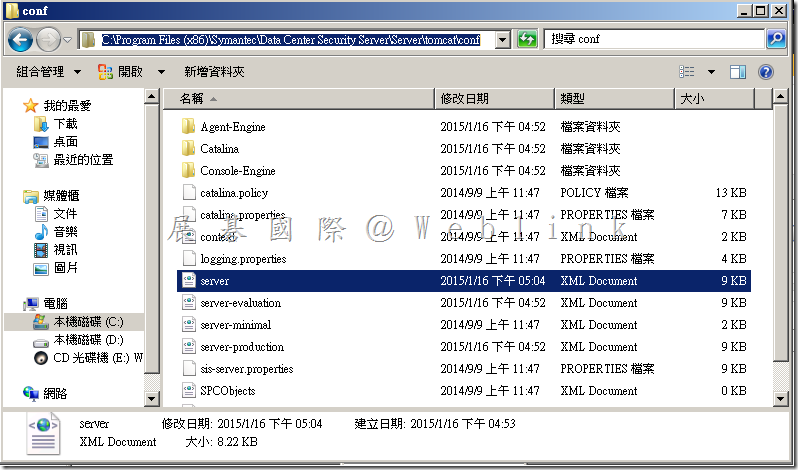
3. 開啟 Management server 資料夾「C:\Program Files (x86)\Symantec\Data Center Security Server\Server\tomcat\conf」,備份「sever.xml」。

image

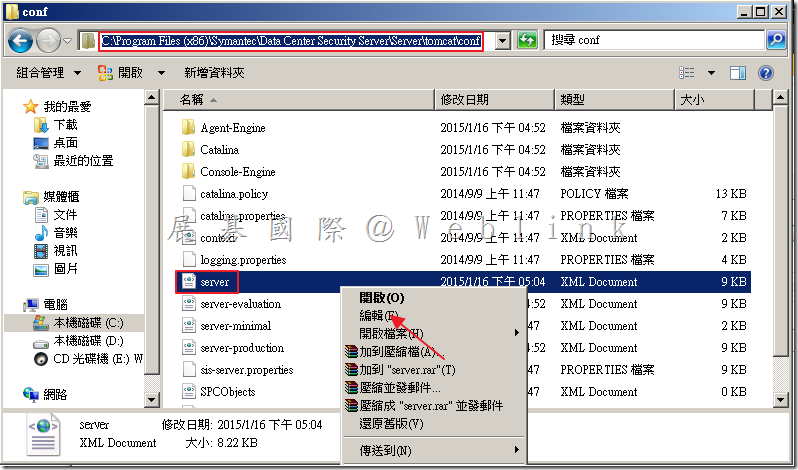
4. 以滑鼠右鍵點選「server.xml」,選取「編輯」。

image

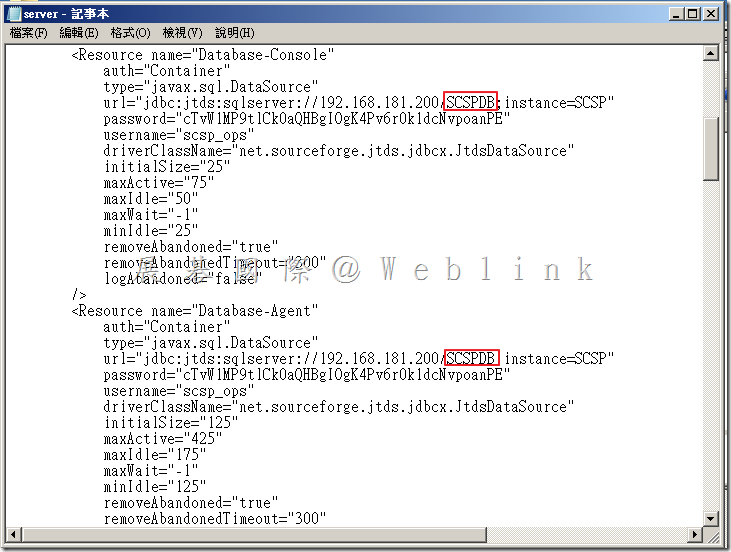
5. 可看到「url=”jdbc:jtds:sqlserver://XXX.XXX.XXX.XXX/XXXXXX;instamce=XXXX”」然後將兩個紅色部分更換為新的DB Name,儲存檔案。

image

6. 啟動「Symantec Data Center Security Server Manager」,即可正常登入。

image

無法重新安裝 DCS Agent

透過新增移除程式 移除 DCS Agent 後,重新開機後卻無法再次安裝 DCS Agent

出現以下錯誤

error!An agent uninstallation requires a reboot.
please reboot system before running installation.

image

請執行 regedit

找到
HKEY_LOCAL_MACHINE\SYSTEM\CurrentControlSet\Control\Session Manager
將裏頭的 PendingFileRenameOperations 刪除

或是寫成批次檔
REG DELETE “HKLM\SYSTEM\ControlSet001\Control\Session Manager" /v PendingFileRenameOperations /f

如果仍無法安裝,請再加以下這幾個

REG DELETE “HKLM\SYSTEM\CurrentControlSet\Services\SISIDSRegDrv" /f
REG DELETE “HKLM\SYSTEM\CurrentControlSet\Services\SISIPSDriver" /f
REG DELETE “HKLM\SYSTEM\CurrentControlSet\Services\SISIPSNetFilter"
REG DELETE “HKLM\SYSTEM\CurrentControlSet\Services\EventLog\System\SISIPSNetFilter" /f


image

DCS Agent 移除指令如下:

MsiExec.exe /X{3D24482F-98BD-48DD-AA62-8B24BFDE7329} /qn

【Unattended uninstallation of an agent】
You can perform an unattended (silent) uninstallation of an agent using the
agent.exe or agent-windows-nt.exe executable and InstallShield and Windows
Installer commands.
The following command structure shows the sequencing:
MsiExec.exe /X{<PRODUCT CODE>} /qn /l*v!+ <UNINSTLL LOG FILE>
The <PRODUCT CODE> is the Symantec Critical System Protection uninstall
string necessary for MsiExec.exe. It is in the following directory:
HKLM\SOFTWARE\Microsoft\Windows\CurrentVersion\Uninstall

For Windows 2008 64-bit system, the <PRODUCT CODE> is in the following
directory:
HKLM\SOFTWARE\Wow6432Node\Microsoft\Windows\CurrentVersion\
Uninstall
Browse the list of IDs. Locate the Symantec Critical System Protection agent
application by looking at the properties in the right pane
. Note the
UinstallString string, and copy and modify it. For example:
MsiExec.exe /X{3D24482F-98BD-48DD-AA62-8B24BFDE7329} /qn /l*v!+
C:\SISAgentUninstall.log
The system reboot is suppressed after the uninstallation.

【SEP 12.1.5 複寫夥伴說明與設定】

複寫夥伴說明與設定總整理


1.       我的 LAB 是如下設定
(1)    先在 【Branch 00】 透過 伺服器設定精靈 設定 【HQ 02】為複寫夥伴
(2)    再在【Branch 01】 透過 伺服器設定精靈 設定 【HQ 02】為複寫夥伴
(3)    複寫夥伴間的 【群組、政策】一定會複寫
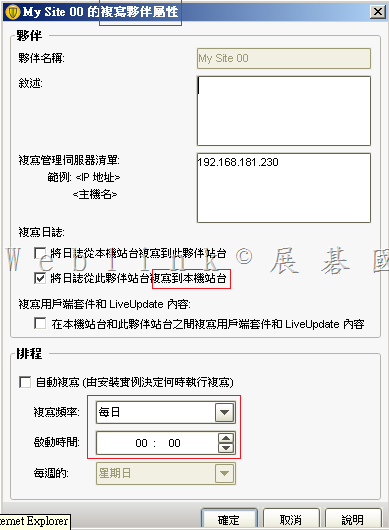
(4)    Log 設定成只由 Branch 複寫至 HQ
(5)    定義檔與安裝套件不進行複寫
(6)     Production環境下,複寫頻率建議不要低於每天,並請於離峰進行

2.    以下是架構圖

image
 
3.      在 HQ 02 看到的複寫夥伴設定
 image

 image
4.    如此的設定,會形成只有在 HQ 02 看到的用戶端才不會是複寫

image

image

 
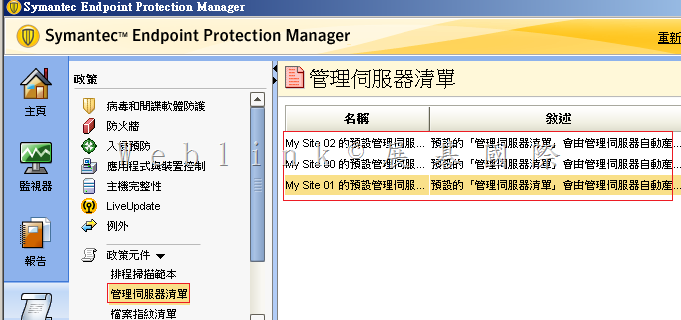
5.    查看一下管理伺服器的清單
 image

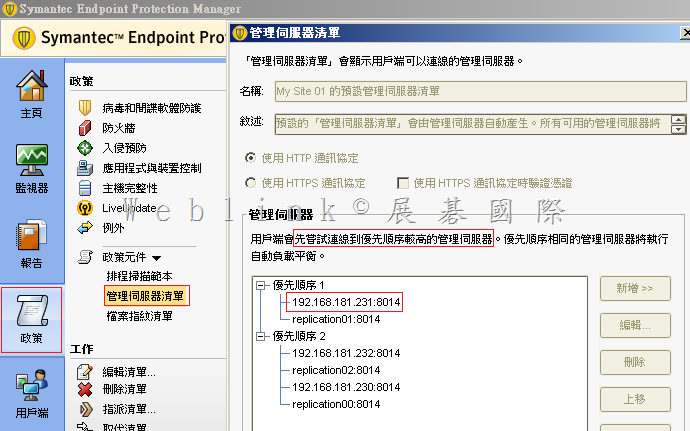
若您因頻寬的關係,確定不允許本地端的用戶端不得在無法連線本地端 SEPM 時轉而向其他站台 SEPM 報到、獲取更新、回報 log 等,請您刪除優先順序2的項目
因為預設的【管理伺服器清單】無法編輯,請您複製→貼上後,進行刪除,並將新的【管理伺服器清單】套給相對應的群組

 image

6.    同時要設定好每個群組使用的是那一個【管理伺服器的清單】(群組所在的地區要優先使用自己區域內 SEPM 當管理伺服器)
 

image

7.    各個群組調整好各自的【管理伺服器清單】後,便可發現群組內的用戶端都是就近向區域內的 SEPM 報到、更新、回報 log 了
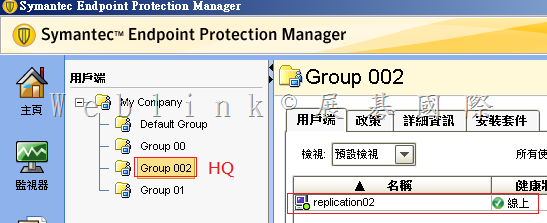
以下是在 HQ 02 看到只有 Group 002 (管理伺服器 第一順位 是 HQ 02 ) 內的用戶端才是線上

 image

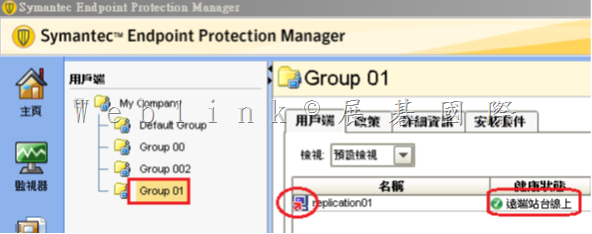
而在 HQ 02 看到Group 00、 Group 01 (管理伺服器 第二順位 是 HQ 02 ) 內的用戶端顯示為複寫圖示 (遠端站台線上)

image

SEP 用戶端一直產生ccSvcHst-*.dmp檔案,每一個都1點多GB,一天可能有1個以上

C:\ProgramData\Symantec\Symantec Endpoint Protection\CurrentVersion\Data\Install\Logs下,
會有ccSvcHst-*.dmp檔案產生,每一個都1點多GB,一天可能有1個以上,這個.dmp檔到底是那個設定所產生的,即便我把logs目錄設定唯讀,還是會寫入。而且我還刪不掉。

这个问题是RU5版本的已知问题

Title
CCSvcHst.exe generates multiple process dumps in ProgramData exhausting disk space 
 
Issue

CCSvcHst.exe appears to generating exceptions forcing a process dump in C:\ProgramData\Symantec\Symantec Endpoint Protection\CurrentVersion\Data\Install\Logs during a scan. Each dump is over 1GB and free disk space is quickly exhausted.
 
Environment

Windows 2012 R2
 
 
Cause

Certain archive files appear to be triggering the issue. Issue has been with some large archive files with older file dates (4+ years) in .zipx and .blb format.
 
Solution

Symantec is aware of the issue and is researching a solution.

Workaround:

Make an exception for the file extension or directory which has been identified through debugging.

Or…
1.Disable Tamper Protection.
2.Open a Command Prompt window.
3.del “C:\ProgramData\Symantec\Symantec Endpoint Protection\12.1.5337.5000.105\Data\Install\Logs\*.dmp"

or

del C:\ProgramData\Symantec\Symantec Endpoint Protection\CurrentVersion\Data\Install\Logs\*.dmp

4.Using regedit.exe, set the following values to 0 (zero):
HKLM\SOFTWARE(\Wow6432Node)\Symantec\Symantec Endpoint Protection\CurrentVersion\Common Client\Debug\CrashHandler\DumpOn*
5.Re-enable Tamper Protection.
6.Open a Command Prompt window.
7.cd “C:\Program Files (x86)\Symantec\Symantec Endpoint Protection\12.1.5337.5000.105\Bin"
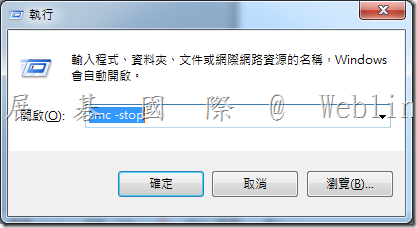
8.smc -stop
9 .smc –start

【6 7 8 9 可如下執行】

請按鍵盤上【Windows 鍵】+【R鍵】→會跳出【執行】視窗

※ XP 請按【開始】→【執行】

在出現的視窗中,輸入【smc –stop】【smc –start】,並按下【確定】

clip_image005


如何設定 DLP Endpoint Prevent 可以阻擋使用者將個資複製至共用資料夾並在用戶端電腦上出現警告視窗

1.    請設定【代理程式組態】

image

2.    雙按【Default Configuration】

image

3.    勾選【複製至共用】

image

4.    請新增【回應規則】

image

5.    按下【新增回應規則】

image

6.    選擇【自動回應】

image

7.      
(1)    輸入【規則名稱】
(2)    新增條件 :按下【新增條件】鈕 → 選擇【通訊協定或端點監控】→【是任一】→【端點複製到網路共用】
(3)    新增動作 :選擇動作類型為【 (端點) Prevent 攔截 】→按下【新增動作】鈕
(4)    視需要修改【端點通知內容】
(5)    記得按下【儲存】鈕

image

image

8.    建立好的【新增回應規則】

image

9.    找到既有的個資政策

image

10.    雙按該既有的個資政策

image


11.    點按【回應】頁籤 → 在下拉選單選擇【先前建立的回應規則 (阻擋個資複製網芳並示警) 】→ 按下【新增回應規則】鈕

image


12.    記得按下【儲存】鈕

image

13.    在用戶端拖曳個資檔案至分享資料夾

image

14.    您可以發現該動作遭封鎖並示警

image

15.    資安事件中也能找到相對應的紀錄

image

Syamatec DCS MSSQL 帳號權限說明

SCSPDBA

(此帳號為安裝系統時需輸入之 SDCS Database Owner,可修改為其他名稱)

這是用於管理實際 SDCS 資料庫所有者帳戶。此帳戶具有「Owner」權限,並可以操縱在 SDCSDB 所有的結構和數據,只能夠控制 SDCS 資料庫。只有初始安裝和升級需要使用。

伺服器角色:

image

使用者對應:

image


SCSP_OPS

(此帳號為安裝系統時自動建立)

這是 SDCS 安裝 Tomcat 所使用的 MS SQL Server 資料庫的帳戶(自動產生密碼)。此帳戶可以讀取和寫入 SDCSDB 資料,但不能執行任何架構更改。SDCS 所有操作使用此帳戶。

伺服器角色:

image

使用者對應:

image


 SCSP_PLUGIN

(此帳號為安裝系統時自動建立)

這是 SDCS 所建立的提供第三方外掛工具(如 SSIM、ArcSight 等)的賬戶(自動建立密碼)。此帳戶具有只讀取 SDCS 資料庫。

伺服器角色:

image

使用者對應:

image

SCSPGuest

(此帳號為安裝系統時可選擇是否要建立)

在安裝過程中這是可選擇是否需要建立的帳戶,如果想建立一個可用於外部 ODBC/JDBC 連線至 SDCS 資料庫,僅有讀取功能。

伺服器角色:

image

使用者對應:

image

如何更改 SDCS SQL 資料庫的 dcs_ops 與 dcs_plugin 帳號的密碼

“How can we change the DCS SQL DB dcs_ops and dcs_plugin account password? “


Change password for dcs_ops & dcs_plugin on SQL server side

image

dcs_plugin change in password has no effect on product., as we don’t use this account on the Manager side

※(dcs_plugin 用來提供 3-party 產品 (如 SSIM、ArcSight) 讀取資料庫使用,SDCS 沒有使用到該帳號,可任意修改)

Change dcs_ops in passwrod will require the following changes to be done on Manager side

1. Stop DCS manager service

image
2. Browse to “C:\Program Files (x86)\Symantec\Data Center Security Server\Server\tomcat\conf"

image
3. Backup server.xml
4. Edit server.xml

image

You can see the JDBC settings in the following:

<Resource name="Database-Console"
auth="Container"
type="javax.sql.DataSource"
url="jdbc:jtds:sqlserver://127.0.0.1/SCSPDB;instance=SCSP"
password="xxxxxxxxxxxxxxxxxxx"
username="scsp_ops"
driverClassName="net.sourceforge.jtds.jdbcx.JtdsDataSource"
initialSize="10″
maxActive="25″
maxIdle="15″
maxWait="-1″
minIdle="10″
removeAbandoned="true"
removeAbandonedTimeout="300″
logAbandoned="false"
/>
<Resource name="Database-Agent"
auth="Container"
type="javax.sql.DataSource"
url="jdbc:jtds:sqlserver://127.0.0.1/SCSPDB;instance=SCSP"
password="xxxxxxxxxxxxxxxxxxxx"
username="scsp_ops"
driverClassName="net.sourceforge.jtds.jdbcx.JtdsDataSource"
initialSize="15″
maxActive="45″
maxIdle="20″
maxWait="-1″
minIdle="15″
removeAbandoned="true"
removeAbandonedTimeout="300″
logAbandoned="false"
/>

5. Replace the text xxxxxxxxxxxx with the new DCS-ops password, at both the locations
6. Then start the DCS manager service

Also refer below article links for more clarity:
http://www.symantec.com/connect/forums/csp-database
http://www.symantec.com/connect/articles/what-are-default-scsp-sql-database-accounts-and-what-are-they-used

如何手動套用特定的 policy 到無法連接主控台的 SDCS 用戶端

  • 請先將該 policy 套用至一個已連線至主控台的用戶端
  • 至上一步驟的用戶端的 C:\Program Files\Symantec\Data Center Security Server\Agent\IPS\driver 目錄下,複製 IPS 與 IDS policy

policy 的格式為 policy1234567.sbp.zip (1234567 為數字)

sbp.zip   .trans   .conf   擁有相同檔名者,請複製其中 sbp.zip (此即為 IPS policy)

其餘 sbp.zip 即為 IDS policy

image


image


  • 停止無法連線至主控台的用戶端的 IPS 服務
  • 將先前步驟複製出的 sbp.zip 檔複製到無法連線至主控台的用戶端的相同目錄 (C:\Program Files\Symantec\Data Center Security Server\Agent\IPS\driver )
  • 並請將 IPS policy 更名 (名稱請至註冊機碼查詢)
  • 之後請確認 IPS policy 的 .trans 與 .conf 是否更新
  • 亦請確認 IDS policy 新的 .pol 是否在 C:\Program Files\Symantec\Data Center Security Server\Agent\IDS\system 被建立


image

查詢 IPS policy 的名稱

image

  • 進行 Common parameters、Prevention parameters 與 Detection parameters Configuration 的設定並套用到已連線的 SDCS 用戶端


image

image


image

  • 停止無法連線至主控台的用戶端的 IPS 服務
  • 將 C:\Program Files\Symantec\Data Center Security Server\Agent\IPS 目錄下的 agent.ini 與 fallback.ini 複製至無法連線至主控台的用戶端的相同目錄
  • 將 C:\Program Files\Symantec\Data Center Security Server\Agent\IDS\system 目錄下的 agent.ini 複製至無法連線至主控台的用戶端的相同目錄
  • 修改 C:\Program Files\Symantec\Data Center Security Server\Agent\IPS 目錄下的 agent.ini 中的以下三區塊

plus.policy.file

ids.plus.policy.file

agentlog.logfile

  • 重啟 IPS 與 IDS 服務

image


image

Symantec DCS 如何新增 User

1. 選取「Admin」頁籤,選取「Users」,點選「Add」。

image

2. 建立 User

2.1.  建立一般 User

2.1.1. 輸入「User name」,輸入「Description」,輸入「Password」,再次輸入「Confirm Password」。

image

2.1.2. 選取「Member Of」頁籤,點選「Add」。

image

2.1.3. 選取增加的 Role,點選「Add」。

image

2.1.4. 點選「OK」。

image

2.2.  建立 AD User

2.2.1. 輸入「User name」〈必須使用網域名稱\帳號的格式,例:local\user〉,輸入「Description」,勾選「Active Directory User」,接著選取「Active Directory User」。

image

2.2.2. 選取「Member Of」頁籤,點選「Add」。

image

2.2.3. 選取增加的 Role,點選「Add」。

image

2.2.4. 點選「OK」。

image

3. 新增完成。

image