如何設定 DLP Endpoint Prevent 可以阻擋使用者將個資複製至共用資料夾並在用戶端電腦上出現警告視窗

1.    請設定【代理程式組態】

image

2.    雙按【Default Configuration】

image

3.    勾選【複製至共用】

image

4.    請新增【回應規則】

image

5.    按下【新增回應規則】

image

6.    選擇【自動回應】

image

7.      
(1)    輸入【規則名稱】
(2)    新增條件 :按下【新增條件】鈕 → 選擇【通訊協定或端點監控】→【是任一】→【端點複製到網路共用】
(3)    新增動作 :選擇動作類型為【 (端點) Prevent 攔截 】→按下【新增動作】鈕
(4)    視需要修改【端點通知內容】
(5)    記得按下【儲存】鈕

image

image

8.    建立好的【新增回應規則】

image

9.    找到既有的個資政策

image

10.    雙按該既有的個資政策

image


11.    點按【回應】頁籤 → 在下拉選單選擇【先前建立的回應規則 (阻擋個資複製網芳並示警) 】→ 按下【新增回應規則】鈕

image


12.    記得按下【儲存】鈕

image

13.    在用戶端拖曳個資檔案至分享資料夾

image

14.    您可以發現該動作遭封鎖並示警

image

15.    資安事件中也能找到相對應的紀錄

image

如何更改 SDCS SQL 資料庫的 dcs_ops 與 dcs_plugin 帳號的密碼

“How can we change the DCS SQL DB dcs_ops and dcs_plugin account password? “


Change password for dcs_ops & dcs_plugin on SQL server side

image

dcs_plugin change in password has no effect on product., as we don’t use this account on the Manager side

※(dcs_plugin 用來提供 3-party 產品 (如 SSIM、ArcSight) 讀取資料庫使用,SDCS 沒有使用到該帳號,可任意修改)

Change dcs_ops in passwrod will require the following changes to be done on Manager side

1. Stop DCS manager service

image
2. Browse to “C:\Program Files (x86)\Symantec\Data Center Security Server\Server\tomcat\conf"

image
3. Backup server.xml
4. Edit server.xml

image

You can see the JDBC settings in the following:

<Resource name="Database-Console"
auth="Container"
type="javax.sql.DataSource"
url="jdbc:jtds:sqlserver://127.0.0.1/SCSPDB;instance=SCSP"
password="xxxxxxxxxxxxxxxxxxx"
username="scsp_ops"
driverClassName="net.sourceforge.jtds.jdbcx.JtdsDataSource"
initialSize="10″
maxActive="25″
maxIdle="15″
maxWait="-1″
minIdle="10″
removeAbandoned="true"
removeAbandonedTimeout="300″
logAbandoned="false"
/>
<Resource name="Database-Agent"
auth="Container"
type="javax.sql.DataSource"
url="jdbc:jtds:sqlserver://127.0.0.1/SCSPDB;instance=SCSP"
password="xxxxxxxxxxxxxxxxxxxx"
username="scsp_ops"
driverClassName="net.sourceforge.jtds.jdbcx.JtdsDataSource"
initialSize="15″
maxActive="45″
maxIdle="20″
maxWait="-1″
minIdle="15″
removeAbandoned="true"
removeAbandonedTimeout="300″
logAbandoned="false"
/>

5. Replace the text xxxxxxxxxxxx with the new DCS-ops password, at both the locations
6. Then start the DCS manager service

Also refer below article links for more clarity:
http://www.symantec.com/connect/forums/csp-database
http://www.symantec.com/connect/articles/what-are-default-scsp-sql-database-accounts-and-what-are-they-used

如何手動套用特定的 policy 到無法連接主控台的 SDCS 用戶端

  • 請先將該 policy 套用至一個已連線至主控台的用戶端
  • 至上一步驟的用戶端的 C:\Program Files\Symantec\Data Center Security Server\Agent\IPS\driver 目錄下,複製 IPS 與 IDS policy

policy 的格式為 policy1234567.sbp.zip (1234567 為數字)

sbp.zip   .trans   .conf   擁有相同檔名者,請複製其中 sbp.zip (此即為 IPS policy)

其餘 sbp.zip 即為 IDS policy

image


image


  • 停止無法連線至主控台的用戶端的 IPS 服務
  • 將先前步驟複製出的 sbp.zip 檔複製到無法連線至主控台的用戶端的相同目錄 (C:\Program Files\Symantec\Data Center Security Server\Agent\IPS\driver )
  • 並請將 IPS policy 更名 (名稱請至註冊機碼查詢)
  • 之後請確認 IPS policy 的 .trans 與 .conf 是否更新
  • 亦請確認 IDS policy 新的 .pol 是否在 C:\Program Files\Symantec\Data Center Security Server\Agent\IDS\system 被建立


image

查詢 IPS policy 的名稱

image

  • 進行 Common parameters、Prevention parameters 與 Detection parameters Configuration 的設定並套用到已連線的 SDCS 用戶端


image

image


image

  • 停止無法連線至主控台的用戶端的 IPS 服務
  • 將 C:\Program Files\Symantec\Data Center Security Server\Agent\IPS 目錄下的 agent.ini 與 fallback.ini 複製至無法連線至主控台的用戶端的相同目錄
  • 將 C:\Program Files\Symantec\Data Center Security Server\Agent\IDS\system 目錄下的 agent.ini 複製至無法連線至主控台的用戶端的相同目錄
  • 修改 C:\Program Files\Symantec\Data Center Security Server\Agent\IPS 目錄下的 agent.ini 中的以下三區塊

plus.policy.file

ids.plus.policy.file

agentlog.logfile

  • 重啟 IPS 與 IDS 服務

image


image

Symantec DCS console 如何設定 console 的 timeout 時間

Symantec DCS console 預設是沒有定義閒置多久後會自動登出 console 主控台

我們可以參考以下說明來設定 timeout 的閒置時間

image

  • 請在 management server 上,找到以下目錄中的 sis-server.properties 檔案

C:\Program Files (x86)\Symantec\Data Center Security Server\Server\tomcat\conf

image

  • 以 notepad 開啟 sis-server.properties
  • 加入以下兩行,這樣 console 主控台閒置 timeout 時間即為 30 分鐘

sissession.autologin.enabled=false
sissession.timeout=30

image

  • 重啟該主機或 DCS Server Manager 服務

image

  • 閒置 30 分鐘後即自動登出

image

安裝 PGP Desktop 10.3.2 MP6 在 Mac OS X 10.10 需先 disable CoreStorage

What’s Changed in Symantec Encryption Desktop for Mac OS X 10.3.2 MP6
General
• Resolved incompatibilities with Apple Mac OS X 10.10 systems.
Known issues
Compatibility with CoreStorage: CoreStorage may be applied, by default, to your Mac OS X 10.10 drives. Symantec Encryption Desktop is not compatible with CoreStorage drives. In order to install Encryption Desktop, you must disable CoreStorage. In addition, in order to prevent future issues, including issues with an encrypted disk, do not re-enable CoreStorage after Encryption Desktop has been installed and your drive has been encrypted. Failure to do so could result in data that cannot be recovered. This issue will be resolved in a future release of the product. [3653114]

所以目前安裝PGP於10.10之前需要先做以下動作

1.    先開啟terminal視窗
下指令: diskutil list查詢目前的情況
10.10版本的預設值會開啟CoreStorage
image

2.    輸入指令轉換格式:diskutil cs revert /  (請注意revert後需要加一個空格再打/)
接著下diskutil list檢查一次格式
Hdd將會轉換回App_HFS,之後就可以正常安裝

image

Symantec Brightmail Gateway 901 (新增第二台 Scanner)

【使用 ESXi 的前置作業】

l 安裝 VMWare Workstation (我裝 7.0)

l 在VMWare Workstation 上,新增一個 VM → (120G、3G memory、CPUx2)(並做好相關設定,讓 VM 中可以開啟另一個 VM,以利本次測試)

l VM 上面安裝VMWare ESXi 4.0【192.168.1.132】

l 連線至 http://192.168.1.132 下載 VSphere client

l 在本機安裝 VSphere client,透過 VSphere client 連線至VMWare ESXi 4.0

l 在 VSphere client 上,上傳 .ovf,以建立另一個 SBG VM

l 開啟此 VM,進行下面 SBG 的設定

【Symantec Brightmail Gateway 9.0.1 設定】

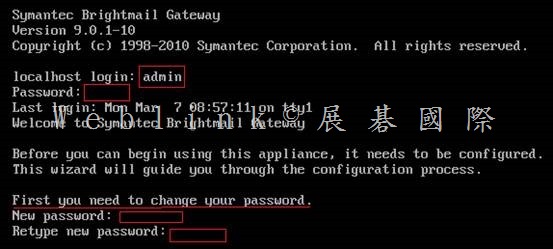
開啟 Symantec Brightmail Gateway

【pre-config console】

以【預設帳號:admin】【預設密碼:symantec】登入 pre-config console

系統會立即請你設定新密碼

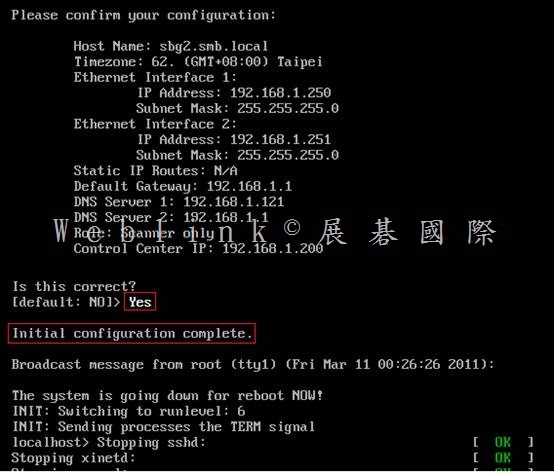
設定 時區 【62】

設定 Symantec Brightmail Gateway FQDN 【sbg2.smb.local】

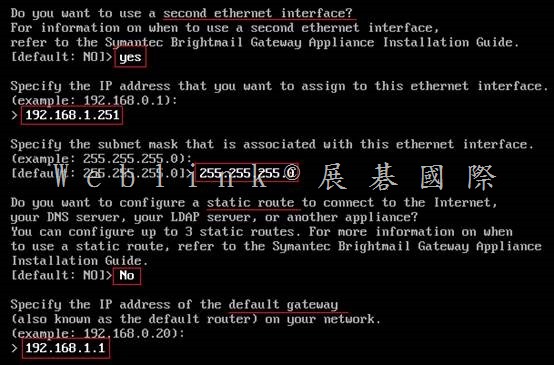
設定 ip、子網路遮罩【192.168.1.250、255.255.255.0】

設定 static route【略】

設定 gateway【192.168.1.1】

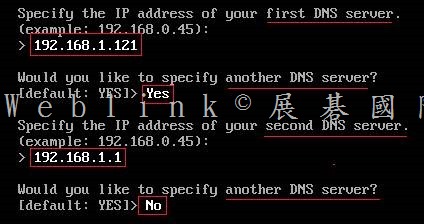
設定 DNS【192.168.1.121】
 

clip_image002

clip_image004

clip_image006

clip_image008

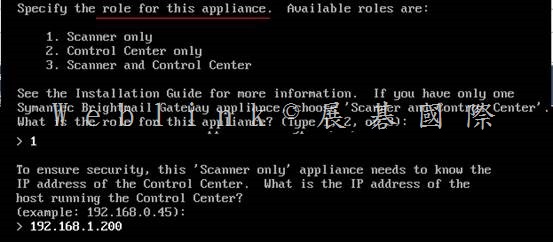
第二台 SBG 僅選擇 1.Scanner only

請先指定 Control Center

clip_image010

clip_image012

【Web console】

登入Symantec Brightmail Gateway web console

https://ip (https://192.168.1.200)

帳號:admin

密碼:

clip_image014

clip_image016

clip_image018

clip_image020

clip_image022

clip_image024

第一次登入 SBG pre-config console時,密碼是 symantec,不過會立即請你設定新密碼

之後就是以此新密碼來登入 web console

需先取得的資訊

VMWare ESXi 4.0

(IP與使用 VSphere登入ESXi 的帳號 [root]、密碼)

SBG

FQDN

IPx2、Subnet Mask、Gateway、DNS

SBG license file (.slf)

Notification Mail Address

NTP

Mail Domain、Forward Mail server or IronPort IP

=======================================================

http://www.stdtime.gov.tw/chinese/bulletin/NTP%20promo.txt

time.stdtime.gov.tw

clock.stdtime.gov.tw

tick.stdtime.gov.tw

tock.stdtime.gov.tw

watch.stdtime.gov.tw

clip_image026

clip_image028

clip_image030

clip_image032

clip_image034

http://www.stdtime.gov.tw/chinese/bulletin/NTP%20promo.txt

time.stdtime.gov.tw

clock.stdtime.gov.tw

tick.stdtime.gov.tw

tock.stdtime.gov.tw

watch.stdtime.gov.tw

clip_image036

clip_image038

clip_image040

clip_image042

clip_image044

clip_image046

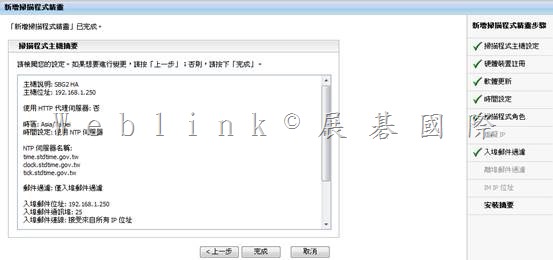
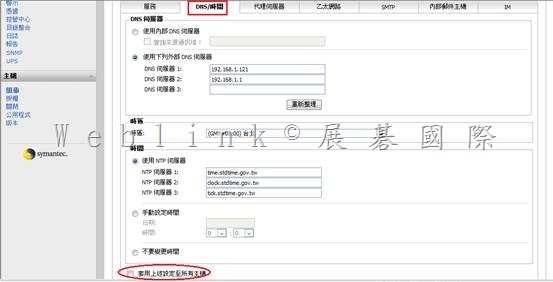
主機說明: SBG2 HA
主機位址: 192.168.1.250
使用 HTTP 代理伺服器: 否
時區: Asia/Taipei
時間設定: 使用 NTP 伺服器
NTP 伺服器名稱:
time.stdtime.gov.tw
clock.stdtime.gov.tw
tick.stdtime.gov.tw
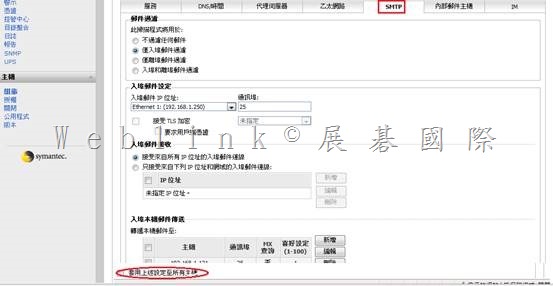
郵件過濾: 僅入埠郵件過濾
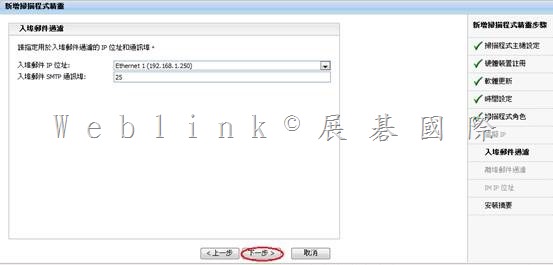
入埠郵件位址: 192.168.1.250
入埠郵件通訊埠: 25
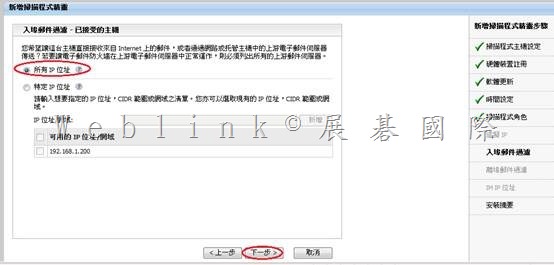
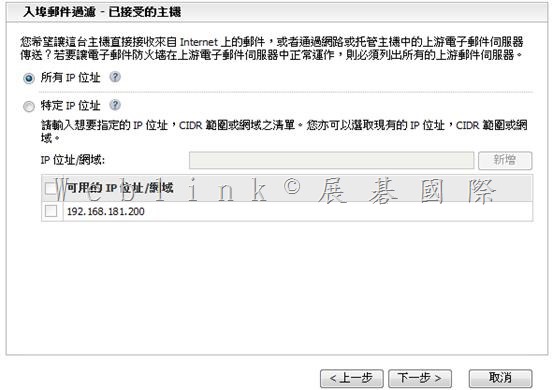
入埠郵件連線: 接受來自所有 IP 位址
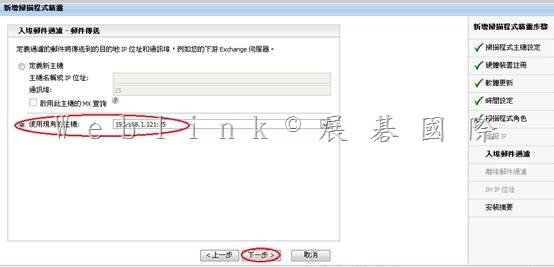
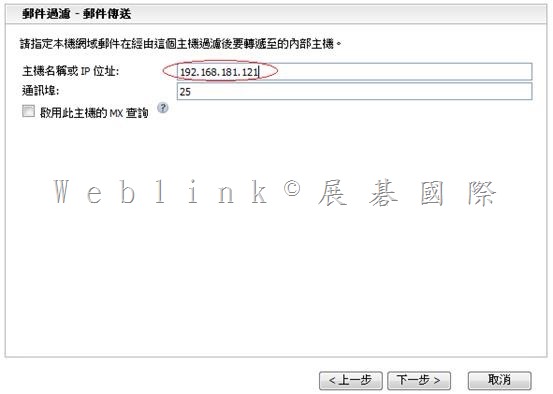
本機轉遞位址: 192.168.1.121
本機轉遞通訊埠: 25
本機轉遞 MX 查詢: 否
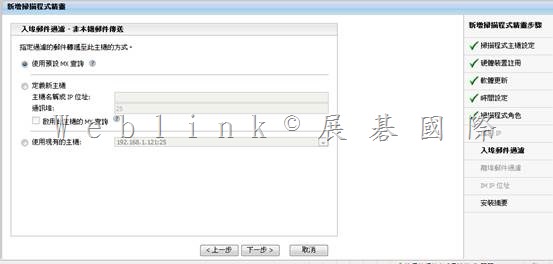
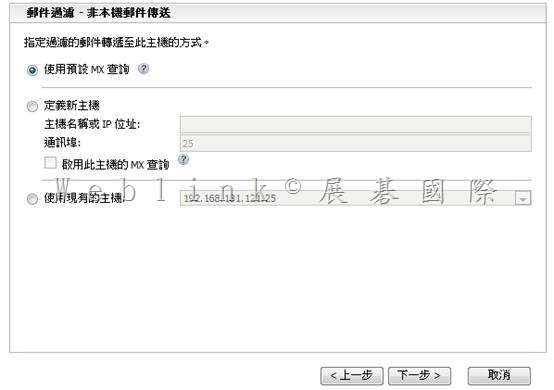
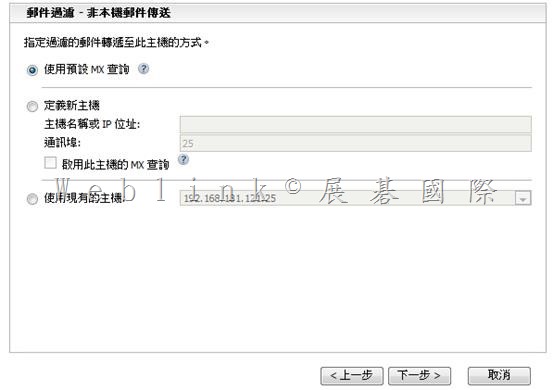
非本機轉遞位址: 使用預設 MX 查詢

clip_image048

clip_image050

clip_image052

clip_image054

clip_image056

clip_image058

clip_image060

clip_image062

clip_image064

=================================================================

x

clip_image066

http://www.stdtime.gov.tw/chinese/bulletin/NTP%20promo.txt

time.stdtime.gov.tw

clock.stdtime.gov.tw

tick.stdtime.gov.tw

tock.stdtime.gov.tw

watch.stdtime.gov.tw

clip_image068

x

clip_image069clip_image071

clip_image073

x

clip_image075

x

clip_image077

clip_image079

clip_image081

x

clip_image082clip_image084

x

clip_image086

clip_image088


clip_image091

clip_image093

clip_image095

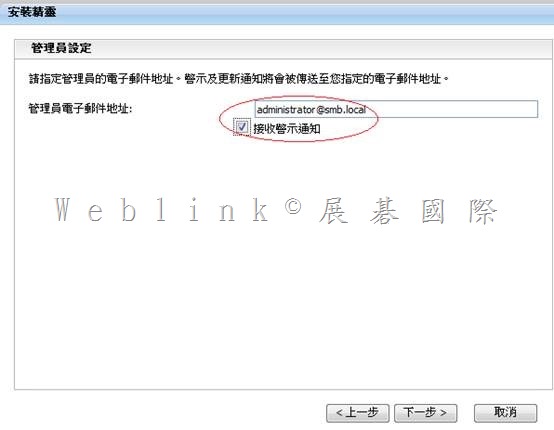
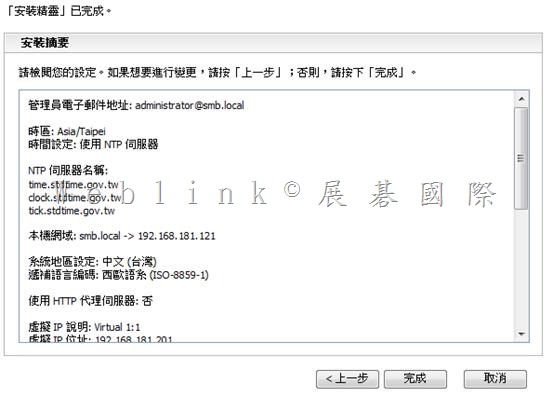
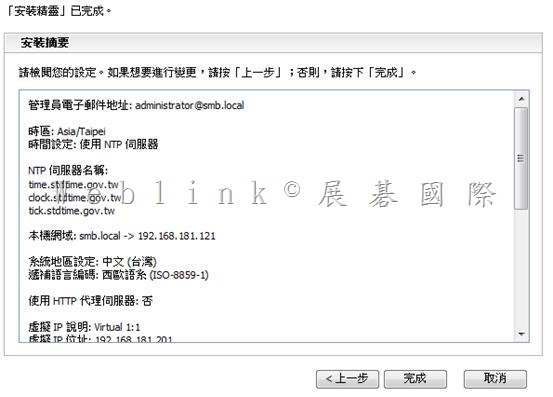
管理員電子郵件地址: administrator@smb.local
時區: Asia/Taipei
時間設定: 使用 NTP 伺服器
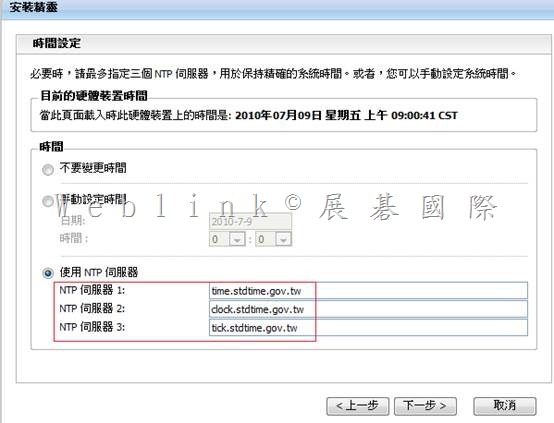
NTP 伺服器名稱:
time.stdtime.gov.tw
clock.stdtime.gov.tw
tick.stdtime.gov.tw
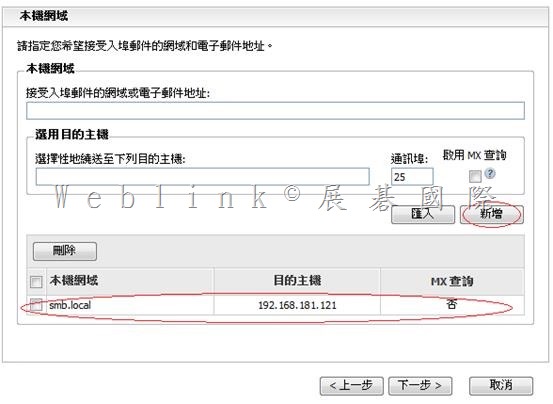
本機網域: smb.local
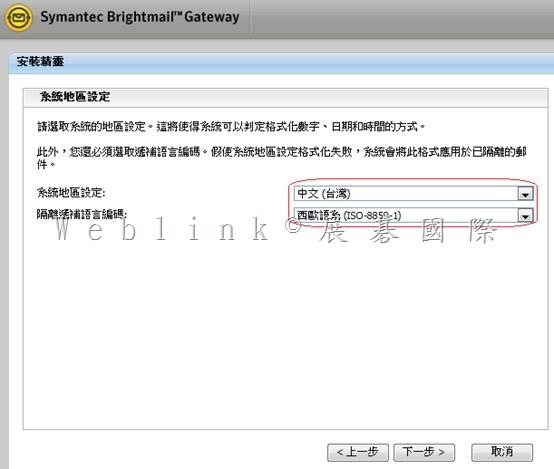
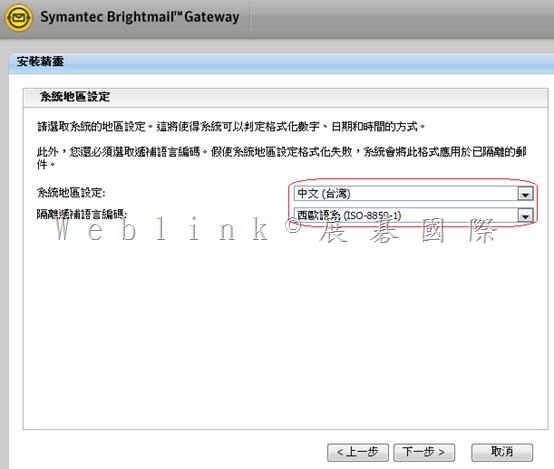
系統地區設定: 中文 (台灣)
遞補語言編碼: Unicode (UTF-8)
使用 HTTP 代理伺服器: 否
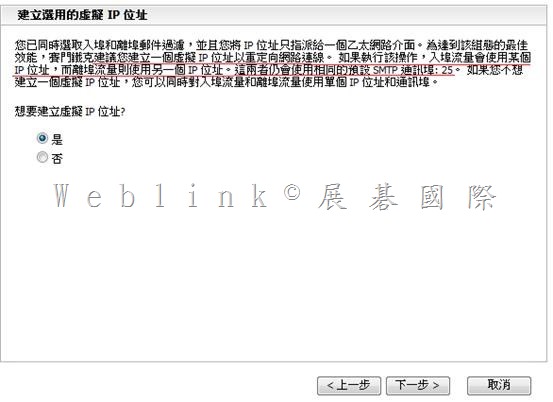
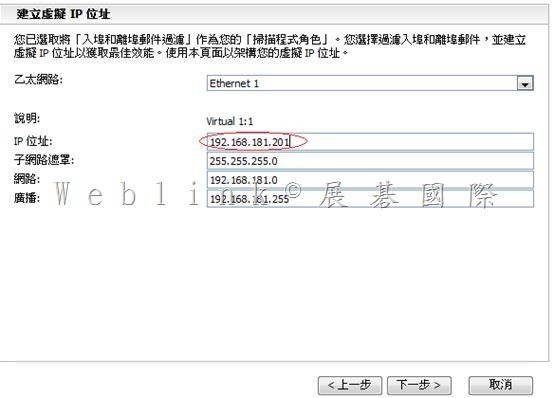
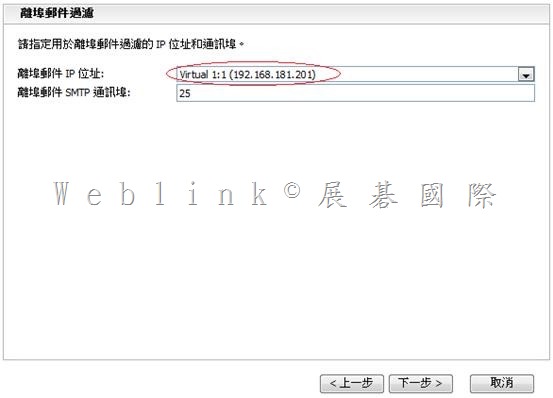
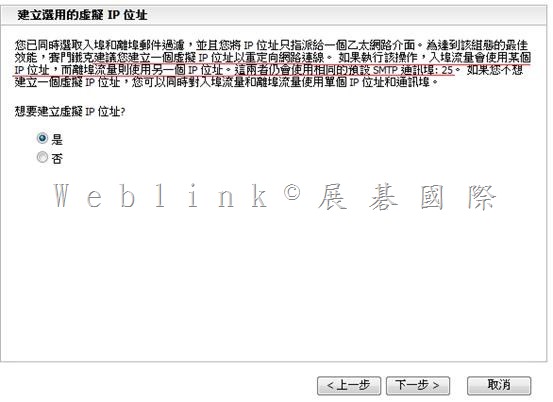
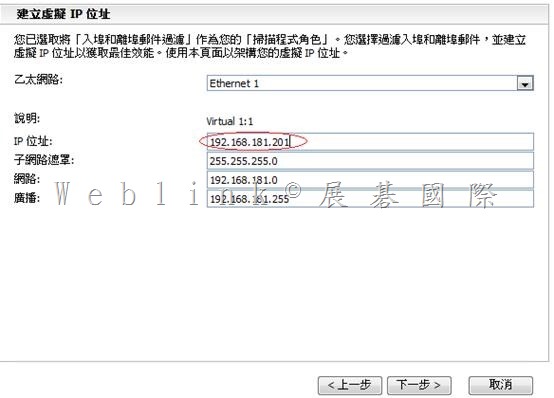
虛擬 IP 說明: Virtual 1:1
虛擬 IP 位址: 192.168.1.201
虛擬 IP 網路遮罩: 255.255.255.0
虛擬 IP 網路: 192.168.1.0
虛擬 IP 廣播: 192.168.1.255
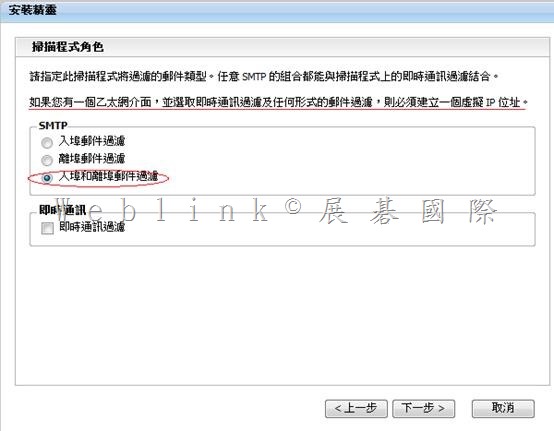
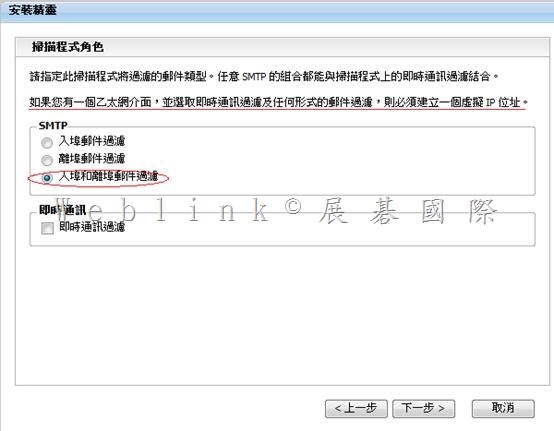
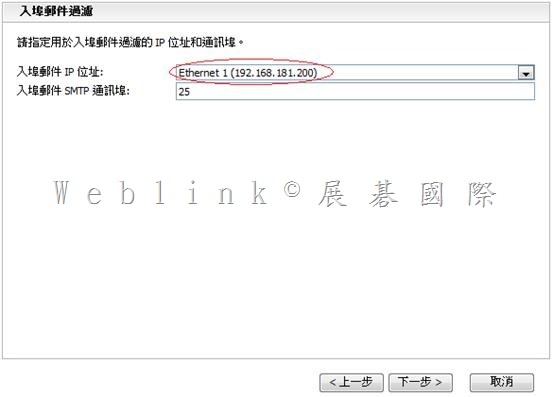
郵件過濾: 入埠和離埠郵件過濾
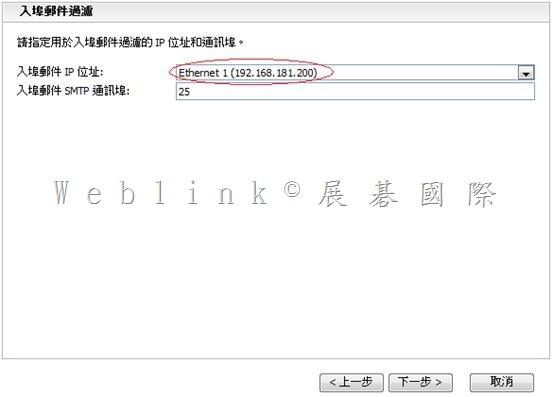
入埠郵件位址: 192.168.1.200
入埠郵件通訊埠: 25
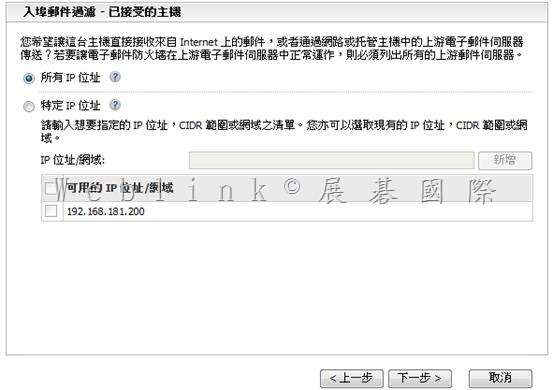
入埠郵件連線: 接受來自所有 IP 位址
離埠郵件位址: 192.168.1.201
離埠郵件通訊埠: 25
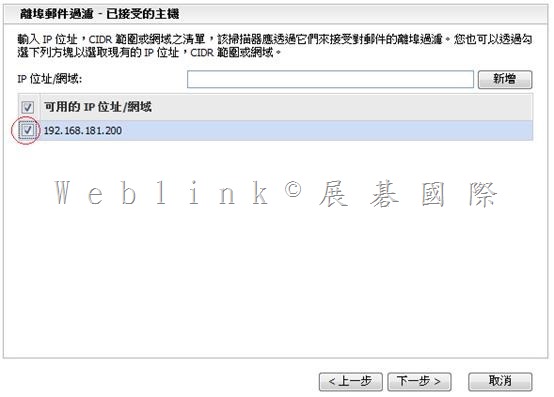
離埠郵件用戶端: 192.168.1.200
離埠郵件用戶端: 192.168.1.121
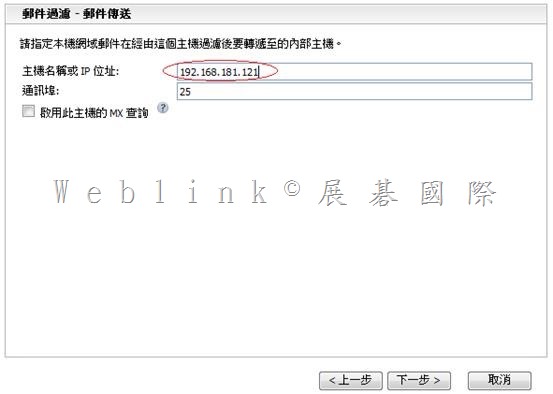
本機轉遞位址: 192.168.1.121
本機轉遞通訊埠: 25
本機轉遞 MX 查詢: 否
非本機轉遞位址: 使用預設 MX 查詢
即時通訊過濾: 已停用

clip_image097

clip_image099

Symantec Brightmail Gateway 9.0.1安裝與基本設定

【使用 ESXi 的前置作業】

l 安裝 VMWare Workstation (我裝 7.0)

l 在VMWare Workstation 上,新增一個 VM → (120G、3G memory、CPUx2)(並做好相關設定,讓 VM 中可以開啟另一個 VM,以利本次測試)

l VM 上面安裝VMWare ESXi 4.0【192.168.1.132】

l 連線至 http://192.168.1.132 下載 VSphere client

l 在本機安裝 VSphere client,透過 VSphere client 連線至VMWare ESXi 4.0

l 在 VSphere client 上,上傳 .ovf,以建立另一個 SBG VM

l 開啟此 VM,進行下面 SBG 的設定

【Symantec Brightmail Gateway 9.0.1 設定】

開啟 Symantec Brightmail Gateway

【pre-config console】

【預設帳號:admin】【預設密碼:symantec】登入 pre-config console

系統會立即請你設定新密碼

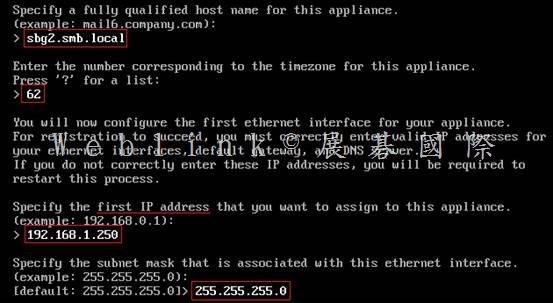
設定 時區 【62】

設定 Symantec Brightmail Gateway FQDN 【sbg.smb.local】

設定 ip、子網路遮罩【192.168.1.200、255.255.255.0】

設定 static route【略】

設定 gateway【192.168.1.1】

設定 DNS【192.168.1.121】
【Web console】

登入Symantec Brightmail Gateway web console

https://ip (https://192.168.1.200)

帳號:admin

密碼:
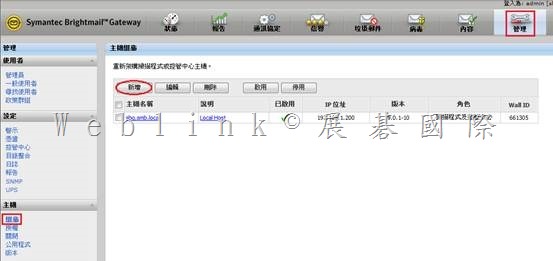
第一次登入 SBG pre-config console時,密碼是 symantec,不過會立即請你設定新密碼

之後就是以此新密碼來登入 web console

需先取得的資訊

VMWare ESXi 4.0

(IP與使用 VSphere登入ESXi 的帳號 [root]、密碼)

SBG

FQDN

IPx2、Subnet Mask、Gateway、DNS

SBG license file (.slf)

Notification Mail Address

NTP

Mail Domain、Forward Mail server or IronPort IP

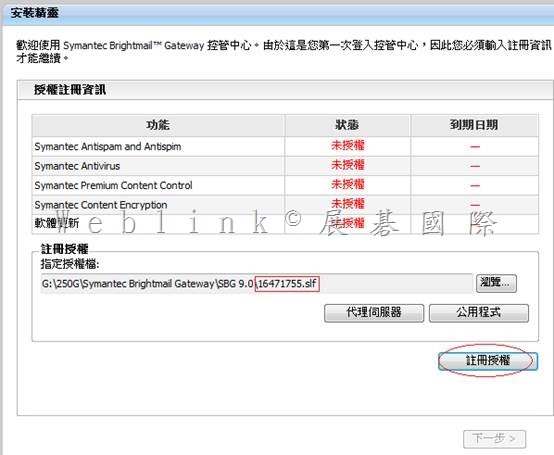
clip_image002

clip_image004

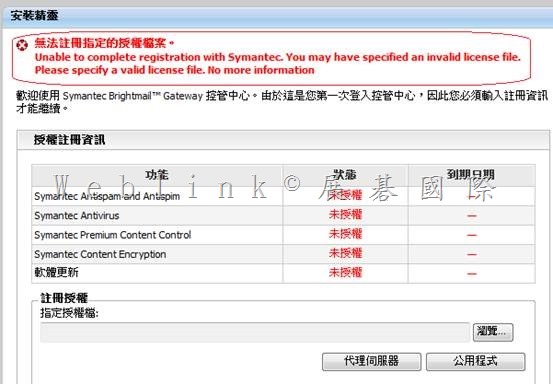
clip_image006

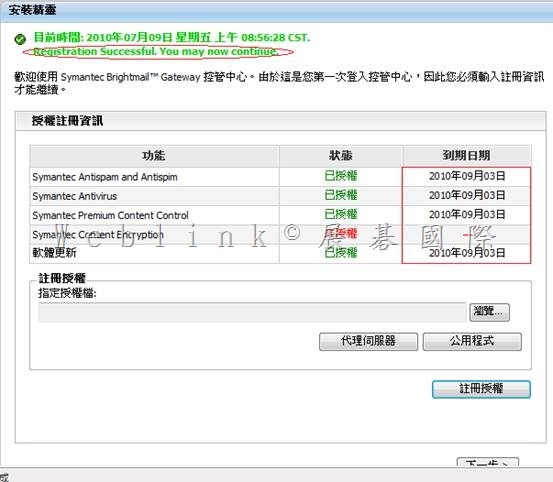
clip_image008

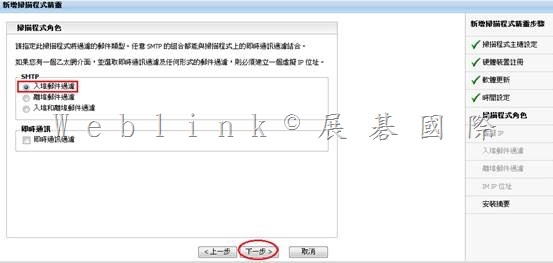
clip_image010

clip_image012

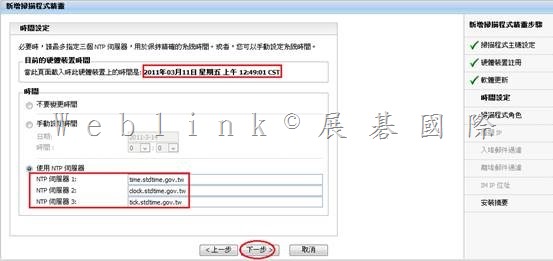
http://www.stdtime.gov.tw/chinese/bulletin/NTP%20promo.txt

time.stdtime.gov.tw

clock.stdtime.gov.tw

tick.stdtime.gov.tw

tock.stdtime.gov.tw

watch.stdtime.gov.tw
clip_image014

clip_image015

此處請改為 UTF8

clip_image017

請視需求選取

clip_image019

一般使用毋須建立

clip_image021


clip_image023

clip_image025

clip_image027

clip_image028clip_image030

clip_image032

clip_image034


clip_image037

clip_image039

clip_image041

管理員電子郵件地址: administrator@smb.local
時區: Asia/Taipei
時間設定: 使用 NTP 伺服器
NTP 伺服器名稱:
time.stdtime.gov.tw
clock.stdtime.gov.tw
tick.stdtime.gov.tw
本機網域: smb.local
系統地區設定: 中文 (台灣)
遞補語言編碼: Unicode (UTF-8)
使用 HTTP 代理伺服器: 否
虛擬 IP 說明: Virtual 1:1
虛擬 IP 位址: 192.168.1.201
虛擬 IP 網路遮罩: 255.255.255.0
虛擬 IP 網路: 192.168.1.0
虛擬 IP 廣播: 192.168.1.255
郵件過濾: 入埠和離埠郵件過濾
入埠郵件位址: 192.168.1.200
入埠郵件通訊埠: 25
入埠郵件連線: 接受來自所有 IP 位址
離埠郵件位址: 192.168.1.201
離埠郵件通訊埠: 25
離埠郵件用戶端: 192.168.1.200
離埠郵件用戶端: 192.168.1.121
本機轉遞位址: 192.168.1.121
本機轉遞通訊埠: 25
本機轉遞 MX 查詢: 否
非本機轉遞位址: 使用預設 MX 查詢
即時通訊過濾: 已停用

clip_image043

clip_image045