漫遊使用者能否在 PGP 下正常運作?

漫遊使用者可以在 PGP 下正常運作

請參考以下測試

Roaming_user account is a roaming user

clip_image002

Windows7-temp.elite2003.intra is a domain computer and has installed the PGP client program,then the boot partition was encrypted.

clip_image003

We log out the current user and login with Roaming_user account.

clip_image004

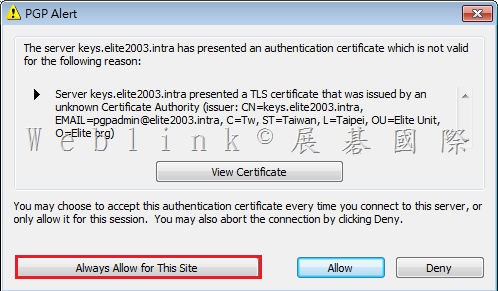
As the same step,you must press the [ Always Allow for This Site ] to accept the Certificate.(We will use the publish CA and you will not see the PGP Alert. )

clip_image005

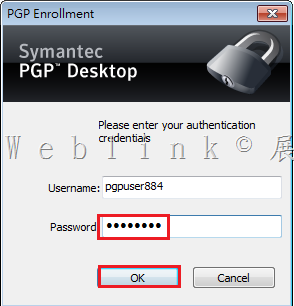
Please type the password for this domain roaming user.

clip_image006

After the silent enrollment finished,you can see the domain roaming user become a bootguard user.

This means that the domain roaming user account can pass the bootguard anthentication then single-sign-on to the Windows on this computer.

So if the domain roaming user account can login to any computer and enroll to the PGP Encryption Managemnet Server,it will work fine on these computers.

clip_image007

Document\PGP\ can be created and you can find the PGP key pair.

\\192.168.181.121\profiles\roaming_user.V2\Documents\PGP

clip_image008

User the domain roaming user to another computer

clip_image001

Type the password for this domain roaming user.

clip_image002

Enrolling to the PGP Encryption Managemnet Server

clip_image003[4]

After the silent enrollment finished,you can see the domain roaming user become a bootguard user.

clip_image004[4]

Review the roaming user profile document folder

clip_image005[4]

View the record on the console

image

The roaming user also create a local user profile on local,you can find the PGP key pair in the c:\users\%username%\Documents\PGP,so it is working fine if the roaming user is offline.


image

Restoring Encryption Management Server Backups larger than 2GB

http://www.symantec.com/business/support/index?page=content&id=TECH149146

Issue

Due to a limitation of Apache, it is not possible to restore backups of 2GB or greater using the Encryption Management Server (previously PGP Universal Server) administrative interface.  To restore backups larger than 2GB requires accessing the server from the command-line interface.


Accessing the Symantec Encryption Management Server (SEMS) command line for read-only purposes (such as to view settings, services, logs, processes, disk space, query the database, etc) is supported. However, performing configuration modifications or customizations via the command line may void your Symantec Support agreement unless the following procedures are followed.

Any changes made to SEMS via the command line must be:

  • Authorized in writing by Symantec Support.
  • Implemented by a Symantec Partner, reseller or Symantec Technical Support.
  • Summarized and documented in a text file in /var/lib/ovid/customization on the PGP Universal Server itself.

Changes made through the command line may not persist through reboots and may be incompatible with future releases. Symantec Technical Support may also require reverting any custom configurations on SEMS back to a default state when troubleshooting new issues.

Solution

To restore a backup larger than 2GB in size:

  1. Copy the most current backup file of SEMS to a network drive or other location.
  2. Export the Organization Key of the server from the SEMS administrative interface.
    Note: It is important to export the full keypair with no passphrase. Entering the passphrase will cause the restore process to fail.
  3. Install SEMS from the .iso image.
  4. Import your SSH key to the server.
  5. Import the Organization key to the server.
  6. Connect to the server with WinSCP and copy the backup to the /var/lib/ovid/backups/ directory on the server.
  7. Access the server via SSH. For more information on accessing the server via SSH, see article TECH149673.
  8. Run pgpbackup --restore <backupfile.pgp> --key <orgkeyfile.asc> --done
  9. Restart tomcat using the command: #pgpsysconf --restart tomcat

Access Symantec Encryption Management Server via SSH Using PuTTY

http://www.symantec.com/business/support/index?page=content&id=TECH149673


Issue

To gain command line access to a Symantec Encryption Management Server (previously PGP Universal Server), you will need to create an SSH key.  You can do this using a utility such as PuTTYgen to create an SSH key and PuTTY to log in to the command line interface.  This article details how to utilize PuTTYgen and PuTTY to access Symantec Encryption Management Server (SEMS) .
PuTTY is a freeware suite of SSH tools. The PuTTY suite includes PuTTYgen, PuTTY, PSFTP, and Pageant the PuTTY authentication agent. The PuTTYgen and PuTTY.exe files are also available to be downloaded separately.

Accessing the server command line for read-only purposes (such as to view settings, services, logs, processes, disk space, query the database, etc) is supported. However, performing configuration modifications or customizations via the command line may void your Symantec Support agreement unless the following procedures are followed.
Any changes made to the server via the command line must be: 

  • Authorized in writing by Symantec Technical Support or published as an approved and documented process on the Symantec Knowledge Base.
  • Implemented by a Symantec Partner, reseller or Symantec Technical Support.
  • Summarized and documented in a text file in /var/lib/ovid/customization on the Symantec Encryption Management Server itself.

Note: Changes made through the command line may not persist through reboots and may be incompatible with future releases.  Symantec Technical Support may also require reverting any custom configurations on the server back to a default state when troubleshooting new issues.

Solution

Using PuTTYgen

To create an SSH keypair using PuTTYgen
These steps assume the entire suite of PuTTY utilities is installed on the computer. The following steps may also be performed using the separately downloaded PuTTYgen.exe and PuTTY files. 

  1. Open PuTTYgen.
  2. Confirm the Parameters (at the bottom of the PuTTY Key Generator window) for the type of key to generate. The parameters of the key must utilize one of the SSH2 options. We recommend that you choose SSH-2 RSA (the default). Set the Number of bits to 2048
  3. Create a key pair by clicking on the Generate button in the Actions sectionGenerate some randomness for the key by moving the mouse over the blank area.

image

image

4  .After the key generation is complete, copy the public key block from PuTTY window into a SEMS admin account by performing the following:


5. Copy the public key from the clipboard window in the PuTTY Key Generator where it says “Public key for pasting into OpenSSH authorized_keys file:"

image

6. Log in as a superuser to the server admin interface.

image

7. Select the System > Administrators card then click on a superuser account. Note: It does require the user to be a superuser administrator to use SSH access. Other roles are not supported to use SSH access.

image

8. Click the plus + sign at the end of the SSHv2 Key line. This will bring up a window that displays Update SSH Public Key.

image

9.  Click the Import Key Block radio button and paste the public key block that you just generated with PuTTYgen directly into this block and click the Import button.

image

image

10.  After you upload the key block you will notice the hex fingerprint of the key will now show up in SSHv2 Key line. You can verify that the fingerprint matches the fingerprint found in the Key fingerprintt line on PuTTY Key Generator to verify that the key was imported succesfully

image

image


11.  Click Save and close the administrative interface.

12.  Next go back to your desktop and save the public and private key within PuTTYgen.

image

image

Note: The minimum key size when generating a key is 1024-bit.  Intermittently PuTTYgen may generate a 1024-bit key as a 1023-bit key due to a bug in PuTTYgen. Thereby causing the key not to work properly. The best practice is to generate a key of at least 1025-bit to avoid the potential problem. We recommend generating a key 2048-bit in length to solve this issue.

Access SEMS using PuTTY

Use the following steps to access the command line interface. 

  1. Open PuTTY from the Start menu.

Enter the SEMS hostname (keys.domain.com) or IP address in the hostname field

  1. If not already entered, change the Port field to use port 22.
  2. Select the SSH radio button as the protocol.

image

  1. Click Auth (under Category>Connection>SSH)
  2. Browse to the private key and add the file that you saved and click Open to start a session. You will be prompted to enter a username. 

image

  1. Type: root and press Enter.

image

image


image


【一些 postgres SQL 指令】

show all postpres SQL table

SELECT table_name FROM information_schema.tables WHERE table_schema = ‘public’;

select * from internal_user_name;

select * from whole_disk_recovery_token;

select * from internal_user where desktop_lastseen < NOW() – INTERVAL’1 months’;


select * from internal_user_name;

image

select * from whole_disk_recovery_token;

image


【如何從資料庫中查詢某使用者的 WDRT token】

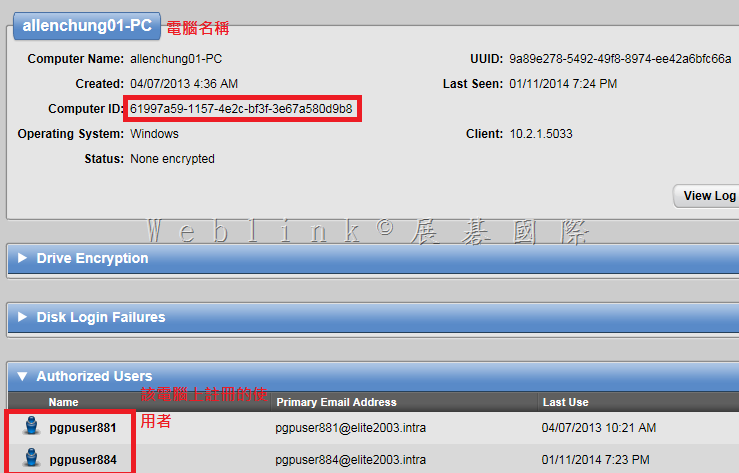
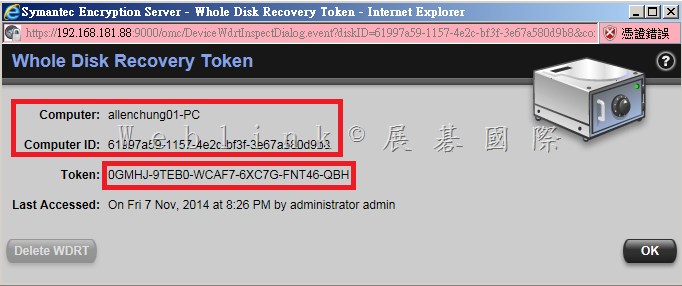
查詢使用者的 WDRT token,並非透過使用者名稱去查詢,而是要透過電腦名稱來查詢,該電腦上若有多個使用者註冊 PGP Universal Server,則每個人的 WDRT token 是相同的
image

image

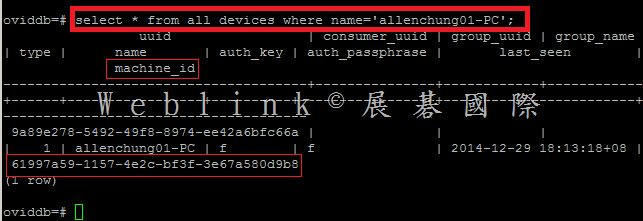
select * from all_devices where name=’allenchung01-PC’;

會查詢到 ‘allenchung01-PC’ 的 machine_id  是  ‘61997a59-1157-4e2c-bf3f-3e67a580d9b8’
image

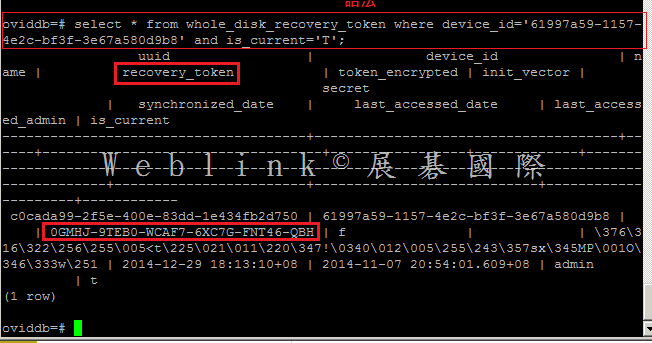
select * from whole_disk_recovery_token where device_id=’61997a59-1157-4e2c-bf3f-3e67a580d9b8′ and is_current=’T’;

查到 Token: 0GMHJ-9TEB0-WCAF7-6XC7G-FNT46-QBH


※ 如果想匯出相關資訊可使用以下指令

psql oviddb ovidr -c “SELECT * FROM whole_disk_recovery_token" > /tmp/WDRT.csv
image


  • If your public key is not accepted by SEMS when you are trying to paste it in from the PuTTYgen window, make sure you are not accidentally adding whitespace when pasting the keyblock.  If it still doesn’t work go through the entire key generation process again. From within Puttygen make sure you have clicked at the very bottom: SSH-2 for the type of key to generate.
  • If your public key is not being accepted and you receive an error stating that the SSH key is not valid when importing to SEMS, this may be due to you saving the key file using the Save public key option in the PuTTY Key Generator utility.  This uses a format that SEMS doesn’t support.  Be sure to copy the key from the portion of the clipboard as described in Step 5 above.
  • The first time you log into SEMS with PuTTY, you will be given a security warning, this is normal.  Just click yes and proceed as above.
  • Saving your session for future use:
    You may want to go back to the (Category > session) tab and type a descriptive name in the box directly under the words Saved Sessions. If you do this and click Save you will notice that the name you typed appears in the larger box as a Saved Session.  Now you will be able to access your configured login for SEMS in the future just by double-clicking on the saved session name.

如何以指令手動建立 PGP 本機帳戶以通過 Bootguard 驗證

指令如下

( 如果硬碟正在加密的同時,此指令仍可正常執行 )

cd C:\Program Files\PGP Corporation\PGP Desktop

pgpwde –add-user –disk 0 –username “Ben" –passphrase benben –admin-passphrase p@ssw0rd

【指令說明】

pgpwde –add-user –disk 0 –username “Ben(使用者名稱)" –passphrase benben(密碼) –admin-passphrase p@ssw0rd(WDE admin 密碼)

(詳細的指令說明可參考以下 PDF 文件)

http://www.wellife.com.tw/symantec/wp-content/uploads/sites/4/2014/10/pgpWDEcmdline_1000_usersguide_en.pdf

範例1:建 Local Boot Guard user account


clip_image001

clip_image002


範例2:建 Domain SSO user account
 
image

PGP 安裝完成後,在用戶端介面中找不到硬碟可加密 (或是出現 unknown error 11980)

目前 PGP 不支援 4K sector byte size,僅支援 512 sector byte size

請參考

http://www.symantec.com/business/support/index?page=content&id=TECH173657

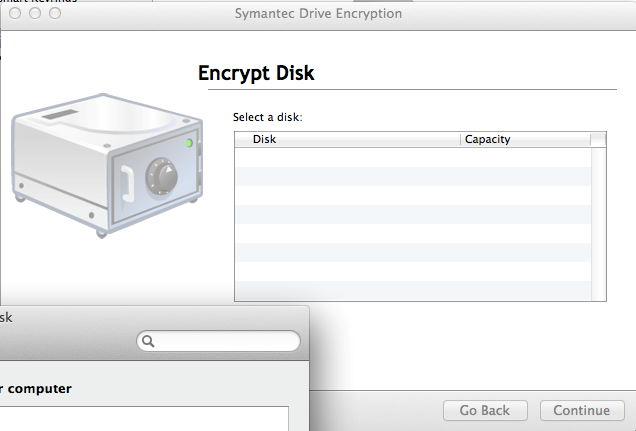
image

以下是 PGP 安裝完成後,在 Mac 用戶端介面中找不到硬碟可加密的畫面

您可以參考以下網頁來確認 sector byte size

【Symantec Drive Encryption How to find the sector byte size】

http://www.symantec.com/business/support/index?page=content&id=TECH198917

For Windows

在命令提示字元輸入 fsutil fsinfo ntfsinfo c:

image

For Mac

請參考以下網頁

輸入

diskutil info /| grep “Block Size"

http://apple.stackexchange.com/questions/78802/what-are-the-sector-sizes-on-mac-os-x

$ diskutil info /| grep "Block Size"

image

已安裝 Symantec Drive Encryption (PGP WDE) 且已完成加密的用戶端,如何在不解密的狀況下,移轉到新的 PGP 主控台?

Description:

http://www.symantec.com/docs/HOWTO79579

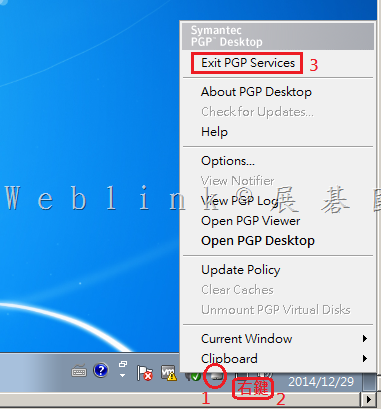
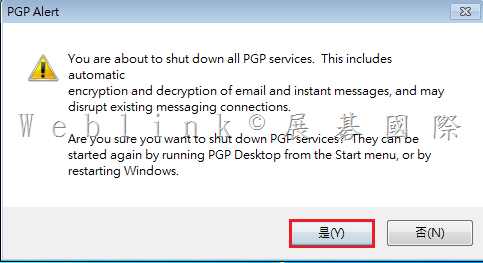
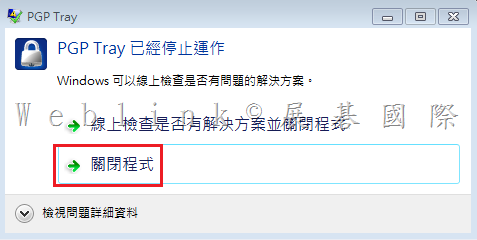
1. Click on the Symantec Encryption Desktop icon by the time, in the task bar and click Exit PGP Services.

 image


image


image


2. Delete the Symantec Encryption Desktop client preferences:

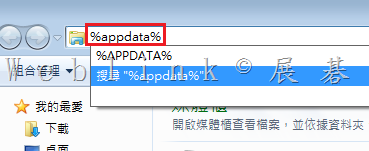
Click Start > Run… on Windows XP or Click Start and type “%appdata%" on Windows Vista or Windows 7.

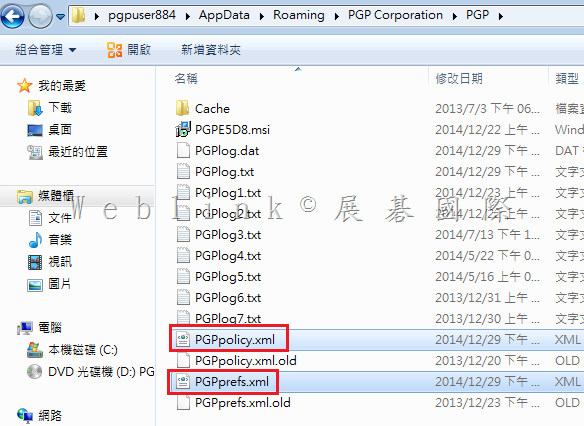
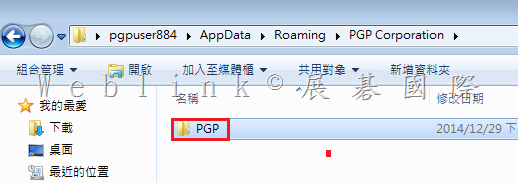
Change directory into PGP Corporation/PGP and delete PGPpolicy.xml and PGPprefs.xml.

開啟檔案總管,在路徑中輸入 【%appdata%】 並按下 【Enter】

 image

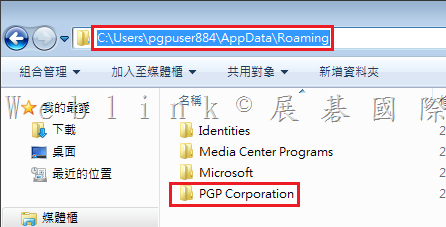
双按【PGP Corporation】

image

双按【PGP】

image

刪除【PGPpolicy.xml】與【PGPprefs.xml】

image

3. Update the PGPSTAMP registry entry to point to the new Symantec Encryption Management Server:
Click Start>Run… on XP or Click Start and type regedit on Vista or Windows 7.
Browse to this Key name:
64 bit system:
HKEY_LOCAL_MACHINE\SOFTWARE\Wow6432Node\PGP Corporation\PGP
32 bit system:
HKEY_LOCAL_MACHINE\SOFTWARE\PGP Corporation\PGP

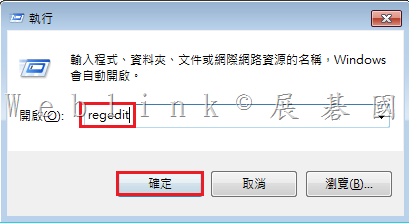
按下鍵盤的【Windows 鍵】+【R】,並輸入【regedit】來開啟註冊機碼編輯器

image

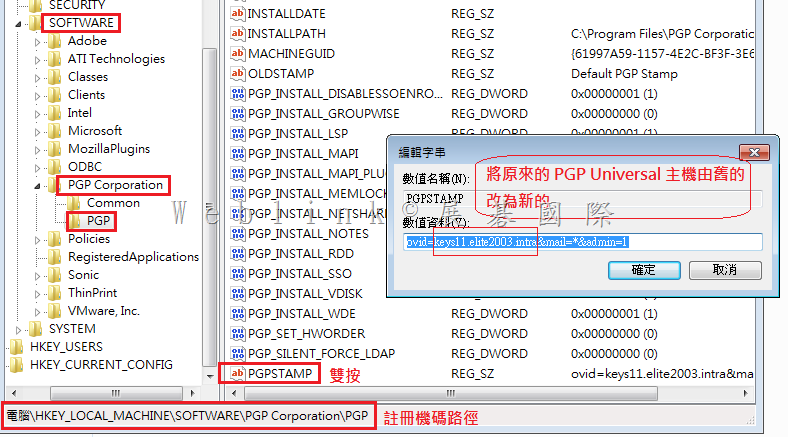
此畫面為 Windows 7 32 位元,路徑為【HKEY_LOCAL_MACHINE\SOFTWARE\PGP Corporation\PGP】

Right-click the string value “PGPSTAMP" and select Modify to change the Value data from “ovid=<Old Symantec Encryption Management Server name>&mail=*&admin=1″ to “ovid=<New Symantec Encryption Management Server FQDN>&mail=*&admin=1″ without the quotes.

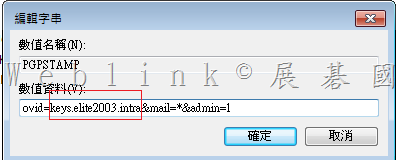
將值由舊的 ovid=<keys11.elite2003.intra>&mail=*&admin=1 (舊主控台的 FQDN)

   改為新的 ovid=<keys.elite2003.intra>&mail=*&admin=1 (新主控台的 FQDN)

image

新的 ovid=<keys.elite2003.intra>&mail=*&admin=1 (新主控台的 FQDN)

image

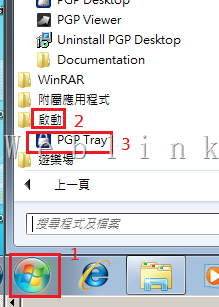
3.  Restart PGP services:
Click Start > All Programs > Startup > PGP Tray.
This will prompt Symantec Encryption Desktop to contact the new server for enrollment.

重啟用戶端 PGP 服務

image

新的 PGP server 會要求重新註冊,請按下【Always Allow for This Site】來重新註冊

image

因為是整合 AD 驗證,目前登入的網域使用者帳戶會自動帶出,請輸入該網域使用者的網域密碼,即可完成 PGP client 的移轉

image

Symantec Drive Encryption (PGP WDE) 用戶端支援列表

【Apple Mac OS X】

PGP is supported on single Mac platform

Meet the OS version requirements
OS 10.8.4, 10.8.5, 10.9.0 ~ 10.9.4

non-support

1.Other encryption applications installed
2.Bootcamp system
3.Non-intel chips
4.Open FileVault
5.Disks formatted using the APM partition scheme
6.Any type of server hardware, including RAID disk drives and software RAID drives
7.Diskettes and CD-RW/DVD-RWs
8.exFAT formatted disks
9.Any configuration where the system partition is not on the same disk as boot partition

other

1.only support Intel based,and disk type are GPT or MBR, not support APM.(KB http://www.symantec.com/docs/TECH149141)
2.support 10.9.4 now.(http://www.symantec.com/docs/TECH174563)

【Ubuntu】

PGP is supported on single Ubuntu platform

Meet the OS version requirements
10.04 LTS
12.04 LTS – 12.04.1, 12.04.2, 12.04.3

non-support

1.Other encryption applications installed
2.Kernel Version higher than 3.8.0-29-generic

other

1.12.04 0nly support kernel 3.8.0-29-generic(KB http://www.symantec.com/docs/HOWTO42122)
2.There are no plans to support Ubuntu 11.04 now or in a future release.(KB http://www.symantec.com/docs/TECH198150)

【Windows】

PGP is supported on single Windows platform

Meet the OS version requirements
Microsoft Windows 8, 8.1 Enterprise (32 bit and 64bit version)
Microsoft Windows 8, 8.1 Pro (32 bit and 64-bit version)
Microsoft Windows 7 (All 32 bit and 64 bit version, including Service Pack 1)
Microsoft Windows Vista (All 32 bit and 64 bit version, including Service Pack 2)
Microsoft Windows XP Home Edition (Service Pack 2 above)
Microsoft Windows XP Professional 64-bit (Service Pack 2 above)
Microsoft Windows XP Professional 32-bit (Service Pack 2 above)

non-support

1.Other encryption applications installed
2.Dynamic disks
3.SCSI drives/controllers
4.Software RAID disks
5.Diskettes and CD-RW/DVD-RWs

【Dual OS for Mac boot cam】

PGP is not supported on Mac Boot Cam

【Dual OS : Mac platform with Windows OS running on the parallels software】

PGP is supported on multi-OS, just install PGP in Mac platform

【Dual OS : Ubuntu and Windows running on the Ubuntu boot service (GNU GRUB)】

PGP is supported on multi-OS, just install PGP in Windows platform, then install PGP in Ubuntu platform

【Unsupported Disk Format】

Windows
.Dynamic disks
.SCSI drives/controllers
.Software RAID disks
.Diskettes and CD-RW/DVD-RWs
Mac OS X
.Disks formatted using the APM partition scheme
.Any type of server hardware, including RAID disk drives and software RAID drives
.Diskettes and CD-RW/DVD-RWs
.exFAT formatted disks
.Any configuration where the system partition is not on the same disk as boot partition
.Starting from version 10.3.2, Symantec Encryption Desktop is not compatible with
    Apple Boot Camp on any Apple Mac OS X system

為了防止系統出現問題或是Hibernation 回復時資料的遺失,PGP WDE disable Mac OS X Hibernation function

由於 PGP WDE 在處理 Mac OS X Hibernation 回復時,會使用到一個特殊的檔案,但 Mac OS X Hibernation 回復時是拒絕任何外來檔案
所以為了防止系統出現問題或是Hibernation 回復時資料的遺失,PGP WDE disable Mac OS X Hibernation function

http://www.symantec.com/business/support/index?page=content&id=TECH149486&viewlocale=en_US

Mac OS X

PGP Whole Disk Encryption is not supported with hibernation mode in the Mac OS X. In Mac OS X, an image file is created upon hibernation of the system. Once power is restored, the state of the system is restored, including any open programs or other processes that were running. The location of this file is in /var/vm/sleepimage and is the size of RAM memory on the system.

This mode may be referred to as Safe Sleep, Deep Sleep, or Hibernation. This is not the normal Sleep mode in which the power can remain on, but the system is essentially idle. This mode does not keep an image of the processes, but rather the information is stored in the RAM memory.

The Mac OS X operating system does not support foreign file systems for hibernation. Mac OS X Hibernation mode is not supported with “boot != root". This “boot != root" is essentially the system used by Mac to boot a foreign file system. For PGP Whole Disk Encryption to boot a system, a special file system is used which is considered foreign. As PGP Whole Disk Encryption is considered a foreign file system,hibernation mode is not supported by the Mac OS X< /strong>. 
As a safeguard to prevent system issues and data loss, PGP Desktop disables the hibernation mode on Mac OS X. Although Sleep will still work, deep sleep does not build a sleep image

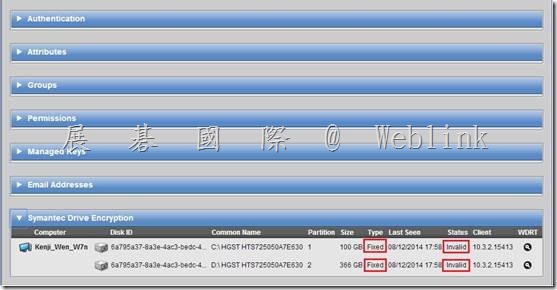
【用戶端硬碟已完成加密,並且能成功進行 policy update,但在主控台 WDE disk Status 卻顯示 Invalid】

WDE Disk Status is Invalid

【用戶端硬碟已完成加密,並且能成功進行 policy update,但在主控台 WDE disk Status 卻顯示 Invalid】

clip_image002

參考官網 KB

KB http://www.symantec.com/business/support/index?page=content&id=TECH149150

http://www.symantec.com/connect/forums/pgp-unable-decrypt-error-12198

解決步驟

1. Click Start.

2. Type regedit in the Start Search field, and then click the regedit result in the Programs list.

clip_image004

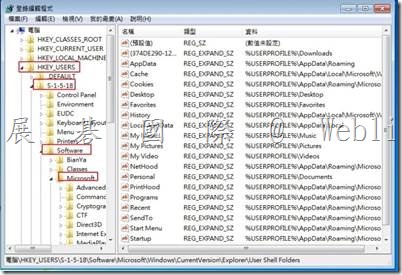
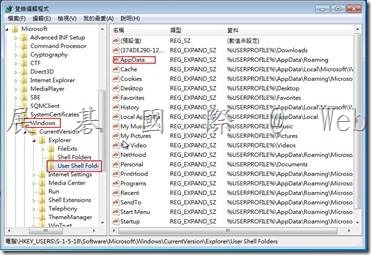
3. Browse to HKEY_USERS\S-1-5-18\Software\Microsoft\Windows\CurrentVersion\Explorer\User Shell Folders.

4. Select the folder and right-click the right pane in the Registry Editor.

clip_image006

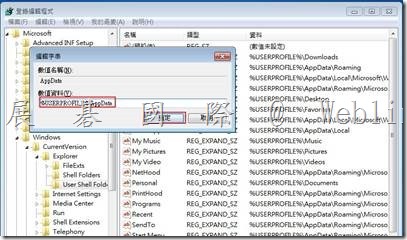
5. Type AppData for the value.

clip_image008

6. Right-click the AppData value and select Modify.

7. Type %USERPROFILE%\Application Data for the Value data and click OK.

clip_image010

8. Close the Registry Editor.

9. Update policy