[SEP] 如何透過裝置控制政策封鎖 USB 外接儲存裝置

1.  開啟「政策」,點選「應用程式與裝置控制」,接著點選「新增應用程式與裝置控制政策」。

image


2.   設定「政策名稱」,接的點選「裝置控制」。

image


3.  於「攔截的裝置」點選「新增」。

image


4.  點選「USB」,接著點選「確定」。

image


5.  可看到「攔截的裝置」已有 USB,接著於「不攔截的裝置」點選「新增」。

image


6.  點選「Human Interface Devices」,接著點選「確定」。

image


7.  設定完成,點選「確定」。

image


8.  指派政策至相關群組,接著點選「是」。

image


9.  選取欲鎖定 USB 的群組,接著點選「指派」。

image


10.  確定指派政策,接著點選「是」。

image


11.  接著點選「用戶端」,選取剛剛所指派的群組,點選「政策」,接著可看到剛剛所套用的「USB Control」政策。

image

密碼變更後 boot-guard的密碼都還是舊的

這與變更密碼的方式有關
請參考以下網頁說明,請透過 Ctrl + Alt + Del 來變更密碼,這樣才能立即同步
Symantec – Changing Your Windows Password with PGP WDE With Single Sign-On
https://support.symantec.com/en_US/article.HOWTO79569.html

Description
To synchronize your Windows password changes with PGP Whole Disk Encryption (PGP WDE), you must change your password for Single Sign-On using the Change Password feature in the Windows Security dialog box, which you access by pressing Ctrl+Alt+Del.
Note: You may also change your password when prompted by Windows that your password will expire during logging in.
To change your passphrase
1.  Press Ctrl+Alt+Delete.
2. Type your old password.
3. Type and confirm your new password.
4. Click OK.
Single Sign-On automatically and transparently synchronizes with this new password with your PGP WDE passphrase. You can use the new password immediately, in your next login attempt.

Caution: If you change your password in any other manner—via Domain Controller, the Windows Control Panel, via the system administrator, or from another system—your next login attempt on the PGP BootGuard screen will fail. You must then supply your old Windows password. Successful login on the PGP BootGuard screen using your old Windows password then brings up the Windows Login username/password screen. You must then log in successfully using

P.S.

Symantec – How to change-update the SSO passphrase over the PGP WDE command line, if it has not synched with the PGP Bootguard.

https://support.symantec.com/en_US/article.TECH149263.html

If your Windows password has not synchronized with your PGP BootGuard passphrase, you can synchronize your new Windows password with the PGP BootGuard passphrase using the pgpwde tool.

To use the pgpwde tool:

Windows XP

  1. Click Start>Run.
  2. Type cmd in the Open field and click OK.
  3. Change to the Program Files\PGP Corporation\PGP Desktop directory.
    • Type the following at the command prompt (non-domain):
      pgpwde –change-passphrase –disk 0 –user username –passphrase ‘yourpassphrase’ –new-passphrase ‘yournewpassphrase’
    • Type the following at the command prompt (domain):
      pgpwde –change-passphrase –disk 0 –user username –domain ‘domainname’ –passphrase ‘yourpassphrase’ –new-passphrase ‘yournewpassphrase’
  4. Press Enter.

Windows Vista & Windows 7 32-bit

  1. Click Start>Run.
  2. Type cmd in the Start Search field.
  3. Click cmd from the list of Programs.
  4. Change to the Program Files\PGP Corporation\PGP Desktop directory.
    • Type the following at the command prompt (non-domain):
      pgpwde –change-passphrase –disk 0 –user username –passphrase ‘yourpassphrase’ –new-passphrase ‘yournewpassphrase’
    • Type the following at the command prompt (domain):
      pgpwde –change-passphrase –disk 0 –user username –domain ‘domainname’ –passphrase ‘yourpassphrase’ –new-passphrase ‘yournewpassphrase’
  5. Press Enter.

Windows Vista & Windows 7 64-bit

  1. Click Start>Run.
  2. Type cmd in the Start Search field.
  3. Click cmd from the list of Programs.
  4. Change to the Program Files (x86)\PGP Corporation\PGP Desktop directory.
    • Type the following at the command prompt (non-domain):
      pgpwde –change-passphrase –disk 0 –user username –passphrase ‘yourpassphrase’ –new-passphrase ‘yournewpassphrase’
    • Type the following at the command prompt (domain):
      pgpwde –change-passphrase –disk 0 –user username –domain ‘domainname’ –passphrase ‘yourpassphrase’ –new-passphrase ‘yournewpassphrase’
  5. Press Enter.

Your PGP WDE passphrase is synchronized with your new Windows password.

Symantec Drive Encryption (Managed by SMES) upgrade to 3.3.2 MP10 issue

Our company used the Symantec Drive Encryption (managed by Symantec Encryption Management Server (SEMS) and integrate with AD authentication and single sign on).

We always upgrad the Symantec Encryption Management Server (SEMS) to the latest version and it almost works normally.

This time we upgrad the Symantec Encryption Management Server (SEMS) to the (3.3.2 MP10) version.

We found if we install a new PC and use the user account (existed in SEMS) to enroll to the SEMS and the Encryption Deaktop Setup Assistant wizard asked to enter the passphrase.

But we can not enter the current domain password (it display “The passprase did not match of the key” ).

It must enter the old domain password (when the user account enrolled to the SEMS first time).

clip_image001

If we didn’t enter the match passphrase we can not press next button.

clip_image002

clip_image003

clip_image004

We refered to the URL below.

It says:

If using Silent Enrollment, we recommend using SKM mode only. Otherwise, a GKM key will be created, using their current Windows passphrase when they first enroll, but the passphrase on that key will not change, so after several Windows passphrase changes, the user will likely not remember the GKM key passphrase.

So we unchecked the Guarded Key Mode (GKM) in the key mode setting Under the LAB and the issue solved.

http://www.symantec.com/connect/forums/single-user-issue-multiple-machines

clip_image006

The key mode change to CKM.

clip_image007

1.We want to know why the (3.3.2 MP10) version has this issue?

Our company used the Symantec Drive Encryption (managed by Symantec Encryption Management Server (SEMS) and integrate with AD authentication and single sign on).

【We use the GKM mode】

If we install a new PC and use the user account (existed in SEMS) to enroll to the SEMS and the Encryption Deaktop Setup Assistant wizard asked to enter the passphrase.

The passphrase must be the original one,not the current domain password.
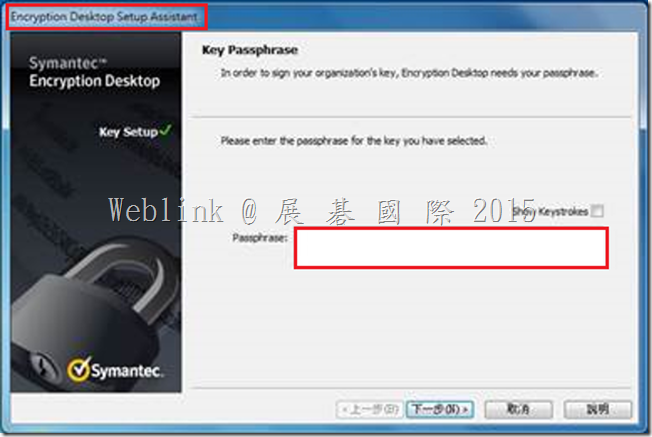
clip_image001

(1) In ( 3.3.2 MP10 )

It display “The passprase did not match of the key”.

And we can not press 【next】 to ignore it,and we can not do any configuration on PGP client.

image

(2) In ( 3.3.2 MP7 and earlier version )

It display “The passprase did not match of the key”.

But we can press 【next】 to ignore it,so we can encrypt th disk.

image

(3) If we unchecked the GKM then the user key change to CKM.

We install a new PC and use the user account (existed in SEMS) to enroll to the SEMS .

It doesn’t ask to enter the passphrase.

We don’t unchecked the GKM in the production environment because we are not sure what effects will be occured.
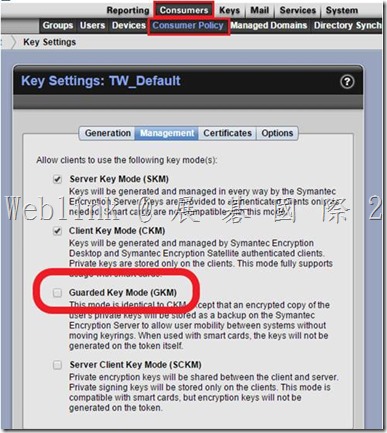
clip_image006

2.What different between check and uncheck the Guarded Key Mode (GKM)?

3.Any effects if we uncheck the Guarded Key Mode (GKM) in the production environment?

4.What is the correct setting for our environment?

【Information form Symantec Connect】

https://www-secure.symantec.com/connect/forums/symantec-drive-encryption-managed-smes-upgrade-332-mp10-issue#comment-form

1. During initial enrollment the users domain password is not used in GKM key mode. The PGP key and passphrase do not have the ability to use SSO(single sign on), the passphrase is assigned to the key in GKM mode when the user manually types their passphrase in the key generation wizard box. This passphrase for the PGP key does not sync with users Windows passwords. If you want to change the passphrase you must do so manually by selecting Symantec Encryption Desktop>PGP Key> Select the key>Change passphrase. It will ask for the old passphrase if it’s not cached and then it will let you update the passphrase. 

2. If you are only using Symantec Drive Encryption for your environment, then I would suggest using SKM key mode as this keymode requires that the users don’t need to maintain and remember their passphrase. The Server manages the key and never asks for a passphrase to use these keys. PGP keys have nothing to do with Symantec Drive Encryption unless you manually put them on a Smart Card or Token and then use that for authentication. By default Symantec Drive Encryption uses passphrase user for access and doesn’t require a PGP key to do the intial encryption.

I would recommend you open a support ticket so they can help you figure out a solution to get the users off of GKM key mode. GKM keymode will be problematic since the users don’t use the PGP key. They will forget the passphrase and you will run into an issue attempting to re-enroll or enroll on new machines. I always recommend SKM keymode for Drive Encryption only environments. 

I would not recommend you just select CKM keymode since it’s not fixing the issue. It will just add to the confusion in the future. The user will have a keypair that they don’t know or remember the passphrase. There are certain operations that require the users know the passphrase to function properly. I’m very suprised that the enrollment wizard allows you to bypass this section without knowing the passphrase to the key even in CKM mode. That seems like a defect to me since the users will have broken keys if they don’t know the passphrase. 

[SEP] 如何使用管理主控台升級用戶端程式

1.   選取「管理員」,點選「安裝套件」,接著點選「用戶端安裝套件」,接著選取欲升級的版本,最後點選「使用套件升級用戶端」。
image


2.   點選「下一步」。
image


3.   選取欲升級的版本,接著點選「下一步」。

image


4.   選取欲升級的群組,接著點選「下一步」。

image


5.   確定檔案來源,接著點選「升級設定」。

image


6.   於「一般」頁籤確定,安裝的功能和安裝的設定,確定是否需設定升級排程。

image


7.   選取「通報」頁籤,確定是否彈出訊息通知使用者,以及設定是否「允許使用者延後升級程序」,最後點選確定。

image


8.   點選「下一步」。

image


9.   點選「完成」。

image


10.   點選「用戶端」,選取剛剛設定的群組,選取「安裝套件」,即可看到剛剛所設定升級的套件。

image

[SEP] SEP 12.1.6 MP1 支援 Windows 10

版本:12.1.6 MP1

Symantec Endpoint Protection(SEP)12.1.6 MP1 / MP1A 增加支援 Windows 10。

升級到 Windows 10 與 SEP 安裝

當安裝 Symantec Endpoint Protection 12.1.6 MP1 或 12.1.6 MP1A 時,可以升級至 Windows 10 但必須先更新病毒和間諜軟件防護的病毒定義檔為 2015年 7 月 27 日之後的版本。

image

以及,消除程式版本為:115.1.1.10

image


若,未完成上述事項,當升級時如果它檢測到的 Symantec Endpoint Protection 的舊版本操作系統升級停止。則必須先卸載舊版的 Symantec Endpoint Protection。

image


以下系統升級安裝 12.1.6 MP1 或 12.1.6 MP1A 支援。 

Windows 8.1 到 Windows 10
Windows 8 到 Windows 10
Windows 7 到 Windows 10

※升級從 Windows 7 到 Windows 10 時的限制

Windows 7 中不包括提前啟動反惡意軟件(ELAM)。因此,Symantec Endpoint Protection ELAM 組件未啟用,並且不支持升級後到  Windows 10 與安裝 Symantec Endpoint Protection。

要允許 Symantec Endpoint Protection 承認 ELAM 並啟用 Symantec Endpoint Protection ELAM 組件,您必須卸載並重新安裝的Symantec Endpoint Protection。修復安裝無法修復這個問題。


https://support.symantec.com/en_US/article.INFO2746.html

[DIS] 4.5 主控台安裝

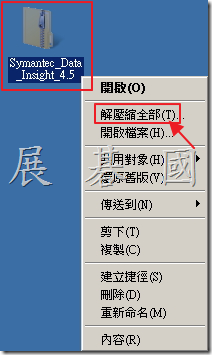
1.   將下載的安裝壓縮檔解壓縮。

image


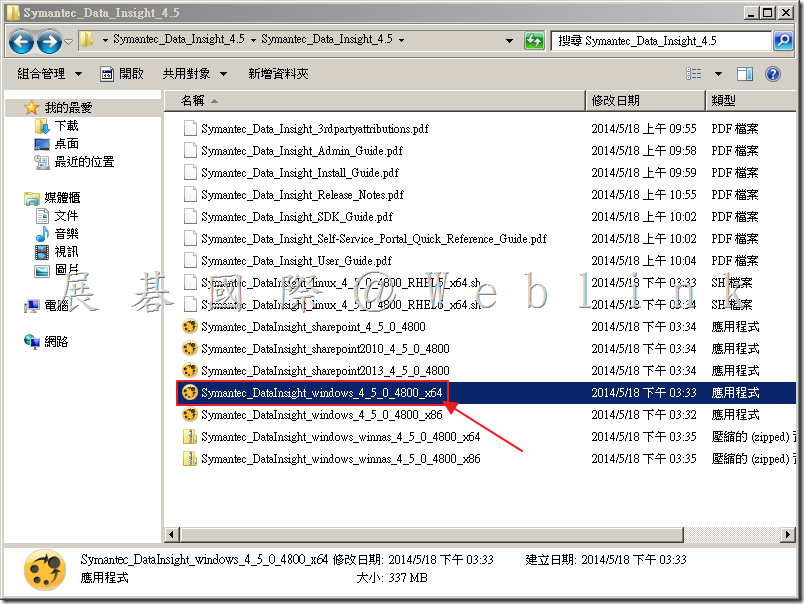
2.   依照系統需求選取安裝檔,執行。

image


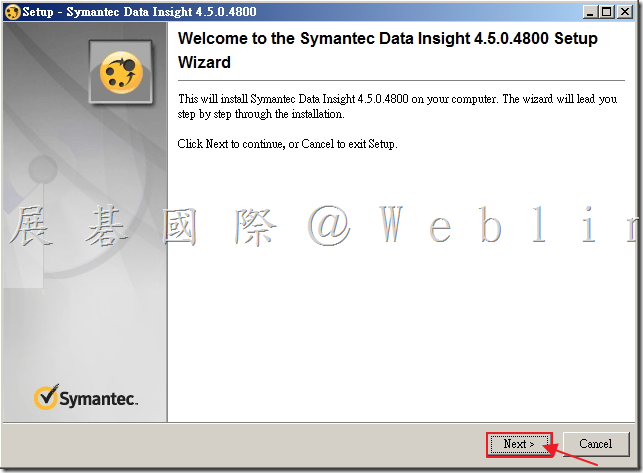
3.   點選「Next」。

image


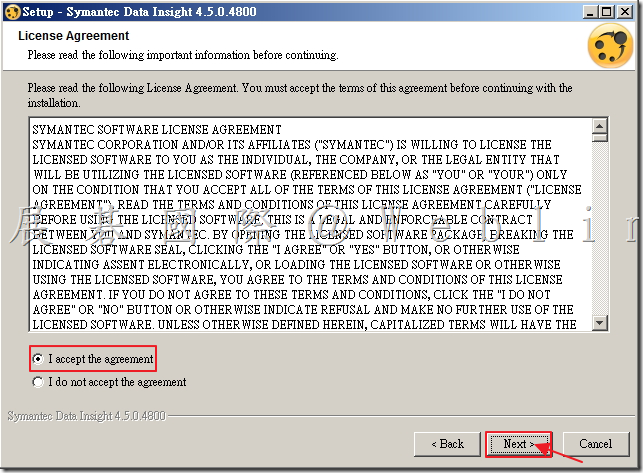
4.   點選「I accept the agreement」,接著點選「Next」。

image


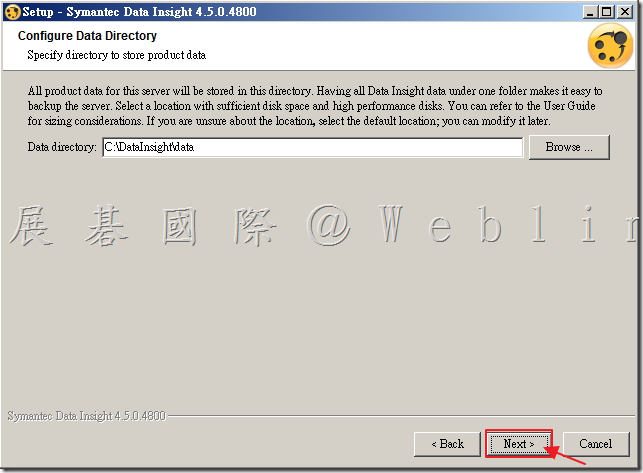
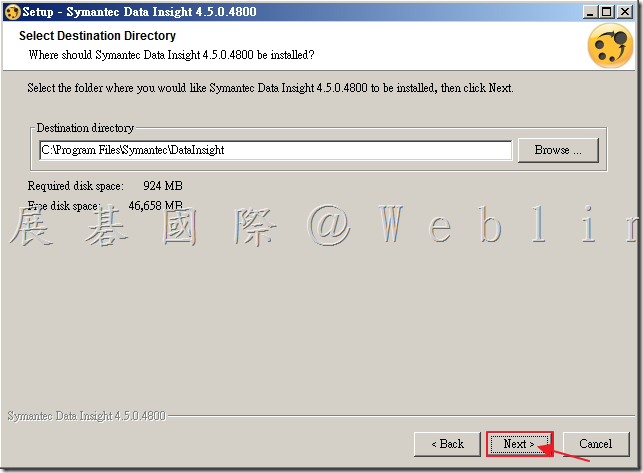
5.   確定安裝路徑,接著點選「Next」。

image


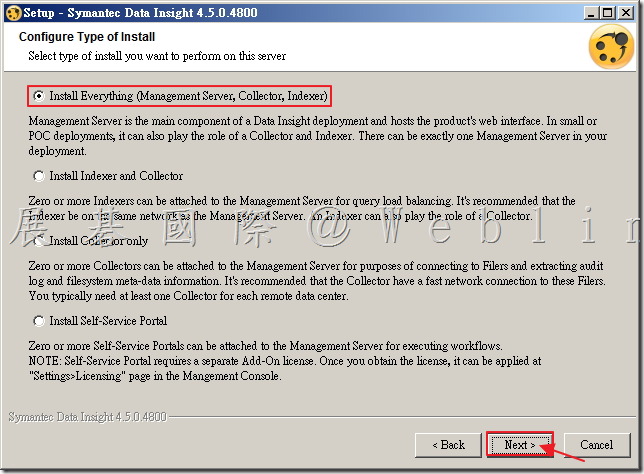
6.   點選「Install Everying」,接著點選「Next」。

image


7.   點選「Next」。

image


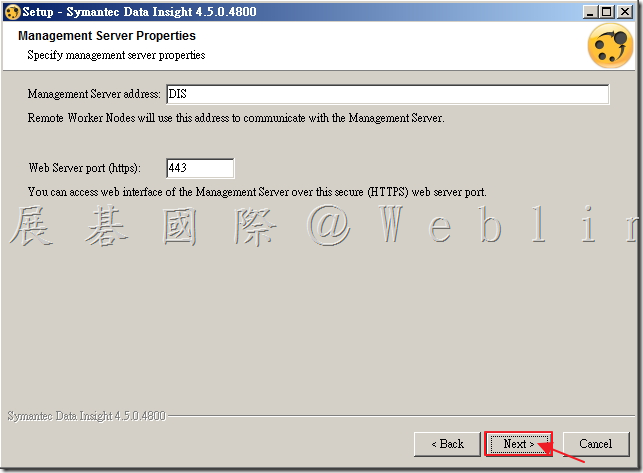
8.   確定連線資訊,接著點選「Next」。

image


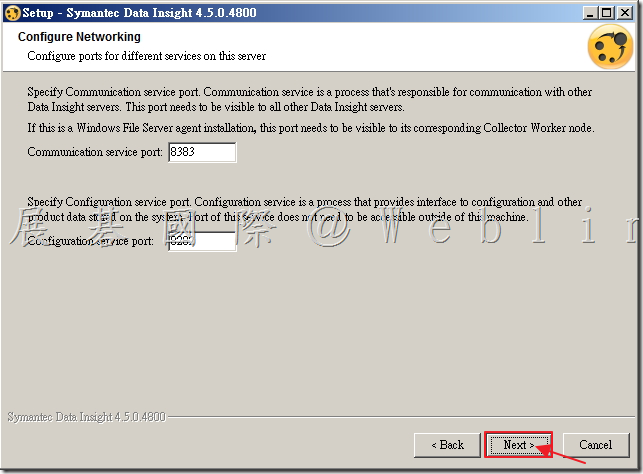
9.   確定埠號,接著點選「Next」。

image


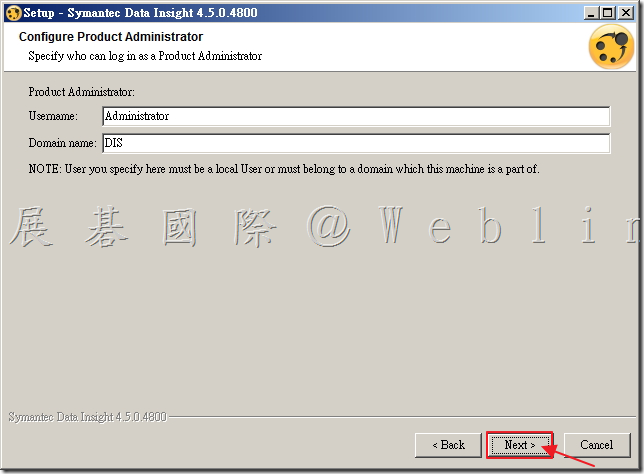
10.   確定帳號,接著點選「Next」。

image


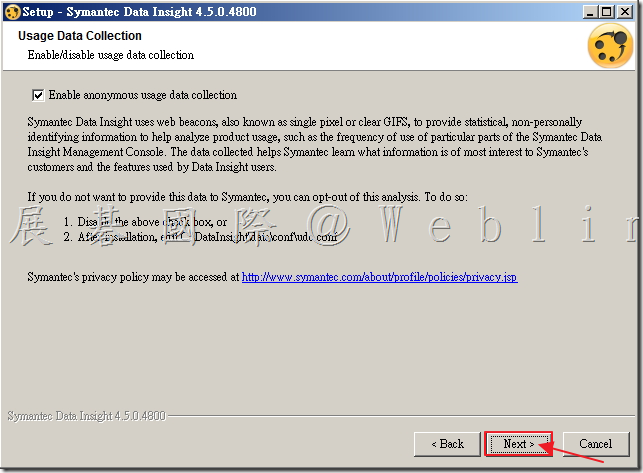
11.   點選「Next」。

image


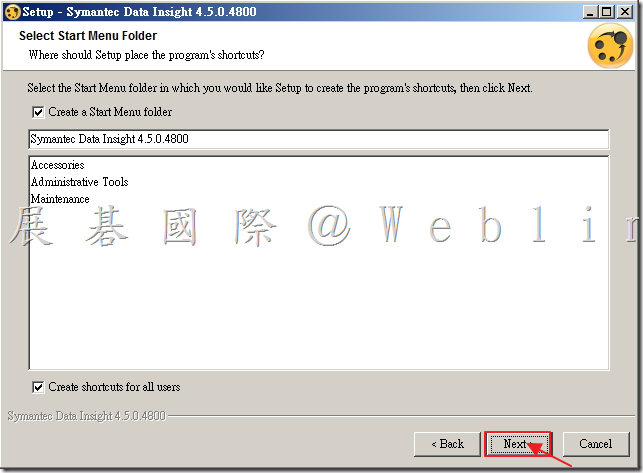
12.   點選「Next」。

image


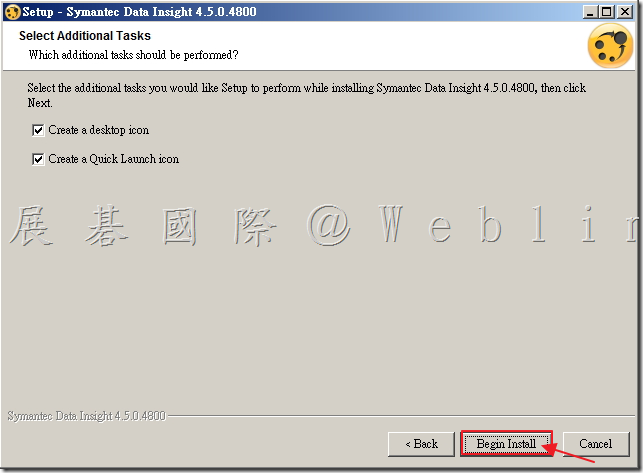
13.   點選「Being Install」。

image


14.   安裝中。

image


15.   安裝完成,點選「Next」。

image


16.   安裝完畢,點選「Finish」。

image


17.   使用本機帳號密碼登入。

image

[SEP] 主控台(SEPM)安裝操作

1.   執行「Symantec_Endpoint_Protection_12.1.6_Full_Installation_CH.exe」。

image


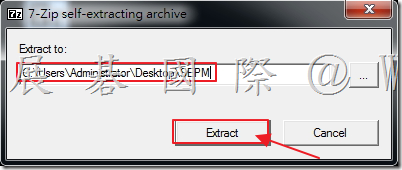
2.   確定檔案解壓縮路徑,點選「Extract」。

image


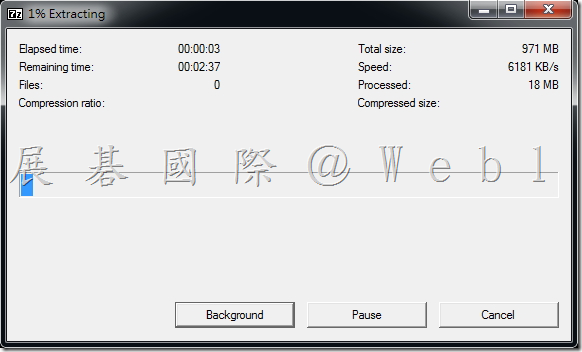
3.   檔案解壓縮中。

image


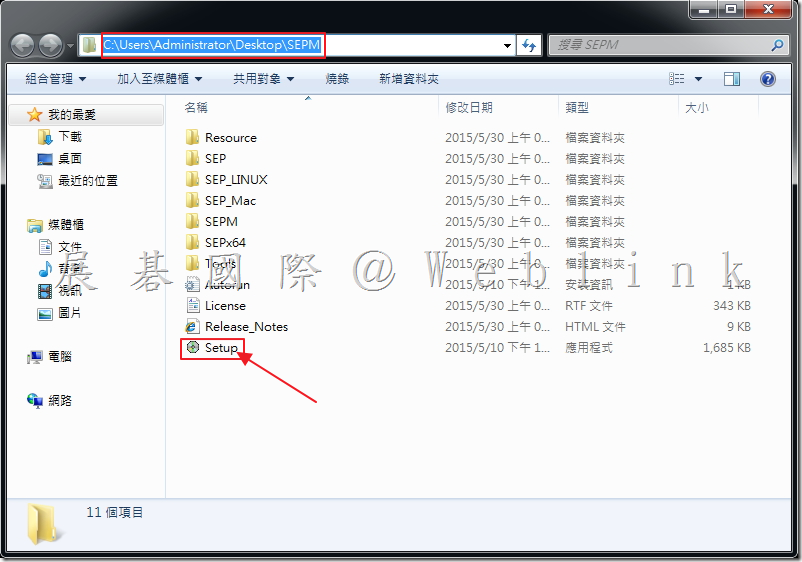
4.   開啟剛剛解壓縮的資料夾,執行「Setup」。

image


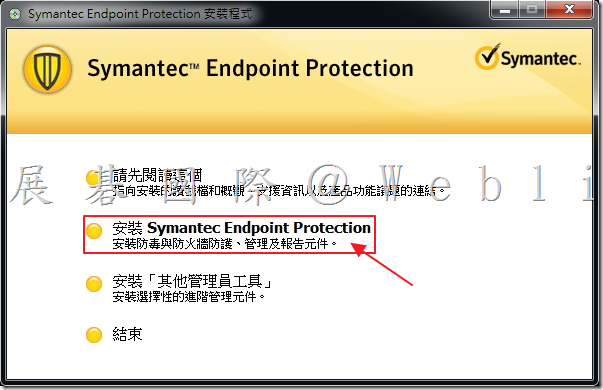
5.   點選「安裝Symantec Endpoint Protection」。

image


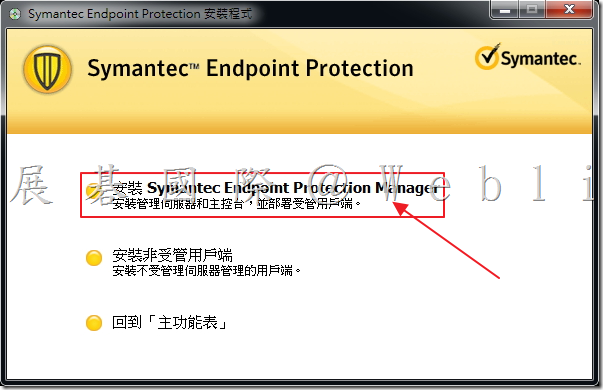
6.   點選「安裝Symantec Endpoint Protection Manager」。

image


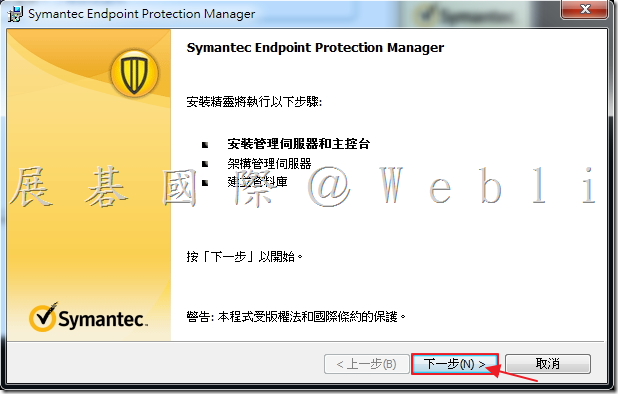
7.   點選「下一步」。

image


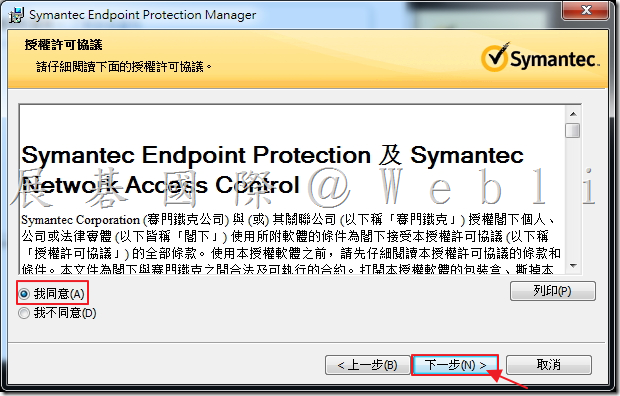
8.   點選「我同意」,接著點選「下一步」。

image


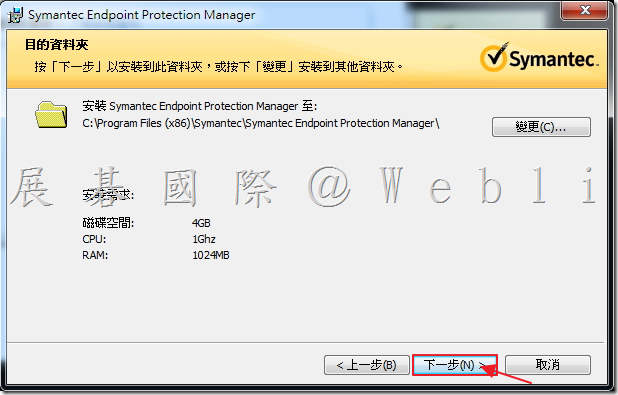
9.   確定系統安裝路徑,接著點選「下一步」。

image


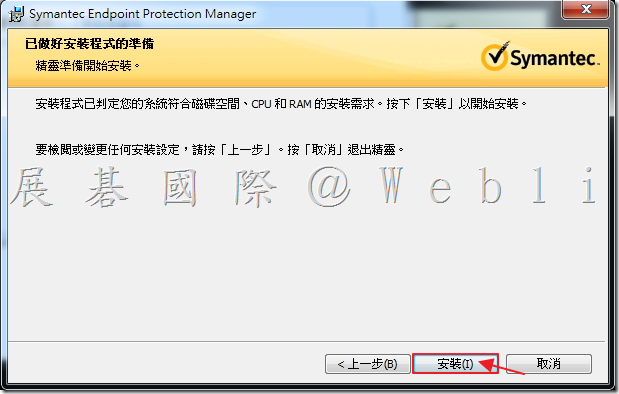
10.   點選「安裝」。

image


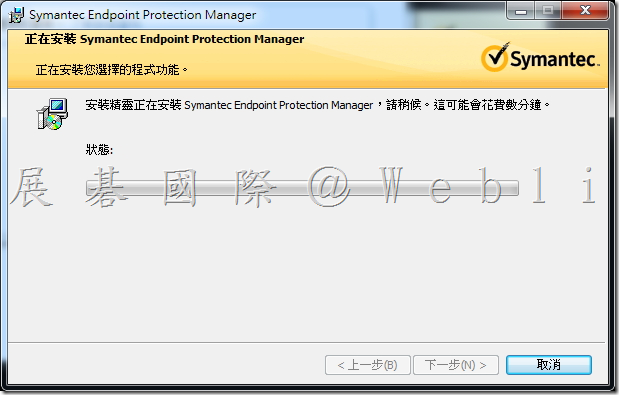
11.   正在安裝程式功能。

image


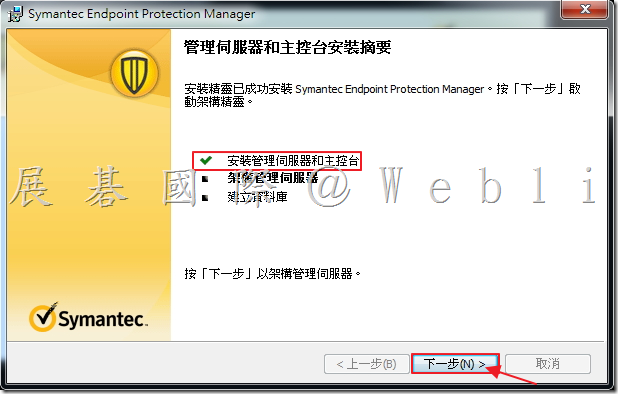
12.   管理伺服器和主控台安裝完成,接著架構管理伺服器,點選「下一步」。

image


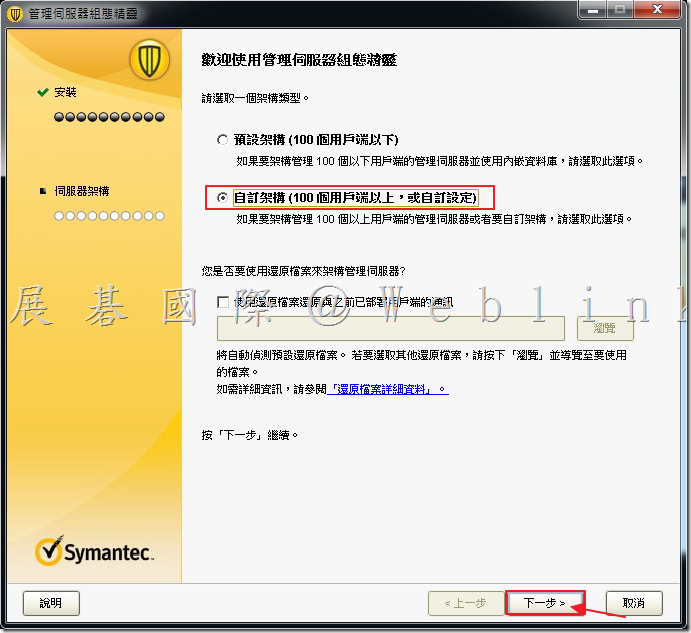
13.   點選「自訂架構」,接著點選「下一步」。

image


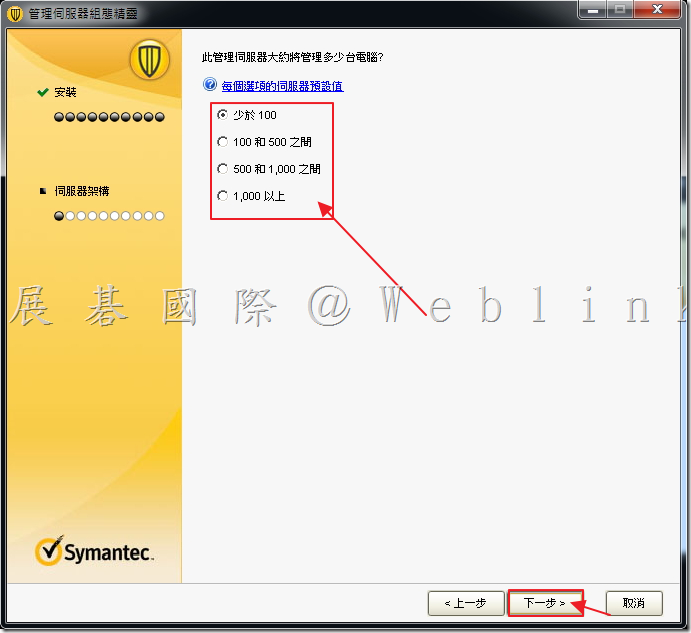
14.   依用戶數量選定,接著點選「下一步」。

image


賽門鐵克會依照不同數量設定不同的系統資源

image


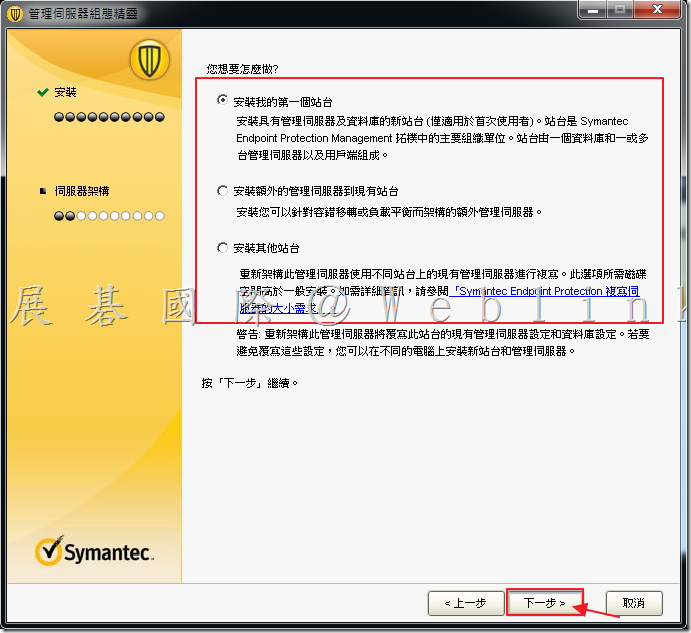
15.   安裝站台(這裡我們假定初次安裝,選擇「安裝我的第一個站台」),接著點選「下一步」。

  • 安裝我的第一個站台:第一個站台架構
  • 安裝額外的管理伺服器到現有站台:容錯或負載平衡(需搭配 MSSQL)
  • 安裝其他站台:進行站台間複寫夥伴機制(內嵌資料庫或 MSSQL)

image


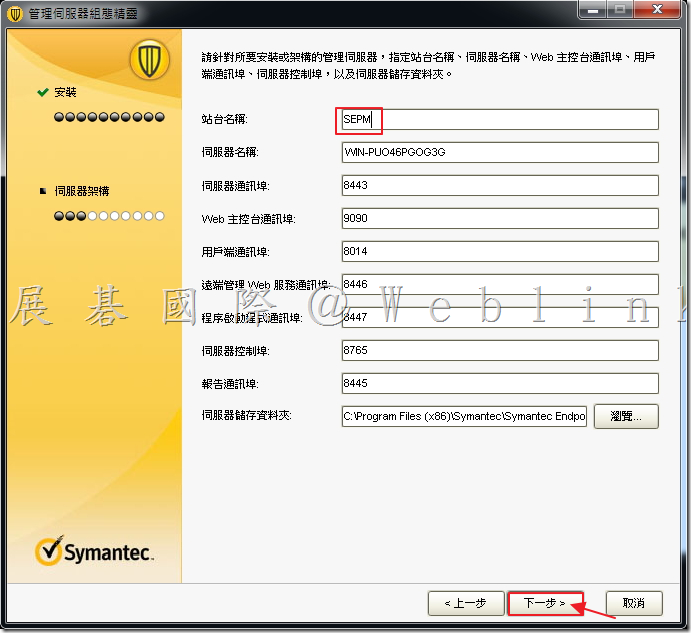
16.   設定站台名稱和其他相關通訊埠,接著點選「下一步」。

image


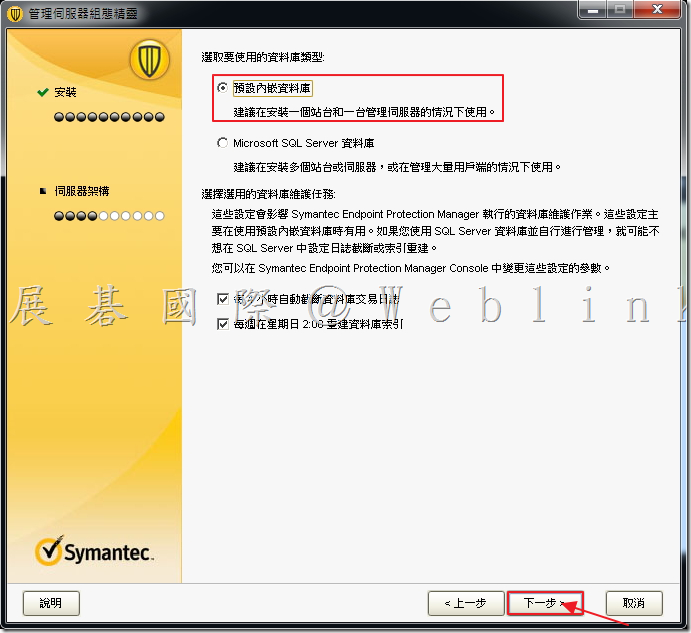
17.   選取資料庫類型,接著點選「下一步」。

  • 內嵌資料庫(範例):建議狀態於1000個以下使用者才選擇使用
  • MSSQL資料庫:需要預先安裝MSSQL的連接工具程式

17.1   選取「預設內嵌資料庫」,接著點選「下一步」。

image


17.2   選取「Microsoft SQL Server 資料庫」,接著點選「下一步」。


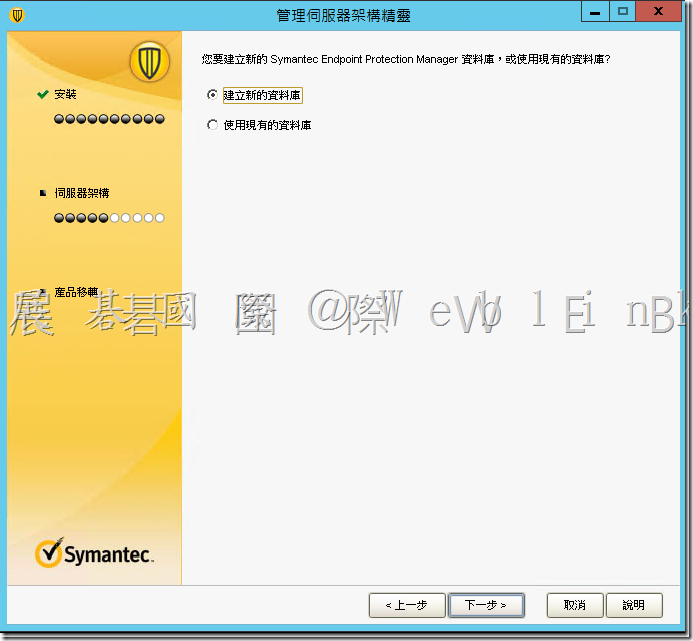
17.3   選擇「建立新的資料庫」或是「使用現有的資料庫」(請依照您環境架構選擇)接著點選「下一步」。

image_thumb34


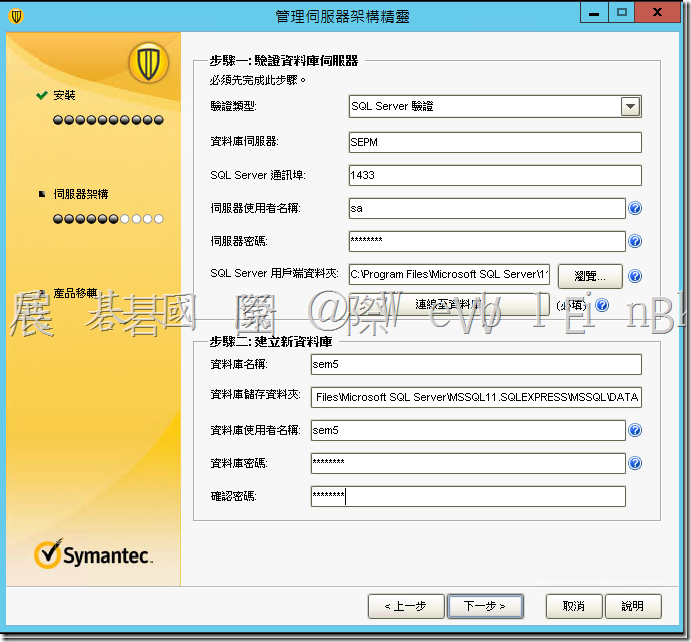
17.4   輸入 MSSQL 資訊以及驗證密碼(需要能夠管理/新建資料庫權限),接著點選「連線至資料庫」

  • 預設:資料庫名稱 sem5 ; 資料庫使用者名稱:sem5 ; 輸入密碼(未來都會使用此帳號密碼連線此資料庫)

image_thumb35


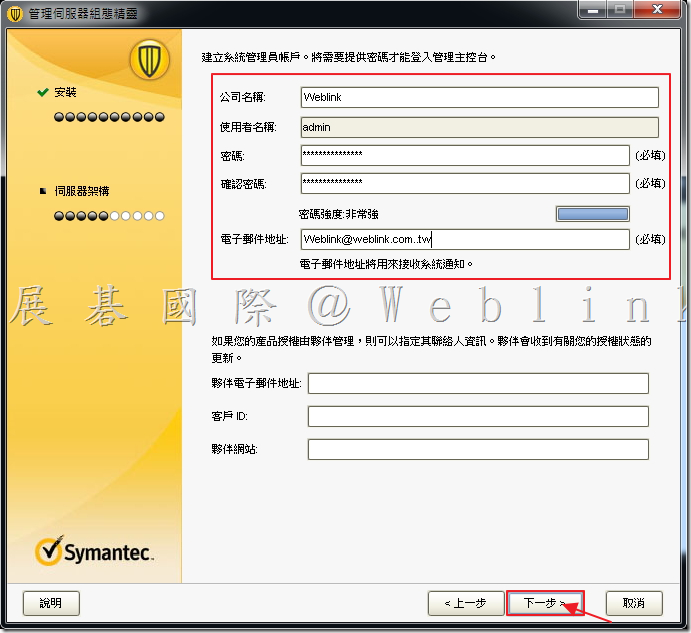
18.   輸入「公司名稱」、「使用者密碼」、「電子郵件地址」,接著點選「下一步」。

  • 12.1.X版本並無法透過工具回復管理員密碼,所以必須都要設定正確的管理員電子郵件地址。

image


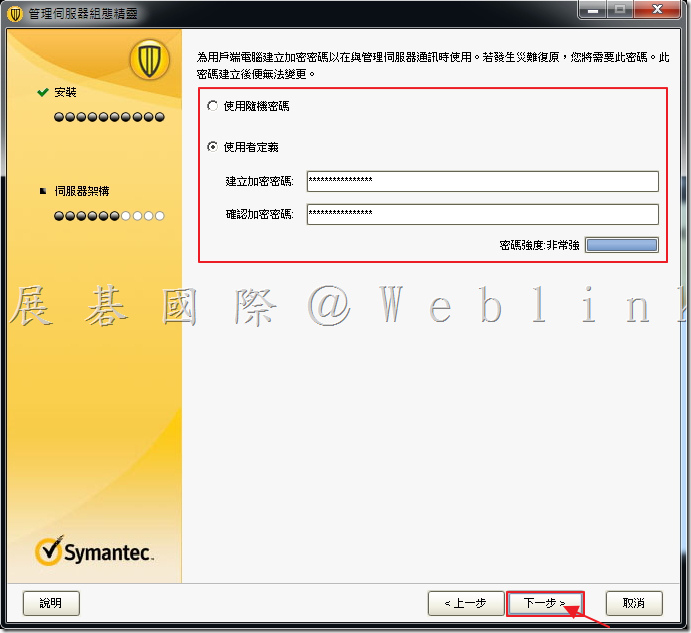
19.   設定加密密碼,接著點選「下一步」。
  • 加密密碼(很重要):這部份透過 HASH 方式產生出數值,與用戶端通訊有關係且勿忘記
  • 若使用隨機密碼請保護好「Server Private Key Backup」資料夾裡面檔案

image


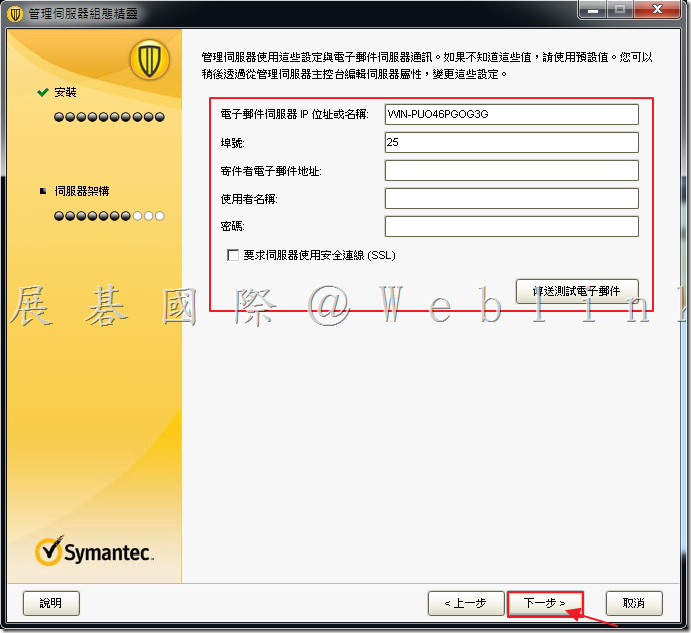
20.   設定電子郵件伺服器,接著點選「下一步」。

  • 包含寄送通知、報告、忘記密碼等相關服務,請務必設定

image


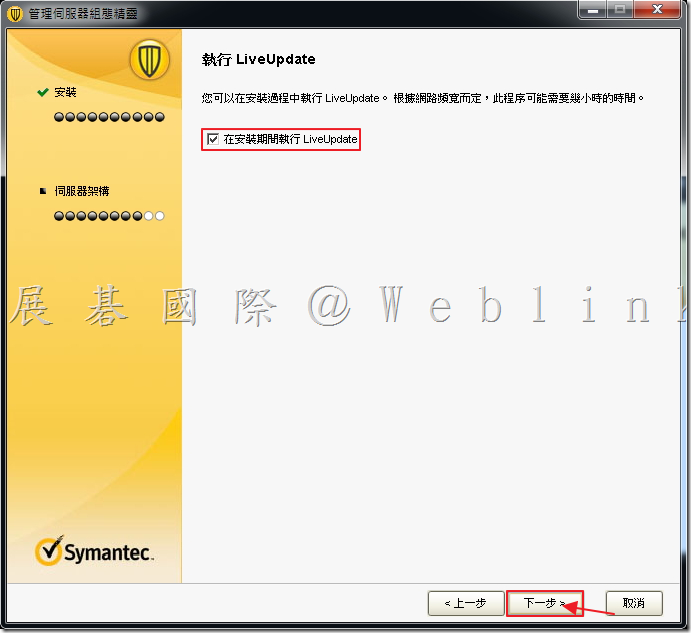
21.   確定勾選「在安裝期間執行LiveUpdate」,接著點選「下一步」。

image


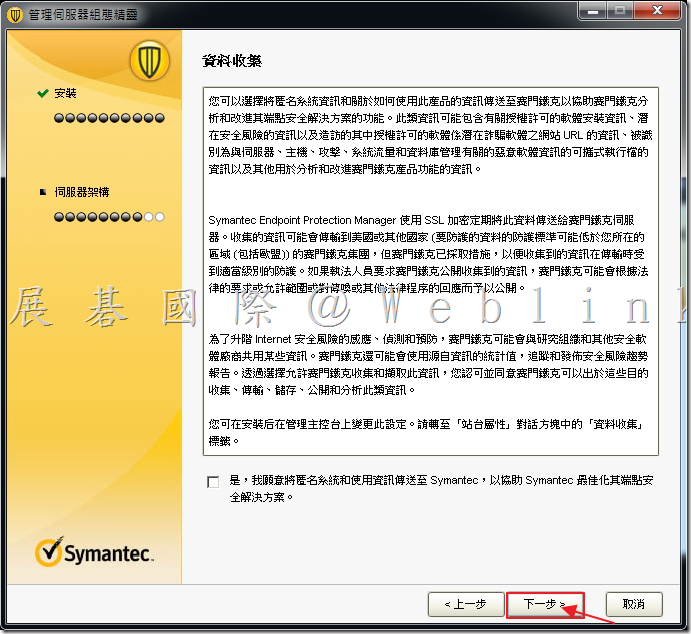
22.   賽門鐵克產品匿名收集資訊:有無勾選並不影響設定與安裝內容,接著點選「下一步」。

image


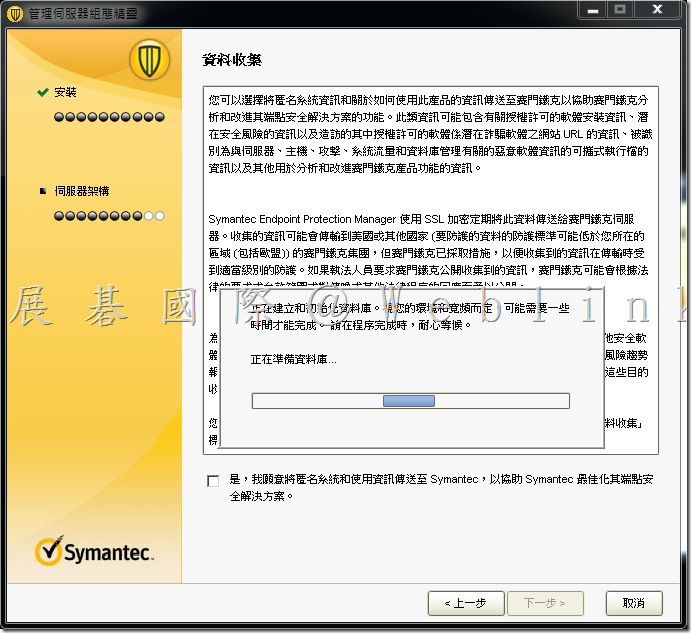
23.   建立資料庫中。

image


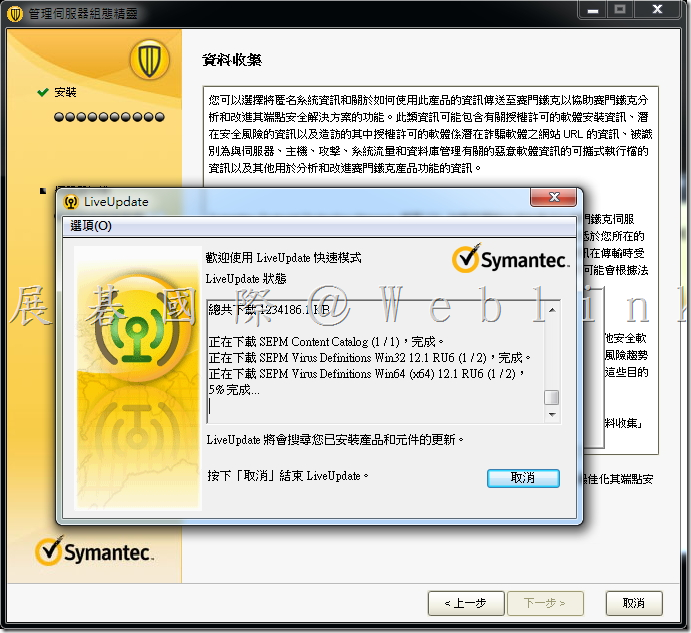
24.   LiveUpdate 中。

image


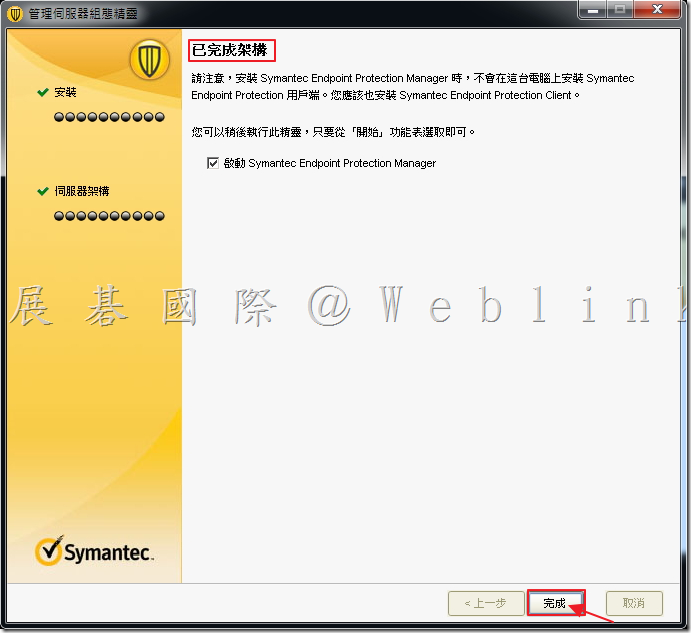
25.   安裝完成,點選「完成」即可啟動「Symantec Endpoint Protection Manager」。

image

[DLP] 安裝與建置 06 新增和移除語言套件

使用語言套件公用程式

若要讓 Symantec Data Loss Prevention 可以使用特定的地區設定,則要透過語言套件公用程式新增語言套件。

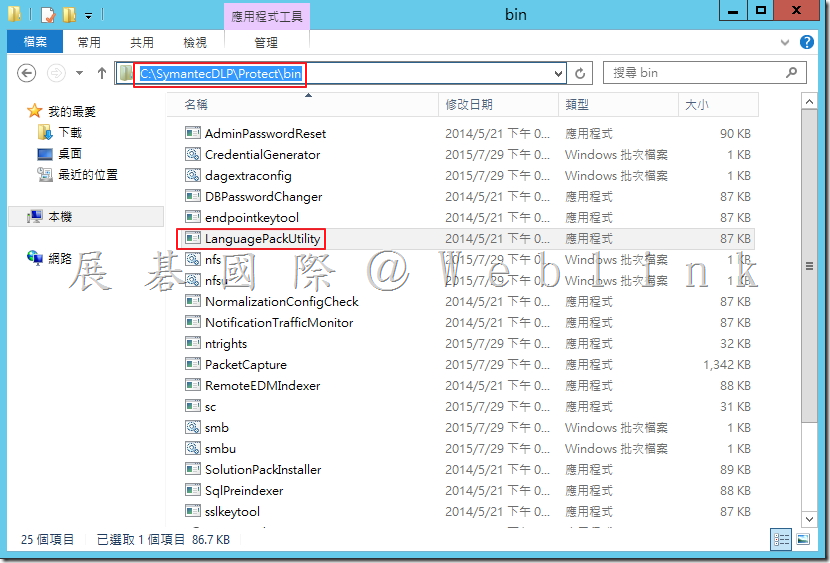
語言套件公用程式是透過指令行執行。其可執行檔「LanguagePackUtility.exe」位於「C:\SymantecDLP\Protect\bin」目錄中。

image

若要使用語言套件公用程式,您必須擁有所有 SymantecDLP 資料夾與子資料夾的「讀取」、「寫入」及「執行」權限。

若要顯示公用程式的說明(例如:有效選項及其旗標的清單),請輸入「LanguagePackUtility」,不帶任何旗標。

附註:

執行語言套件公共程式會導致 Vontu Manager 及 Vontu Incident Persister 的服務停止長達 20 秒。已登入 Enforce Server 管理主控台的任何使用者都會自動登出。當公用程式的更新結束,公用程式會自動重新啟動服務,使用者就可以再次登入管理主控台。

※ 新增語言套件

通知其他使用者,任何正在使用 Enforce Server 管理主控台的使用者都必須儲存其工作並登出。

開啟命令提示字元,執行語言套件公用程式,使用 -a 旗標,後面接著該語言套件的 ZIP 檔名稱。輸入:

LanguagePackUtility -a filename

其中 filename 是語言套件 ZIP 檔的完整路徑以及名稱。

例如,如果日文語言套件的 ZIP 檔儲存在 c:\temp 中,請輸入以下內容進行新增:

【LanguagePackUtility -a C:\temp\Symantec_DLP_12.5_Lang_Pack-JP.zip】

若要在同一階段作業中新增多個語言套件,請指定多個檔案名稱並以空格分隔,例如:

LanguagePackUtility -a

C:\temp\Symantec_DLP_12.5_Lang_Pack-TW.zip

Symantec_DLP_12.5_Lang_Pack-CS.zip

登入 Enforce Server 管理主控台,並確認在「編輯一般設定」畫面中可使用該新語言的選項。若要執行此動作,請移至【「系統」>「設定」>「一般」>「架構」>「編輯一般設定」】。

Symantec Data Loss Prevention 的語言套件可以從 Symantec File Connect 取得。

※ 移除語言套件

通知使用者,任何正在使用 Enforce Server 管理主控台的使用者都必須儲存其工作並登出。

開啟命令提示字元,執行語言套件公用程式,使用 -r 旗標,後面接著您要移除之語言套件的 Java 地區設定代碼。輸入:

LanguagePackUtility -r locale

其中 locale 是與 Symantec Data Loss Prevention 語言套件對應的有效 Java 地區設定代碼。

例如,若要移除法文語言套件,請輸入:

LanguagePackUtility -r fr_FR

若要在同一階段作業中移除多個語言套件,請指定多個檔案名稱並以空格分隔。

登入 Enforce Server 管理主控台,並確認在「編輯一般設定」畫面中已無法使用該語言套件。若要執行此動作,請移至「系統」>「設定」>「一般」>「架構」>「編輯一般設定」。

移除語言套件會產生下列影響:

使用者無法再選取已移除語言套件的地區設定供個人使用。

附註:

如果執行 Symantec Data Loss Prevention 所需的 Java 版本支援該語言套件的地區設定,則管理員之後可以指定其為替代的地區設定,以供任何需要的使用者使用。

地區設定還原至管理員架構的全系統預設值。

如果移除的語言之前是全系統預設的地區設定,則系統的地區設定會還原成英文。

[DLP]安裝與建置 05 匯入SymantecDLP_Solution_Pack

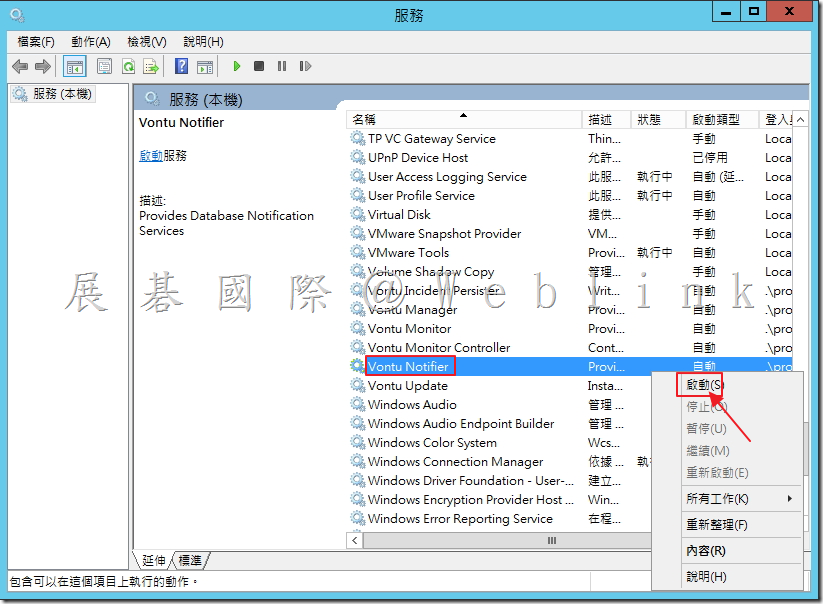
1.   啟動 Vontu 服務(Vontu Notifier)。

image


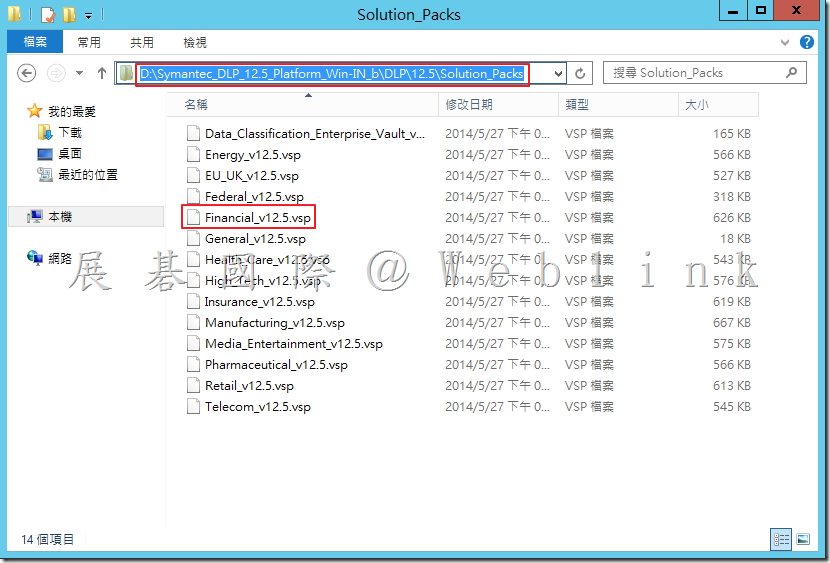
2.   在資料夾「\Symantec_DLP_12.5_Platform_Win-IN_b\DLP\12.5\Solution_Packs」找到所需的產業類型的Solution_Packs。

image


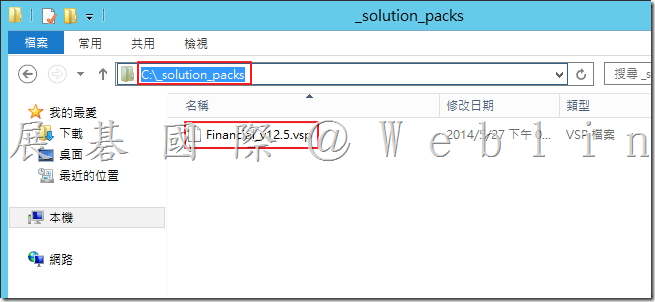
3.   將 Solution Pack 複製到 c:\_solution_packs(_solution_packs請自行建立)。

image


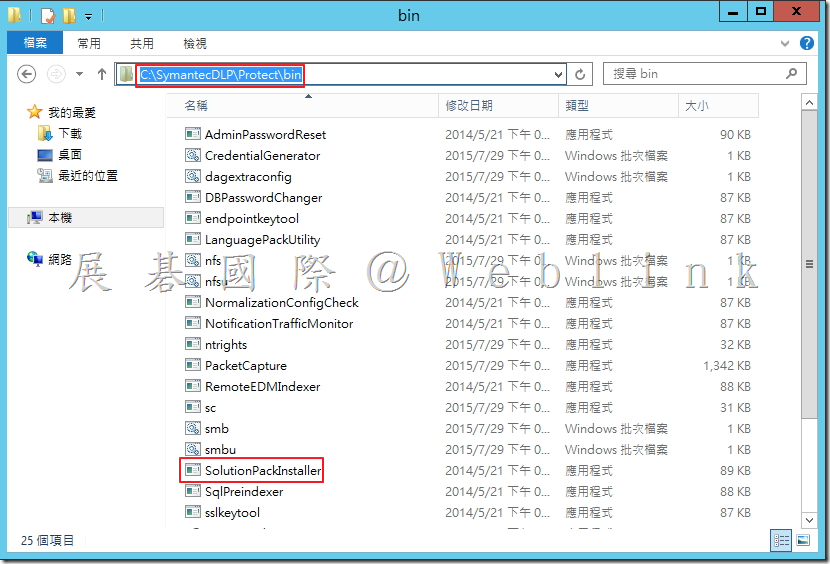
4.   確認「SolutionPackInstaller.exe」路徑為「C:\SymantecDLP\Protrct\bin」。

image


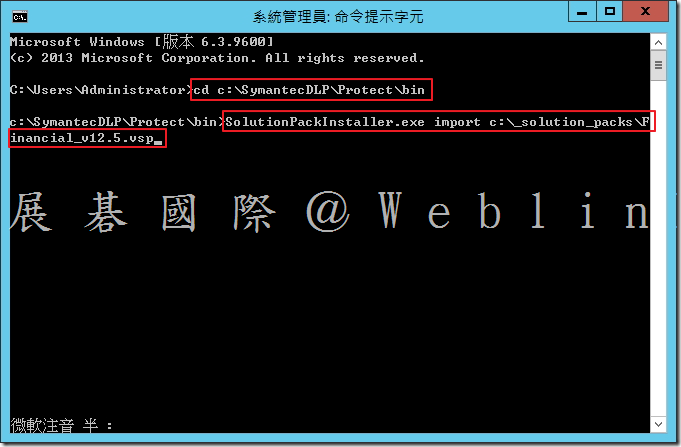
5.   開啟命令提示字元,輸入指令。
  • cd c:\SymantecDLP\Protect\bin
  • SolutionPackInstaller.exe import C:\_solution_packs\Financial_v12.5.vsp

image


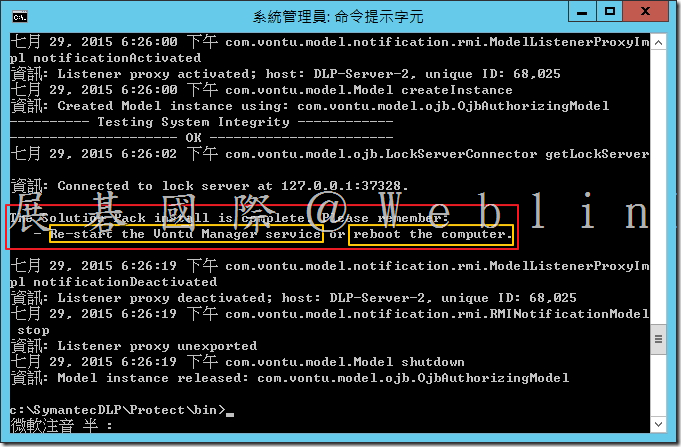
6.   安裝完成,重新開機。

image

DLP 安裝與建置 04 安裝 SymantecDLP 主程式(Enforce+Detection)

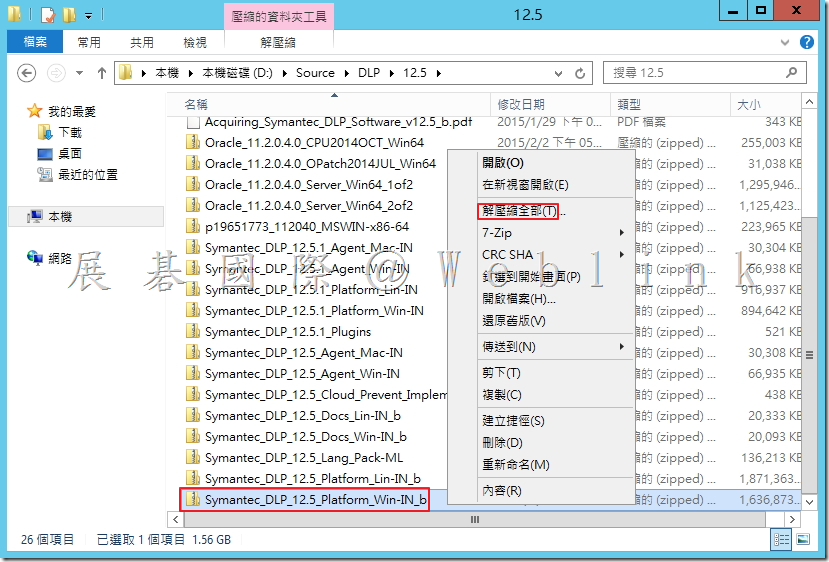
1.   解壓縮檔案「Symantec_DLP_12.5_Platform_Win-IN_b.zip」。

image


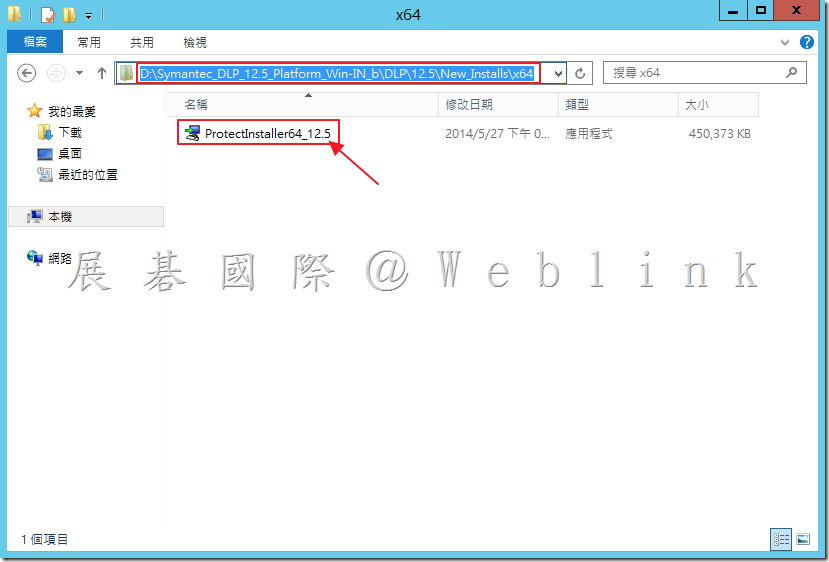
2.   於資料路徑「\ Symantec_DLP_12.5_Platform_Win-IN_b.zip\DLP\12.5\New_Installs\x64」,執行檔案「ProtectInstaller64_12.5.exe」。

image


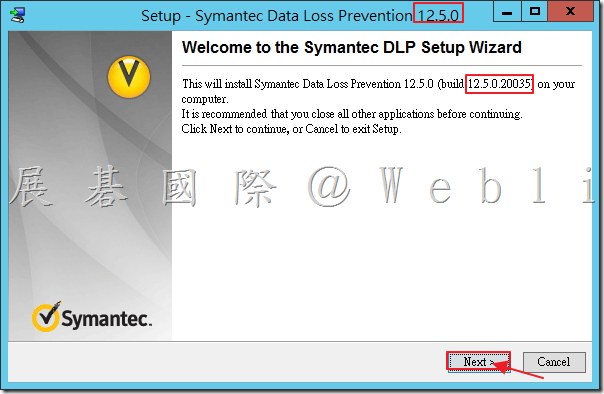
3.   確定安裝版本,接著點選「Next」。

image


4.   點選「OK」。

image


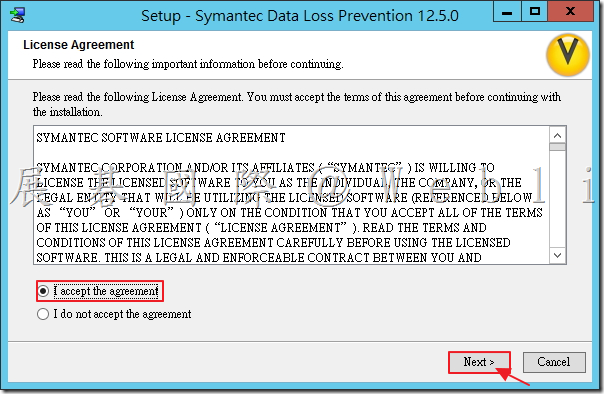
5.   選取「I accept the agreement」,接著點選「Next」。

image


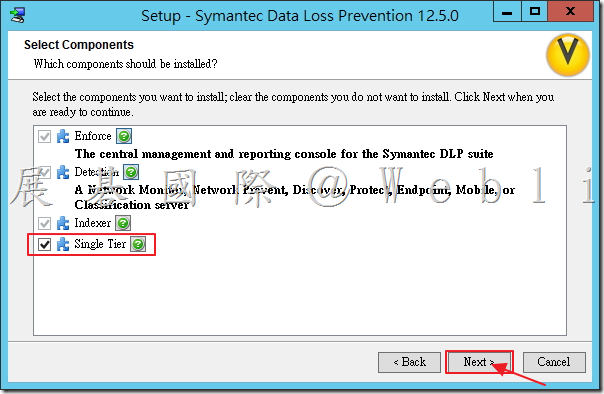
6.   選取「Single Tier」,接著點選「Next」。

image


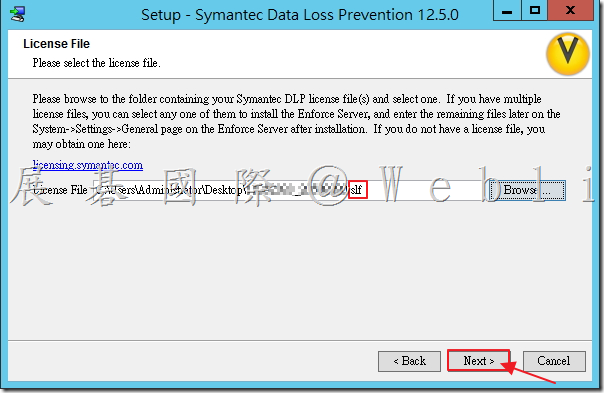
7.   選取賽門鐵克授權檔(.slf),接著點選「Next」。

image


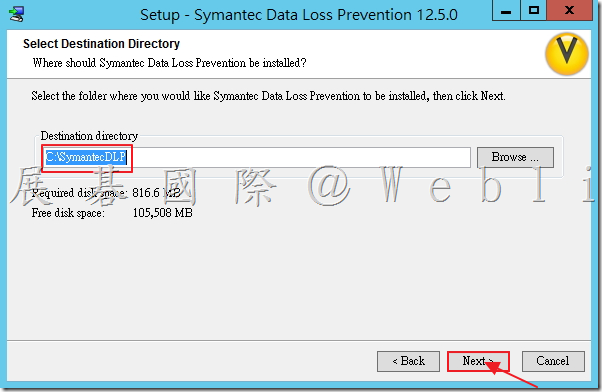
8.   安裝路徑為 C:\SymanyecDLP 接著點選「Next」。

image


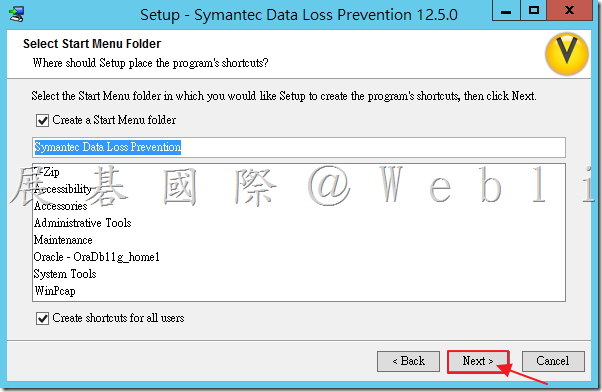
9.   點選「Next」。

image


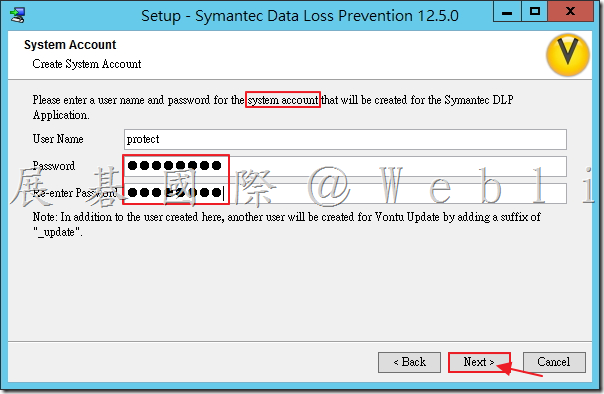
10.   建立系統帳號,輸入密碼,接著點選「Next」。

image


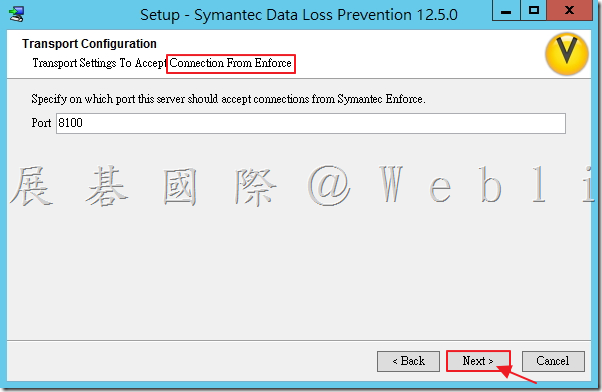
11.   Connection From Enforce Port,點選「Next」。

image


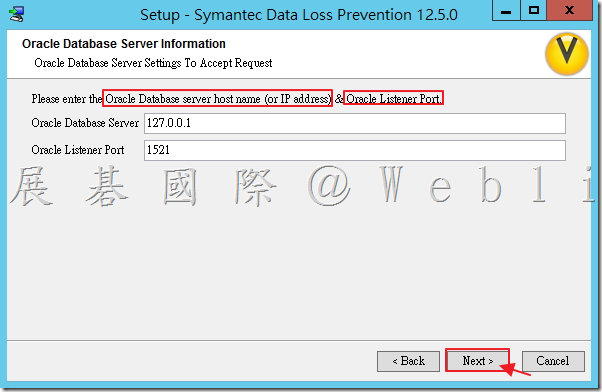
12.   Oracle Database server host name(or IP address)& Oracle Listener Port,點選「Next」。

image


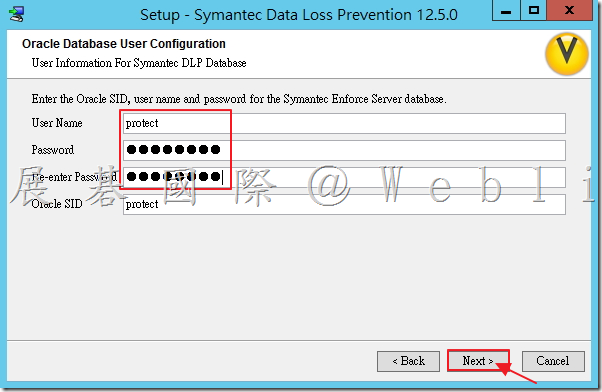
13.   輸入 Oracle 帳號密碼,接著點選「Next」。

image


14.   點選「Next」。

image


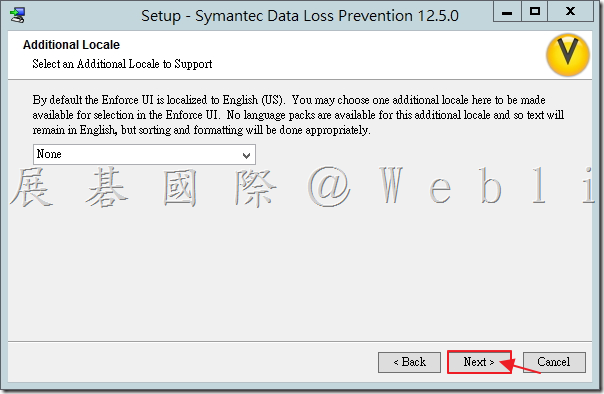
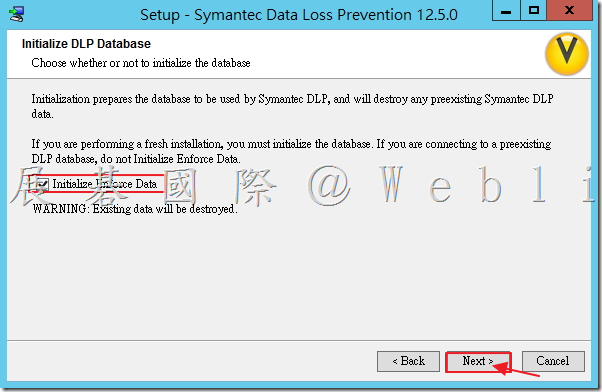
15.   點選「Initialize Enforce Data」,接著點選「Next」。

image


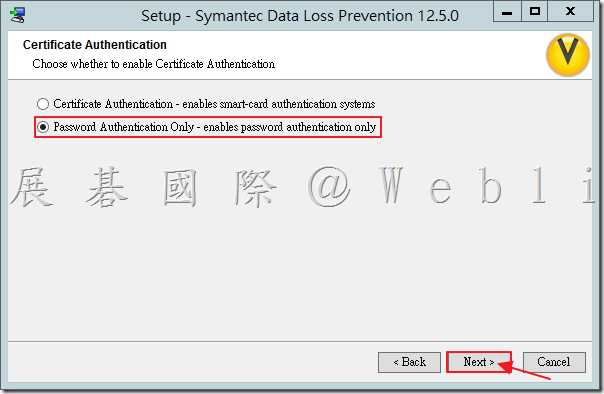
16.   點選「Password Authentication Only – enables password authentication only」,接著點選「Next」。

image


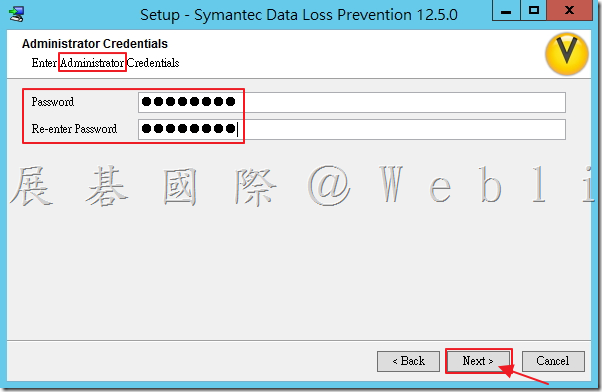
17.   設定Administrator密碼,接著點選「Next」。

image


18.   安裝中。

image


19.   是否啟用DLP遠端支援,輸入相關資訊,接著點選「Next」。

image


20.   安裝中。

image


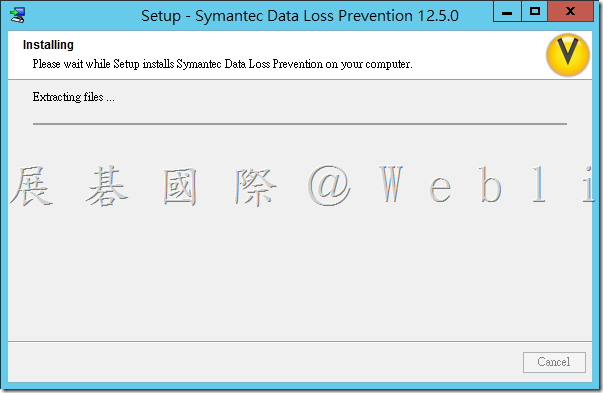
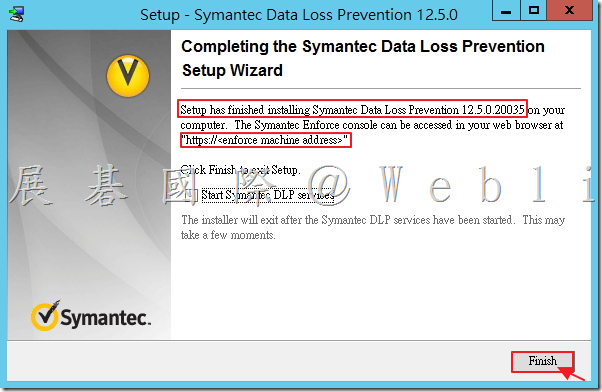
21.   安裝完成,若需匯入Solution Pack,請先不要啟用DLP服務,接著點選「Finish」。

image