Unable Access Second Partition After Formatting Primary Partition

Issue

On a whole disk encrypted a disk with two partitions, the second partition is inaccessible after formatting the primary partition without decrypting the disk.  

Warning: Do not re-encrypt the C: Drive as this will result in overwriting the session key and PGPWDE01 file which contains the drive encryption information and makes the disk unrecoverable.

Environment
  • 2 partitions on an internal hard disk (C: and D: )
  • Both partitions are PGP Whole Disk Encrypted
  • The C: partition is formatted without decrypting the drive
Solution

To resolve this issue, you must attached the disk to another computer with PGP Desktop installed. Then use the pgpwde command line interface to decrypt the disk.

Use the following steps:

1. Open a Windows Command Prompt.

2. Change to the following directory C:\Program Files\PGP Corporation\PGP Desktop

3. Type pgpwde –recover -d 1 –passphrase “your passphrase" and press Enter.

(Assuming that the D: drive is the disk number “1”)

Drive Encryption Diagnosis and Recovery

Drive Encryption Diagnosis and Recovery – Symantec Drive Encryption & PGP Whole Disk Encryption

http://www.symantec.com/business/support/index?page=content&id=TECH149679

Issue

This article provides tools and steps to diagnose and recover disks that are encrypted with Symantec Drive Encryption (previously PGP Whole Disk Encryption). 

Solution

Section 1 describes some symptoms that users with encrypted disk problems may encounter.  Section 2 provides procedures for using the PGPWDE command line interface. Section  3 details use of the Recovery Disk.

Note: If a system hard disk has been “fully" decrypted, and will not boot, make sure to slave the disk and backup all your data, or use bit-by-bit copy of the disk. Connect the hard disk back to system and run the fixmbr command from the Windows Recovery Console from a Windows XP installation CD.

SECTION 1 – Symptoms

On rare occasions internal or external disks that are encrypted may experience the following issues:

  • Inability to decrypt or read the contents of a secondary or non-system disk.
  • System displays “Error loading operating system_" after entering the passphrase at the PGP BootGuard screen.
  • Master Boot Record (MBR) corruption causing the system to no longer boot.
  • After starting the system with the hard disk encrypted to a passphrase and an eToken, valid passphrases are not accepted.

1. Users able to access their encrypted disk from Windows should proceed to Section 2.
2. Users unable to access their disk from Windows or who are unable to boot should proceed to
Section 3.

SECTION 2 – PGPWDE Command Line

The following commands will help diagnose and decrypt the disk. Other commands can be listed by typing pgpwde –help.
1. To begin working with the PGPWDE command line tool, open a command prompt and change to the PGP installation directory (default directory shown) C:\Program Files\PGP Corporation\PGP desktop.
2. To list all installed hard disks in the system type: pgpwde –enum. Entering this command displays a list of disks which the following steps reference.
3. Type pgpwde –status –disk 1. In the command, substitute the PGP WDE disk number listed in the previous step for the number 1 if it is different. The output of this command tells you whether the disk is still encrypted. 

  • If the disk is not encrypted, “Disk <number> is not instrumented by bootguard" will be the output.
  • If the disk is encrypted, the output will display:
    “Disk <number> is instrumented by Bootguard."
    The total number of sectors.
    A Highwater value (number of sectors encrypted).
  • Whether the current key is valid.

4. Type pgpwde –list-user –disk 1. This provides the user information contained on the disk. This will help in multi-user environments to determine which user passphrase was used for Drive Encryption.
5. Type pgpwde –decrypt –disk 1 –passphrase {MYPASSWORDHERE}. This will start the decryption process. To view progress, type the status command listed in step 3 and note the Highwater number. This number will get smaller and smaller as the number of sectors encrypted decreases. 

6. In case if your primary partition was formatted and your secondary partition is still encrypted, you may try to recover it by following TECH170574.

SECTION 3 – Using Recovery Disk Images (bootg.iso or bootg.img)

Warning: Use of the recovery disks should be used as the last step when attempting recovery.  Should there be a power loss while decrypting with the recovery disk, the result to the disk could be fatal and non-recoverable. It is also highly recommended to use the latest recovery disk available for the version you are running.
Recovery Images can be obtained by following the links below:

Windows

Mac OS X

Caution: Users with extended partitions on their hard disks that were encrypted should ONLY use the latest available Recovery disk for your version. Prior versions could cause these partitions to no longer be visible to Windows after fully decrypting the disk.
Once you have started to decrypt a disk or partition using a recovery CD, do not stop the decryption process. Depending on the size of the disk being decrypted, this process can take a long time. A faster way to decrypt the drive is to use another system that has the same version of Encryption Desktop\PGP Desktop installed on it.

Use the Recovery Disk with the following instructions if experiencing blue screen failures at boot up:
1. Boot the system with the recovery disk.
2. Do not continue with the normal sequence of entering a passphrase.
3. Go to the “advanced" panel.
4. This message “PGPWDE record inconsistency on 1 disk(s) was found and fixed" might be displayed. If this message is seen, the BSOD (blue screen failure) will be fixed.
5. Return back to the previous screen and continue to boot from the recovery CD. Rebooting without the Recovery Disk in the drive also works.

Use the Recovery Disk with the following instructions should the system not boot into Windows for any other reasons:

The Symantec Encryption Desktop for Windows User’s Guide provides instructions for creating recovery disks. 

  1. Boot the system with the recovery disk.
  2. When prompted, press any key to continue. Drive Encryption Recovery searches for user records and prompts to press any key when the records are found.
  3. Press any key to continue.
  4. On the PGP BootGuard screen, enter the passphrase and user name, if required.
  5. Press D to decrypt the drive. Drive Encryption Recovery starts decrypting your disk.

Note: Decrypting using a Recovery disk might take considerably more time than it does from within Windows.

DLP 12.5 無法偵測部分符合的 IDM 事件

DLP 12.5 在【系統】→【代理程式】→【代理程式組態】→【代理程式設定】→【進階代理程式設定】中,Detection.TWO_TIER_IDM_ENABLED.str 的參數值預設是【off】

表示 DLP 12.5 預設

(1) IDM 的偵測是在用戶端進行,Endpoint 與 Detection Server 間並非持續性的連線狀態 (Interval time 約 15 分鐘 )

(2) IDM 事件可以攔阻

(3) 偵測與攔阻的前提是相符率必須是 100%

(4) 無法偵測或攔阻部分相符的事件


若您需要偵測部分相符的事件請您參照以下畫面將 Detection.TWO_TIER_IDM_ENABLED.str 的參數值改為【on】

(1) 此設定下表示 IDM 的偵測是 forward 至 Detection Server 進行

(2) 此設定下無法攔阻部分相符的事件

(3) 也無法攔阻100% 相符的事件

1. 在【系統】→【代理程式】→【代理程式組態

image

2.【代理程式設定】

image

3.【進階代理程式設定】

image

4.將 Detection.TWO_TIER_IDM_ENABLED.str 的參數值改為【on】

image

5. 由於 DLP 12.5 開始,Agent 並非持續與 Detection Server 連線,因此相關事件無法即時回傳主控台,您必須再更改以下參數

[DLP 12.5] Incidents delay. Takes longer to show on Incidents reports.  Symantec Connect

http://www.symantec.com/connect/forums/dlp-125-incidents-delay-takes-longer-show-incidents-reports#comment-10466151

image

6. 請至【管理】→【資料設定檔】→【已建立索引的文件】

image


7. 【重新建立索引】

image

8. 重啟 Enforce server

安裝好 PGP Desktop E-mail 後,outlook 無法發信出現【PGP Universal service not available】

安裝好 PGP Desktop E-mail 後,outlook 無法發信出現【PGP Universal service not available】

image

請將 Outgoing Mail Server (SMTP) 中,SSL/TLS 下拉改選【Do not attempt】即可解決

[點圖可放大]

image


【其他的除錯步驟】

1.Exit PGP Services 後,確認 Outlook 寄信是否正常,若仍不正常則可能是原始 mail client 設定有問題
 
image


2. 刪除重建 PGP Desktop E-mail service

image

3.提供用戶端 log

image

4.Enterprise Support – Symantec Corp. – Troubleshooting: PGP Messaging Services for PGP Desktop 10 for Windows
http://www.symantec.com/business/support/index?page=content&id=TECH149647


By default, PGP Desktop automatically determines your email account settings and creates a PGP Messaging service that proxies messaging for that email account.

Because of the large number of possible email account settings and mail server configurations, on some occasions a messaging service that PGP Desktop automatically creates may not work quite right.


If PGP Desktop has created a messaging service that is not working right for you, one or more of the following items may help correct the problem:

Verify that you can both connect to the Internet and send and receive email with PGP Services stopped. To do this:
Right-click the PGP Desktop Tray icon and select Stop PGP Services from the list of commands.

Note: You should always restart your email client after starting or stopping PGP Services.
Read the PGP Desktop Release Notes for the version of PGP Desktop you are using to see if your problem is a known issue.

Make sure SMTP authentication is enabled for the email account (in your email client). This is recommended for PGP Desktop to proxy your messaging. If you only have one email account and you are not using PGP Desktop in a PGP Universal Server-managed environment, then SMTP authentication is not needed. It is required when using a PGP Universal Server as your SMTP server, or when you have multiple email accounts on the same SMTP server.

Open the PGP Log to see if the entries offer any clues as to what the problem might be.

If SSL/TLS is enabled in your email client, you must disable it there if you want PGP Desktop to proxy your messaging. (This does not leave the connection to and from your mail server unprotected; by default PGP Desktop automatically attempts to upgrade any unprotected connection to SSL/TLS protection. The mail server must support SSL/TLS for the connection to be protected.)

If either Require STARTTLS or Require SSL is selected (in the SSL/TLS settings of the Server Settings dialog box) your mail server must support SSL/TLS or PGP Desktop will not send or receive any messages.

If your email account uses non-standard port numbers, make sure these are included in the settings of your messaging service.

If PGP Desktop is creating multiple messaging services for one email account, use a wild card for your mail server name.

Delete the PGP Messaging service that is not working correctly and send/receive email. PGP Desktop regenerates the messaging service.
If none of these items help correct the problem, try manually creating a PGP Messaging Service.

5.
http://www.symantec.com/connect/forums/not-working-outbound-mail-encryption-outlook-2010-pgp-1021

Please reread the PGP Release Notes for any known conflict or settings adjustments that may be needed for your system.

Although I don’t see Norton 360 specifically mentioned, the following quote may offer guidance that might also help with Norton 360 use.

Symantec Norton AntiVirus 9.x through 10.x, Symantec Norton Internet Security 2003, Symantec Norton Internet Security 2004
Disable email scanning.
For Norton Internet Security users, disable Norton Privacy Control and Spam Alert.
Disable SSL/TLS in Server Settings in PGP Desktop and PGP Universal Satellite. (In PGP Desktop, select the PGP Messaging Control Box and then choose Messaging > Edit Server Settings. For SSL/TLS, select Do Not Attempt. In PGP Universal Satellite, on the Policies tab, select Ignore SSL/TLS.) These versions of Norton AntiVirus prevent all mail clients from using SSL/TLS, regardless of the use of PGP software.

Symantec Norton AntiVirus 11.x through 12.x, Symantec Norton Internet Security 2005, Symantec Norton Internet Security 2006
No special configuration required for MAPI email.
When using POP email, enable Auto-Protect and disable the Anti-Spam and Email Scanning options. Auto-Protect, which is enabled by default, provides protection against viruses in email messages when the message is opened.
Disable SSL/TLS in Server Settings in PGP Desktop or PGP Universal Satellite. (In PGP Desktop, select the PGP Messaging Control Box and then choose Messaging > Edit Server Settings. For SSL/TLS, select Do Not Attempt. In PGP Universal Satellite, on the Policies tab, select Ignore SSL/TLS.) These versions of Norton AntiVirus prevent all mail clients from using SSL/TLS, regardless of the use of PGP software.

有關 PGP logs 的 purge

1.  How long will the Symantec Encryption Management Server purge the logs?
The SEMS purge the logs in 1months time.

2. Where can I set the purge interval and find the logs percentage of hard disk usage?
You can set the purge time of the logs in the crontab.


In /etc/crontab edit the line

0 0 * * * root /usr/bin/pgpdellog.pl —days=30 /var/log/ovid >& /dev/null

and either change it to the desired value (–days=XX)

or comment the entry completely if the logs may not be deleted.
(by adding a # in front)

Depending on the requirements another solution might be to retain regular backups (which also contain the logfiles).


3. Location of the logs are available at 2 places1

(1) /var/log/ – General system logs
(2) /var/log/ovid/ – pgp process logs

4.If you want to list the size of the folder size please use
du -sh* or du -sh /var/log/ovid

You can use winscp to copy the logs from the linux machine to the windows and then delete the logs manually from the specifc location as mentioned above.
Please do not delete the parent location but only the logs inside the parent folder
.

新安裝之Mac OS X 10.10.0註冊後,在Userlist莫名出現其他使用者ID的問題

這樣的問題可能是 使用者ID 在還原檔已存在

請參考以下畫面在該 Mac 機器中,移除 [ 其他使用者的 ] key pair

移除金鑰檔 (若有需要請先備份金鑰檔)

點選桌面左上方【Encryption Desktop】,並按下【Quit Encryption Desktop】

image

image

(1) 開啟 【PGP】資料夾

image

(2) 將 【.skr 檔】備份至其他位置或刪除

image

WinPE 4.0 5.0 5.1整合 PGP 光碟製作

1.    關於新版 WinPE 整合 PGP 光碟製作請參考以下網址
How to Customize Windows PE 4.0 and above using Symantec Encryption Desktop 10.3.2 and PGPRecoveryGUI.exe
http://www.symantec.com/business/support/index?page=content&id=HOWTO95227
內容包含
(1)    Customizing Windows PE 4.0/5.0 for 32-bit Windows Environment
(2)    Customizing Windows PE 4.0/5.0 for 64-bit Windows Environment
(3)    How to make customized WinPE as a bootable .iso file or CD/UFD

2.    Download 適用於 Windows 8.1 更新的 Windows 評定及部署套件 (Windows ADK) from Official Microsoft Download Center
http://www.microsoft.com/zh-tw/download/details.aspx?id=39982

3.   
適用於 Windows 8 的 WinPE:Windows PE 5.0
https://technet.microsoft.com/zh-tw/library/hh825110.aspx

將 WinPE 5.0 更新為 WinPE 5.1
https://technet.microsoft.com/zh-tw/library/dn613859.aspx


Enterprise Support – Symantec Corp. – Windows PE customization for Symantec Encryption (PGP) – Index of documents

http://www.symantec.com/business/support/index?page=content&id=TECH215515

無法重新安裝 DCS Agent

透過新增移除程式 移除 DCS Agent 後,重新開機後卻無法再次安裝 DCS Agent

出現以下錯誤

error!An agent uninstallation requires a reboot.
please reboot system before running installation.

image

請執行 regedit

找到
HKEY_LOCAL_MACHINE\SYSTEM\CurrentControlSet\Control\Session Manager
將裏頭的 PendingFileRenameOperations 刪除

或是寫成批次檔
REG DELETE “HKLM\SYSTEM\ControlSet001\Control\Session Manager" /v PendingFileRenameOperations /f

如果仍無法安裝,請再加以下這幾個

REG DELETE “HKLM\SYSTEM\CurrentControlSet\Services\SISIDSRegDrv" /f
REG DELETE “HKLM\SYSTEM\CurrentControlSet\Services\SISIPSDriver" /f
REG DELETE “HKLM\SYSTEM\CurrentControlSet\Services\SISIPSNetFilter"
REG DELETE “HKLM\SYSTEM\CurrentControlSet\Services\EventLog\System\SISIPSNetFilter" /f


image

DCS Agent 移除指令如下:

MsiExec.exe /X{3D24482F-98BD-48DD-AA62-8B24BFDE7329} /qn

【Unattended uninstallation of an agent】
You can perform an unattended (silent) uninstallation of an agent using the
agent.exe or agent-windows-nt.exe executable and InstallShield and Windows
Installer commands.
The following command structure shows the sequencing:
MsiExec.exe /X{<PRODUCT CODE>} /qn /l*v!+ <UNINSTLL LOG FILE>
The <PRODUCT CODE> is the Symantec Critical System Protection uninstall
string necessary for MsiExec.exe. It is in the following directory:
HKLM\SOFTWARE\Microsoft\Windows\CurrentVersion\Uninstall

For Windows 2008 64-bit system, the <PRODUCT CODE> is in the following
directory:
HKLM\SOFTWARE\Wow6432Node\Microsoft\Windows\CurrentVersion\
Uninstall
Browse the list of IDs. Locate the Symantec Critical System Protection agent
application by looking at the properties in the right pane
. Note the
UinstallString string, and copy and modify it. For example:
MsiExec.exe /X{3D24482F-98BD-48DD-AA62-8B24BFDE7329} /qn /l*v!+
C:\SISAgentUninstall.log
The system reboot is suppressed after the uninstallation.

【SEP 12.1.5 複寫夥伴說明與設定】

複寫夥伴說明與設定總整理


1.       我的 LAB 是如下設定
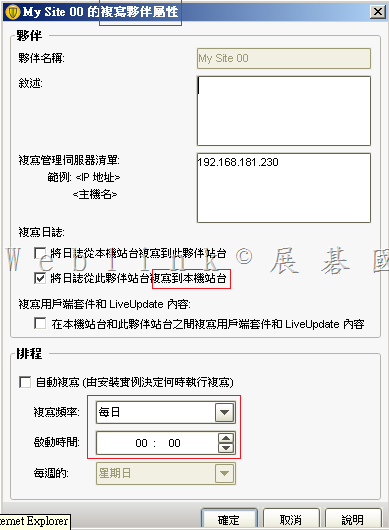
(1)    先在 【Branch 00】 透過 伺服器設定精靈 設定 【HQ 02】為複寫夥伴
(2)    再在【Branch 01】 透過 伺服器設定精靈 設定 【HQ 02】為複寫夥伴
(3)    複寫夥伴間的 【群組、政策】一定會複寫
(4)    Log 設定成只由 Branch 複寫至 HQ
(5)    定義檔與安裝套件不進行複寫
(6)     Production環境下,複寫頻率建議不要低於每天,並請於離峰進行

2.    以下是架構圖

image
 
3.      在 HQ 02 看到的複寫夥伴設定
 image

 image
4.    如此的設定,會形成只有在 HQ 02 看到的用戶端才不會是複寫

image

image

 
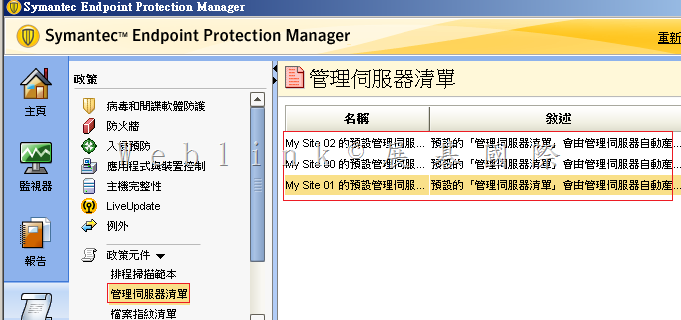
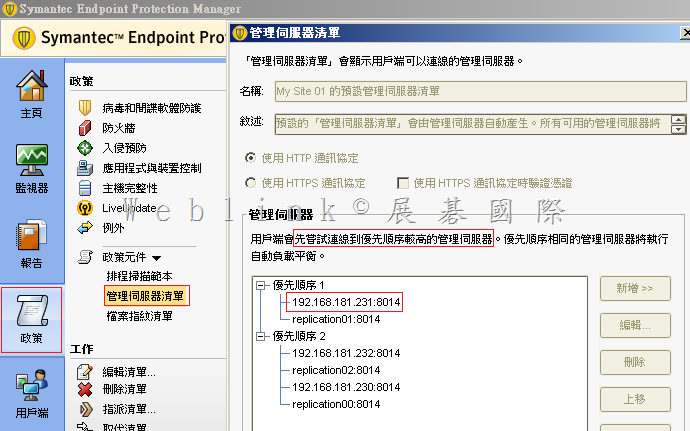
5.    查看一下管理伺服器的清單
 image

若您因頻寬的關係,確定不允許本地端的用戶端不得在無法連線本地端 SEPM 時轉而向其他站台 SEPM 報到、獲取更新、回報 log 等,請您刪除優先順序2的項目
因為預設的【管理伺服器清單】無法編輯,請您複製→貼上後,進行刪除,並將新的【管理伺服器清單】套給相對應的群組

 image

6.    同時要設定好每個群組使用的是那一個【管理伺服器的清單】(群組所在的地區要優先使用自己區域內 SEPM 當管理伺服器)
 

image

7.    各個群組調整好各自的【管理伺服器清單】後,便可發現群組內的用戶端都是就近向區域內的 SEPM 報到、更新、回報 log 了
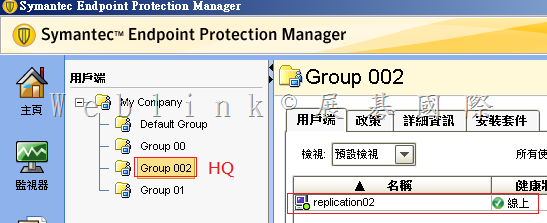
以下是在 HQ 02 看到只有 Group 002 (管理伺服器 第一順位 是 HQ 02 ) 內的用戶端才是線上

 image

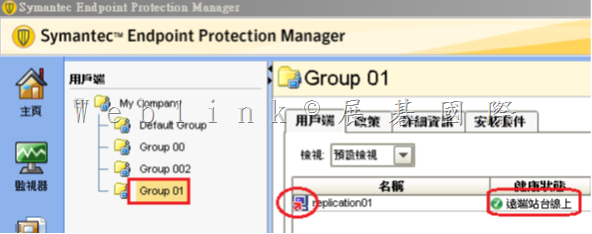
而在 HQ 02 看到Group 00、 Group 01 (管理伺服器 第二順位 是 HQ 02 ) 內的用戶端顯示為複寫圖示 (遠端站台線上)

image

SEP 用戶端一直產生ccSvcHst-*.dmp檔案,每一個都1點多GB,一天可能有1個以上

C:\ProgramData\Symantec\Symantec Endpoint Protection\CurrentVersion\Data\Install\Logs下,
會有ccSvcHst-*.dmp檔案產生,每一個都1點多GB,一天可能有1個以上,這個.dmp檔到底是那個設定所產生的,即便我把logs目錄設定唯讀,還是會寫入。而且我還刪不掉。

这个问题是RU5版本的已知问题

Title
CCSvcHst.exe generates multiple process dumps in ProgramData exhausting disk space 
 
Issue

CCSvcHst.exe appears to generating exceptions forcing a process dump in C:\ProgramData\Symantec\Symantec Endpoint Protection\CurrentVersion\Data\Install\Logs during a scan. Each dump is over 1GB and free disk space is quickly exhausted.
 
Environment

Windows 2012 R2
 
 
Cause

Certain archive files appear to be triggering the issue. Issue has been with some large archive files with older file dates (4+ years) in .zipx and .blb format.
 
Solution

Symantec is aware of the issue and is researching a solution.

Workaround:

Make an exception for the file extension or directory which has been identified through debugging.

Or…
1.Disable Tamper Protection.
2.Open a Command Prompt window.
3.del “C:\ProgramData\Symantec\Symantec Endpoint Protection\12.1.5337.5000.105\Data\Install\Logs\*.dmp"

or

del C:\ProgramData\Symantec\Symantec Endpoint Protection\CurrentVersion\Data\Install\Logs\*.dmp

4.Using regedit.exe, set the following values to 0 (zero):
HKLM\SOFTWARE(\Wow6432Node)\Symantec\Symantec Endpoint Protection\CurrentVersion\Common Client\Debug\CrashHandler\DumpOn*
5.Re-enable Tamper Protection.
6.Open a Command Prompt window.
7.cd “C:\Program Files (x86)\Symantec\Symantec Endpoint Protection\12.1.5337.5000.105\Bin"
8.smc -stop
9 .smc –start

【6 7 8 9 可如下執行】

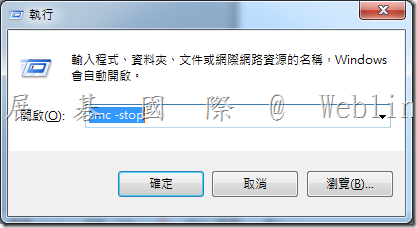
請按鍵盤上【Windows 鍵】+【R鍵】→會跳出【執行】視窗

※ XP 請按【開始】→【執行】

在出現的視窗中,輸入【smc –stop】【smc –start】,並按下【確定】

clip_image005