http://www.symantec.com/business/support/index?page=content&id=TECH219921
PGP Troubleshooting reference URL
Enterprise Support – Symantec Corp. – HOW TO Re-enroll Symantec Encryption Desktop for Windows Clients
http://www.symantec.com/business/support/index?page=content&id=HOWTO42029
Enterprise Support – Symantec Corp. – HOW TO Create Custom BootGuard Background Images with GIMP
http://www.symantec.com/business/support/index?page=content&id=HOWTO42035
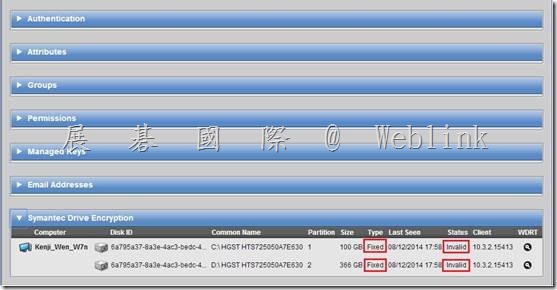
【用戶端硬碟已完成加密,並且能成功進行 policy update,但在主控台 WDE disk Status 卻顯示 Invalid】
WDE Disk Status is Invalid
【用戶端硬碟已完成加密,並且能成功進行 policy update,但在主控台 WDE disk Status 卻顯示 Invalid】
參考官網 KB
KB http://www.symantec.com/business/support/index?page=content&id=TECH149150
http://www.symantec.com/connect/forums/pgp-unable-decrypt-error-12198
解決步驟
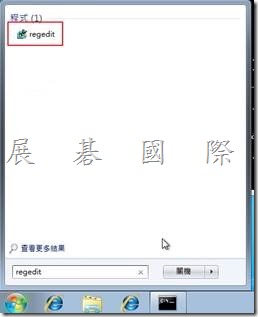
1. Click Start.
2. Type regedit in the Start Search field, and then click the regedit result in the Programs list.
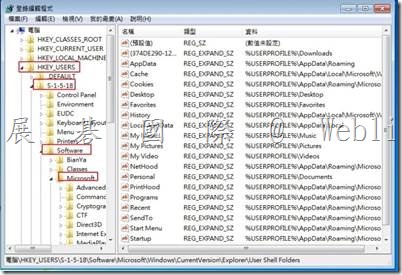
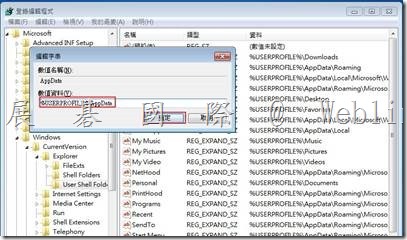
3. Browse to HKEY_USERS\S-1-5-18\Software\Microsoft\Windows\CurrentVersion\Explorer\User Shell Folders.
4. Select the folder and right-click the right pane in the Registry Editor.
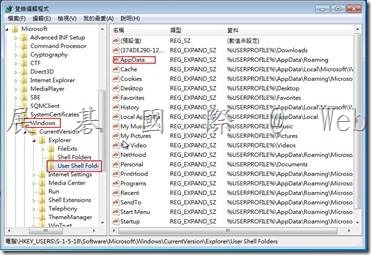
5. Type AppData for the value.
6. Right-click the AppData value and select Modify.
7. Type %USERPROFILE%\Application Data for the Value data and click OK.
8. Close the Registry Editor.
9. Update policy
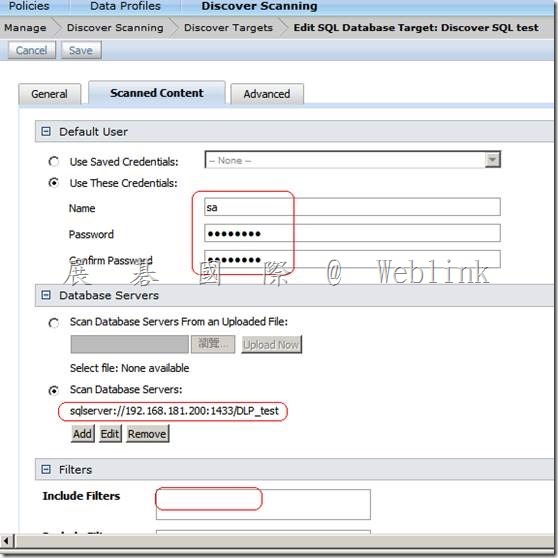
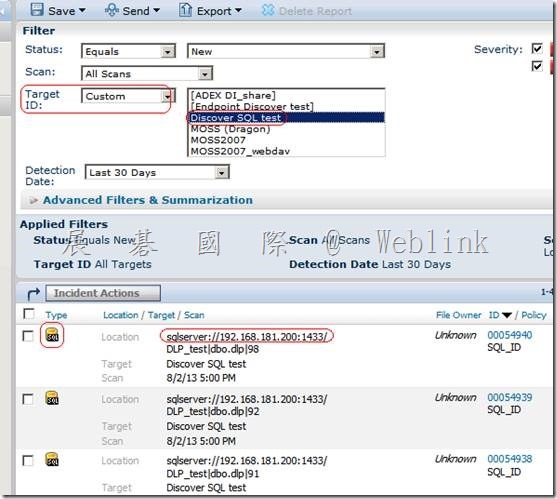
Symantec DLP Network Discover for MS SQL
Symantec DLP Network Discover for MS SQL
您必須安裝 JDBC 驅動程式,才能掃描每種資料庫類型。
安裝 JDBC 驅動程式
1 取得相關 JDBC 驅動程式。
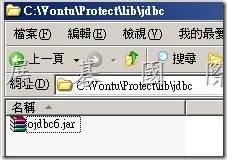
l Oracle 驅動程式已隨 Network Discover Server 一起安裝在預設 SQL 驅動
程式目錄 Protect/lib/jdbc 中。
JDBC 驅動程式為 Oracle JDBC 驅動程式 10.2.0.3.0 版。
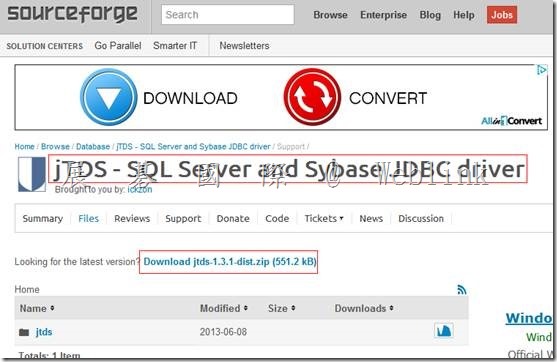
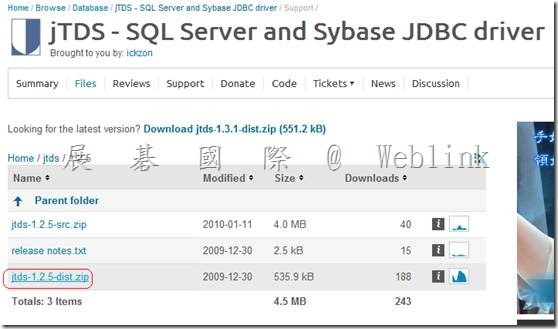
l 對於 Microsoft SQL Server,開放來源驅動程式 jTDS 可從 Source Forge 取
得,其網址為:http://jtds.sourceforge.net/
http://sourceforge.net/projects/jtds/files/
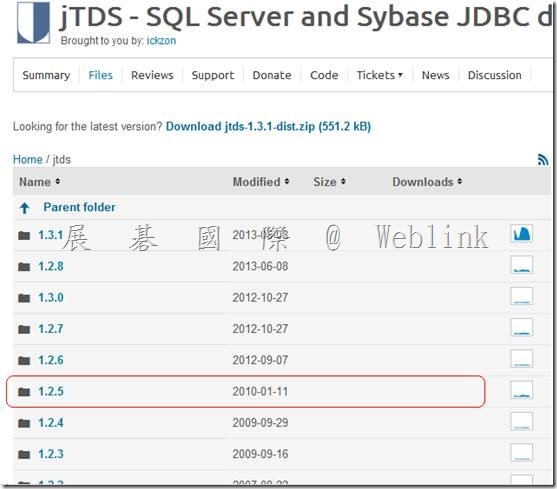
1.3.1 太新不支援
jTDS – SQL Server and Sybase JDBC driver – Browse -jtds at SourceForge.net
http://sourceforge.net/projects/jtds/files/jtds/
jTDS JDBC 驅動程式 1.2.2 版已經 Network Discover 測試過。
l 若為 DB2,IBM 驅動程式 JAR 檔案位於 IBM DB2 發布的 java 資料夾下。
您可以從 IBM 網站 http://www.ibm.com/db2 取得這些檔案。
設定 SQL 資料庫的掃描1011
安裝 SQL 資料庫目標的 JDBC 驅動程式
IBM JDBC 驅動程式 1.4.2 版已經 Network Discover 測試過。
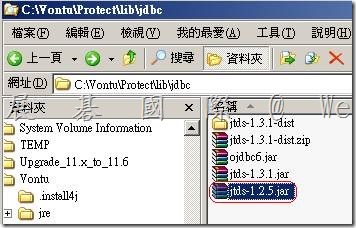
2 將驅動程式檔案複製到預設 SQL 驅動程式目錄 Protect/lib/jdbc。
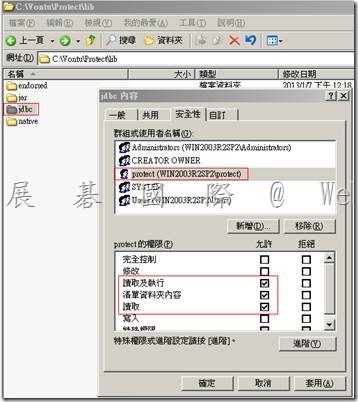
3 變更 JDBC 驅動程式檔案的權限,讓 Protect 使用者至少具有閱讀權限。
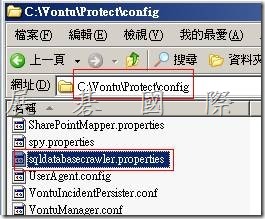
4 sqldatabasecrawler.properties 檔案可能也必須修改為指定選定驅動程式
的正確 JAR 名稱。
C:\Vontu\Protect\config
請參閱第 1012 頁的「SQL 資料庫掃描組態內容」。
SQL 資料庫掃描組態內容
您可以在 Network Discover Server 上的 sqldatabasecrawler.properties 組態
檔中編輯以下組態內容:
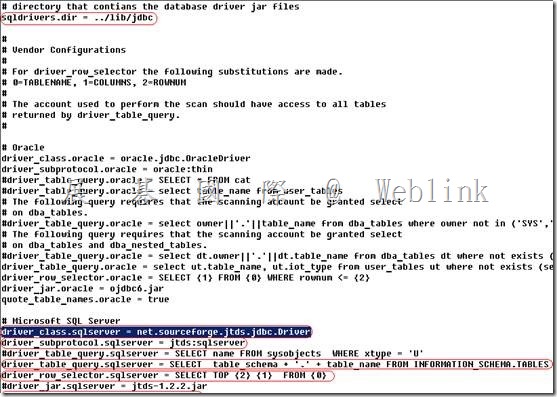
l driver_class.vendor_name
指定要使用的 JDBC 驅動程式的類別名稱。此驅動程式的 JAR 檔案必須包含在
sqldrivers.dir 中所指定的目錄,並必須命名為 driver_jar.vendor_name。
範例:
driver_class.sqlserver = net.sourceforge.jtds.jdbc.Driver
l driver_subprotocol.vendor_name
指定 JDBC 連線字串的子通訊協定部分。
範例:
driver_subprotocol.sqlserver = jtds:sqlserver
l driver_jar.vendor_name
指定驅動程式所需的 JAR 檔案清單。JAR 檔案儲存在 sqldrivers.dir 中所指
定的目錄。
請參閱第 1011 頁的「安裝 SQL 資料庫目標的 JDBC 驅動程式」。
範例:
driver_jar.sqlserver = jtds-1.2.2.jar
driver_jar.db2 = db2jcc.jar, db2jcc_license_cu.jar
l driver_table_query.vendor_name
指定傳回要掃描之表格清單所要執行的查詢。通常,查詢應傳回資料庫中的所
有使用者表格。請注意,執行此查詢的資料庫帳戶需要由資料庫管理員授予其
適當的權限。
您必須使用帳戶來掃描能夠在 sqldatabasecrawler.properties 中設定
driver_table_query 的內容,並傳回結果。您可以使用 sqlplus 以掃描使用
設定 SQL 資料庫的掃描
SQL 資料庫掃描組態內容
1012
者身分登入來測試掃描組態,並執行查詢。如果取得結果,您便擁有完成掃描
的權限。如果沒有取得結果,則您必須變更查詢,或變更掃描使用者的權限。
範例:
driver_table_query.sqlserver = SELECT table_schema
+ ‘.’ + table_name FROM information_schema.tables
l driver_row_selector.vendor_name
指定用於從表格選取列的查詢格式。此廠商名稱會視資料庫而異。對於最常見
的資料庫,sqldatabasecrawler.properties 組態檔包含了範例。
查詢中使用以下替代變數:
0=TABLENAME
1=COLUMNS
2=ROWNUM
範例:
driver_row_selector.sqlserver = SELECT TOP {2} {1} FROM {0}
l quote_table_names.vendor_name
指定是否在建立列選擇查詢之前將表格名稱用引號括起來。啟用此功能會允許
掃描含有數字名稱的表格。例如,將名稱用引號括起來後,Payroll.1 變為
“Payroll”.“1”。
範例:
quote_table_names.sqlserver=true
l sqldrivers.dir
指定放置 JDBC 驅動程式 JAR 檔案的目錄位置。
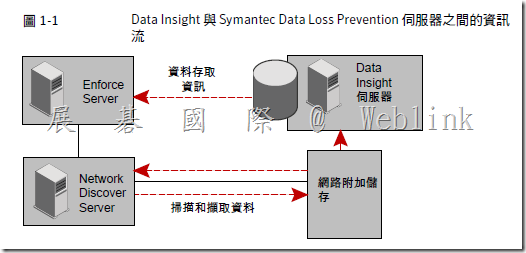
DLP 整合 Data Insight
DLP 整合 Data Insight
|
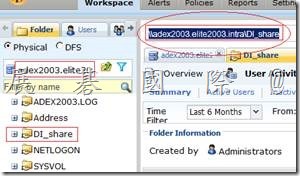
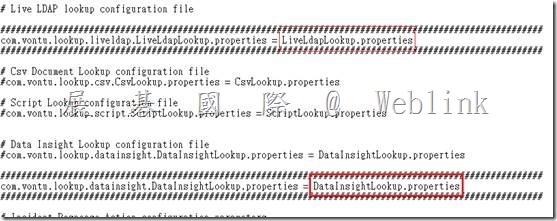
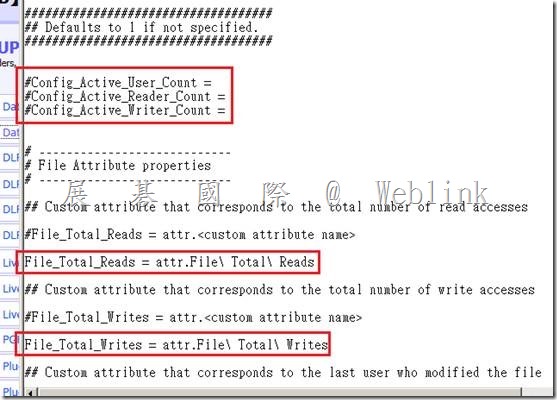
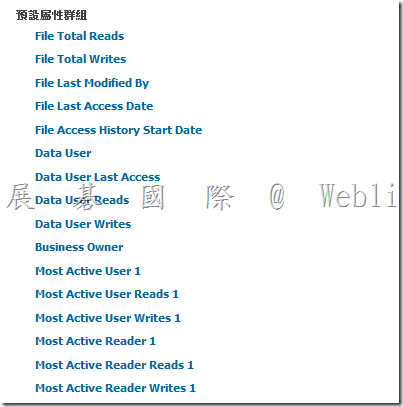
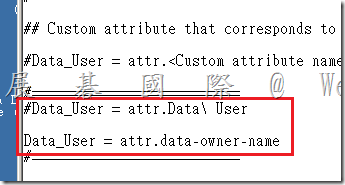
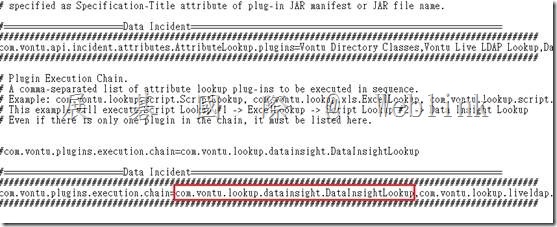
l 安裝 Data Insight l 安裝DLP (Network Discover) l 在 Enforce建立 Discover Target (csan 的 path 要與 Data Insight 上的 path 一致,否則 Data Insight attribute 會 lookup 不出來) l 設定 Enforce server 與 Data Insight Management Server 的連線 (DLP 若未匯入 Data Insight license file,請先匯入 Data Insight license file,並重啟 Incident Persister 服務) l 測試 Enforce server 與 Data Insight Management Server 的連線 l 架構風險分數、時間範圍以報告有風險的資料夾 l 在Data Insight Management Server 新增 Directory Service l 在Data Insight Management Server上傳 Agent l 在Data Insight Management Server Add filter l Data Insight Management Server 參數設定 l 在 DLP Enforce server 建立自訂的 Network Discover Report 以取得 saved report ID l 在Data Insight Management Server 設定DLP l Data Insight 查詢外掛程式 (plugings.properties、datainsightlookup.properties) l 在 DLP Enforce自訂屬性 l datainsightlookup.properties→架構 Data Insight 外掛程式來填入 [資料擁有者] [資料擁有者 E-mail] l 測試 l Business Unit、Business Unit Owner allen_chung@elite2003.intra,KS010S,allen chung denny_liu@elite2003.intra,KS010S,allen chung alex_chien@elite2003.intra,KS010S,allen chung jach_lin@elite2003.intra,KS010S,allen chung jach_lin@elite2003.intra,KS010S,allen chung gordon_lee@elite2003.intra,KS010S,allen chung cd C:\Program Files\Symantec\DataInsight\bin adcli.exe –mode importbu csvfile C:\DataInsight\data\users \bucsv.csv |
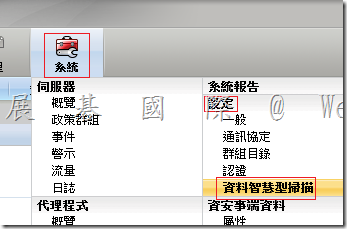
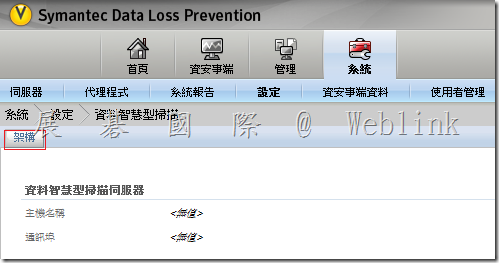
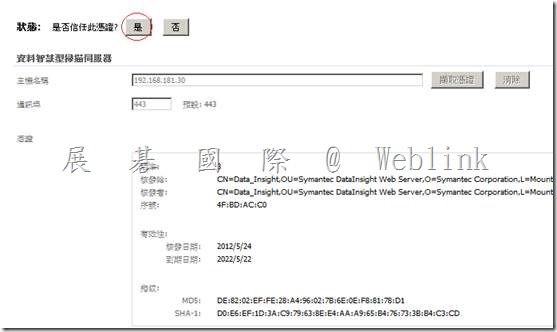
l 設定 Enforce server 與 Data Insight Management Server 的連線
(DLP 若未匯入 Data Insight license file,請先匯入 Data Insight license file,並重啟 Incident Persister 服務)
l 測試 Enforce server 與 Data Insight Management Server 的連線
|
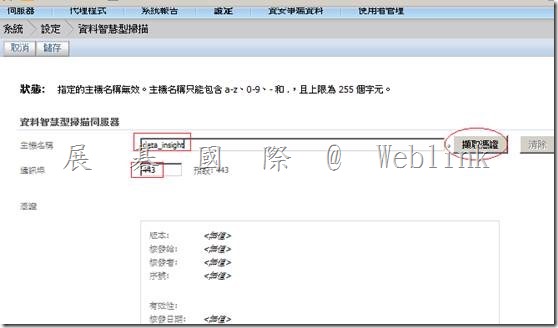
註:請還是將電腦名稱改為 data-insight (不要用 data_insight),不然之後安裝 Data Insight Agent 會有問題 【A connection could not be established to the specified server.】 【I can’t make a connection to the Data Insight Management server】 https://kb-vontu.altiris.com/display/1n/kb/article.asp?aid=52328&n=2&s= Data_Insight (Host Nmae 不接受 _,只好打 IP) IP 又與 CN 不 match,因此出現 【A connection could not be established to the specified server.】 【How do I turn off host name validation for the connection to Data Insight?】 https://kb-vontu.altiris.com/display/1n/kb/article.asp?aid=52329&link= 在 Enforce server 上停用 Host Nmae 驗證 Yes, the host name verification can be turned off in the Data Loss Prevention Enforce server. In the file Vontu\Protect\config\DataInsightConnection.properties fine the line, matrixcommunication.auth.doCertificateValidation = true and change true to false. matrixcommunication.auth.doCertificateValidation = false matrixcommunication.auth.donameValidation = false Save the file and restart the Enforce Manager. |
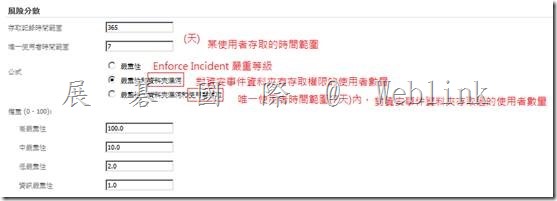
l 架構風險分數、時間範圍以報告有風險的資料夾
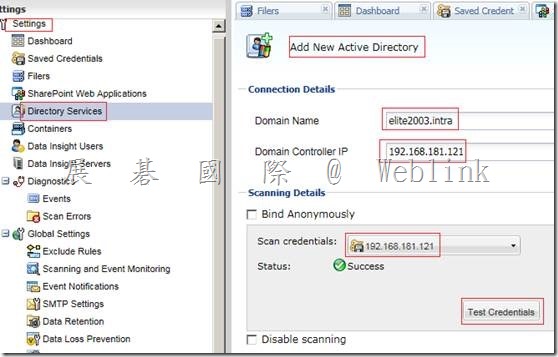
l 在Data Insight Management Server 新增 Directory Service
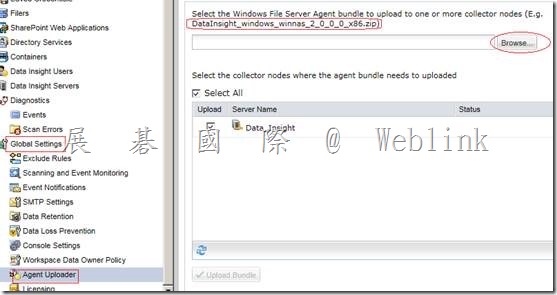
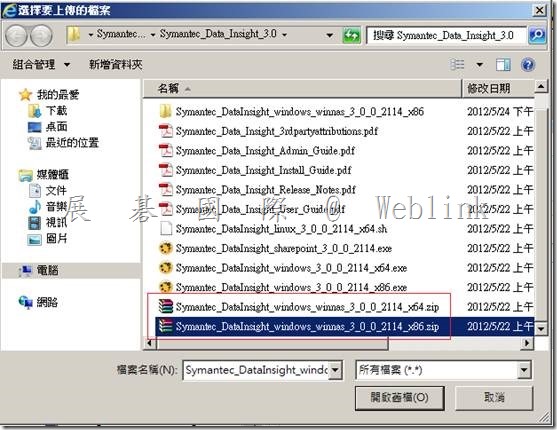
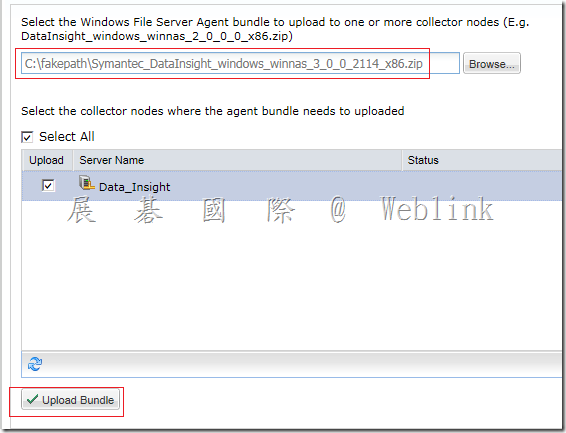
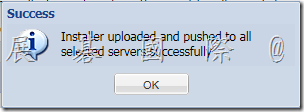
l 上傳 Agent
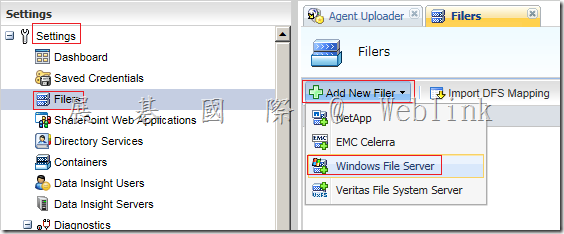
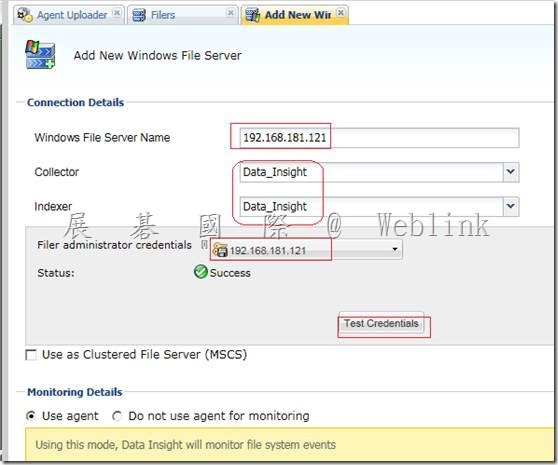
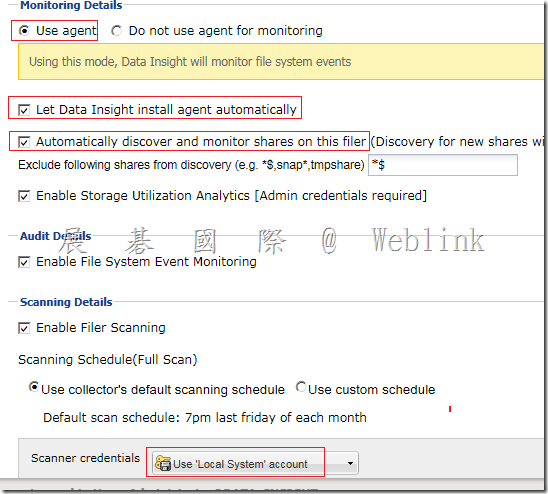
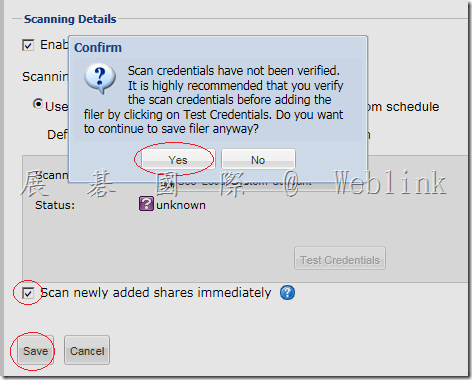
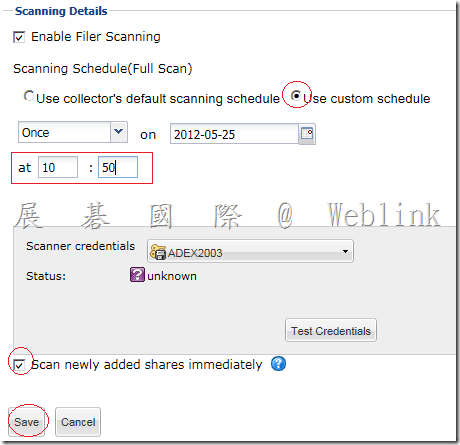
l Add Windows File Server Filer
輸入電腦名稱 (電腦名稱使用 Data-Insight)
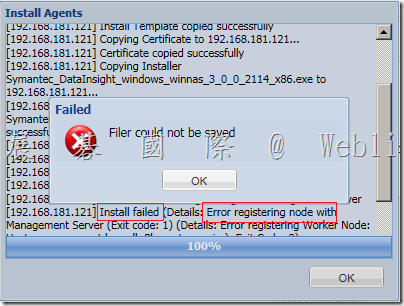
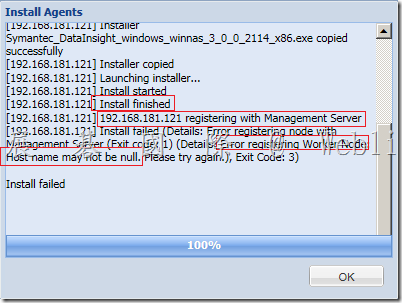
將電腦名稱改為 data-insight (不要用 data_insight),不然安裝 Data Insight Agent 會有此問題
?
Error registering node with Management Server (Exit code:1)
Error registering Worker node Host name may not be null (Exit code:3)
l Data Insight Management Server 參數設定
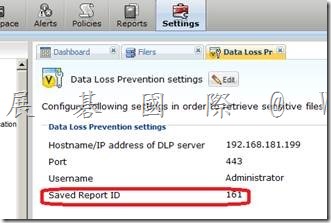
l 在 DLP Enforce server 建立自訂的 Network Discover Report 以取得 saved report ID
l 在Data Insight Management Server 設定DLP
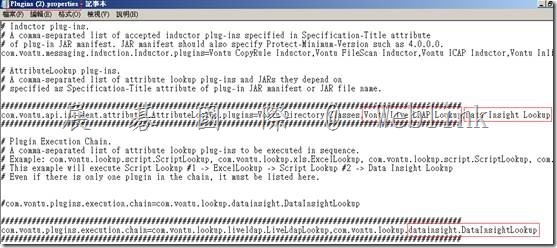
l Data Insight 查詢外掛程式
Plugins.properties
重啟
Vontu manager
Vontu Incident Persister
l 自訂屬性
DataInsightLookup.properties
l 架構 Data Insight 外掛程式來填入 [資料擁有者] [資料擁有者 E-mail]
?
Plugins.properties
l 測試
測試 Enforce server 與 Data Insight Management Server 的連線
Plugins.properties 若變更
重啟
Vontu manager
Vontu Incident Persister
RAR 加密檔案偵測政策 → 使用 【fileanalyzer_windows_4_0_1.exe】偵測自定義檔案格式
RAR 加密檔案偵測政策
1#
啟用自訂檔案類型偵測:
依預設,不會啟用自訂檔案類型政策規則。若要實作「自訂檔案類型特徵」條件﹐您必須先啟用它。
啟用「自訂檔案類型特徵」規則
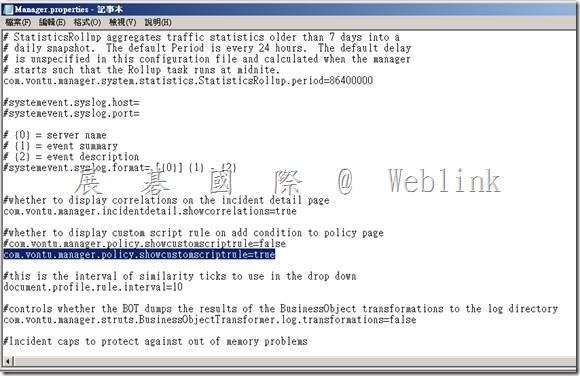
A. 使用文字編輯器開啟檔案 C:\Vontu\Protect\config\Manager.properties
B. 將以下選項設定為 true﹕com.vontu.manager.policy.showcustomscriptrule=true
C 停止並重新啟動 Vontu Manager 服務。
2#
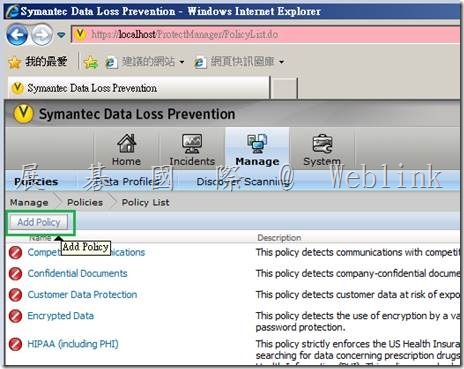
(1) 新增Policy
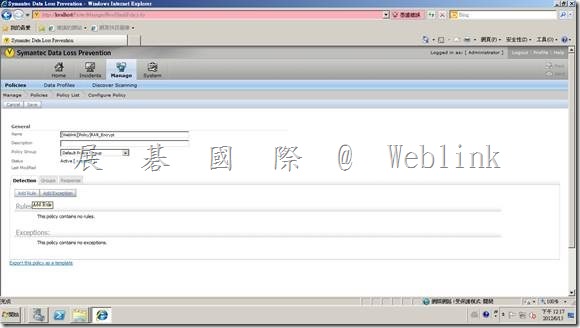
(2) 在Policy中新增Rule
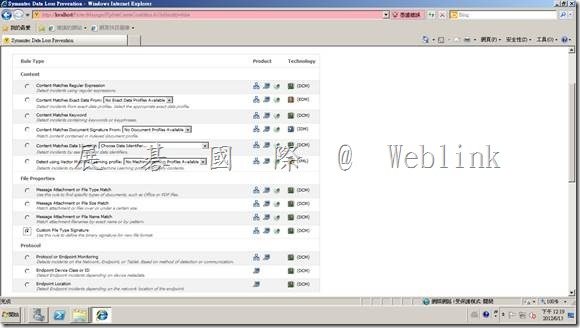
(3) 選擇 Custom File Type Signature 後 Next
(4) 填寫自訂檔案類型與偵測技術資訊 (請參考下方【註】說明來建立標頭偵測規則 )
【註】使用 【fileanalyzer_windows_4_0_1.exe】偵測自定義檔案格式
● 找到 Symantec_DLP_12.5_Platform_Win-IN_b\DLP\12.5\File_Type_Analyzer 目錄
● 在此目錄下執行【fileanalyzer_windows_4_0_1.exe】以安裝 DLP File_Type_Analyzer
● 執行 【C:\Program Files (x86)\File Analyzer】目錄下 【analyzer_gui.exe】
● 在畫面中按下 【Add Directory】來新增分析目錄,該目錄請放置欲偵測檔案與其他常見的檔案 (例如:word,當成對照組)
● 【File Name Filter】請輸入【[\w\s]+.[\w]+】
● 按下【Analyze Dataset】進行兩個不同型態的檔案的標頭差異分析
● 再按下【Analyze Table Data】進行表格的差異分析
● 可以發現 .DSN 與 .doc【一直到第 48 格 】才有所差異
http://www.symantec.com/connect/forums/sdlp-and-custom-file-type-detection-file-type-analyzer
● 所以我們可以在【Solution 】中輸入以下的標頭偵測規則
$Int1 = getHexStringValue(‘
$Int1=getHexStringValue(‘D0CF11E0A1B11AE1000000000000000000000000000000003E000300FEFF09000600000000000000000000000100000001‘);
$Int2=getBinaryValueAt($data,0x0,49);
assertTrue($Int1==$Int2);
● 按下【Test Solution】發現確實只有 .DSN 檔案格式被偵測到
以下為 .rar 測試規則
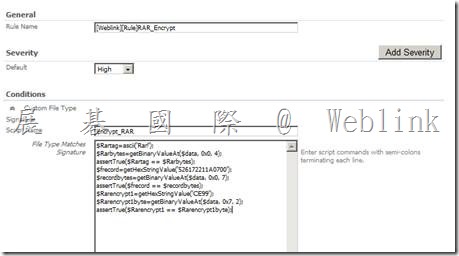
File Type Matches Signature 值
$Rartag=ascii(‘Rar!’);
$Rarbytes=getBinaryValueAt($data, 0x0, 4);
assertTrue($Rartag == $Rarbytes);
$frecord=getHexStringValue(‘526172211A0700’);
$recordbytes=getBinaryValueAt($data, 0x0, 7);
assertTrue($frecord == $recordbytes);
$Rarencrypt1=getHexStringValue(‘CE99’);
$Rarencrypt1byte=getBinaryValueAt($data, 0x7, 2);
assertTrue($Rarencrypt1 == $Rarencrypt1byte);
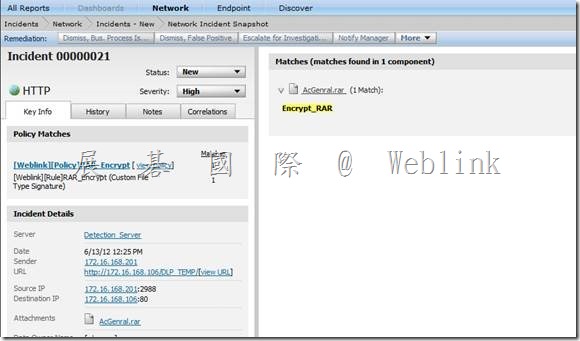
(5) 確認偵測事件
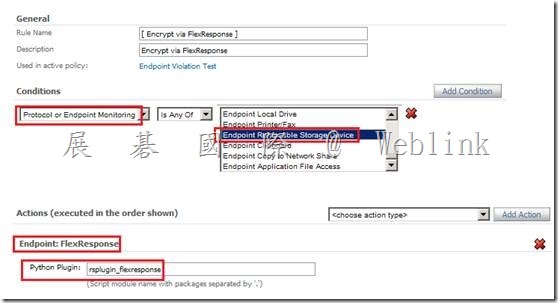
SEE 整合 DLP
SEE 整合 DLP
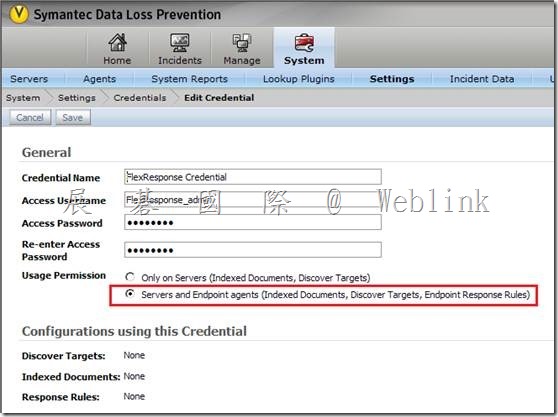
1. DLP 相關設定
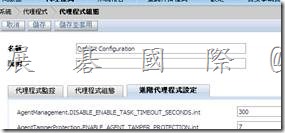
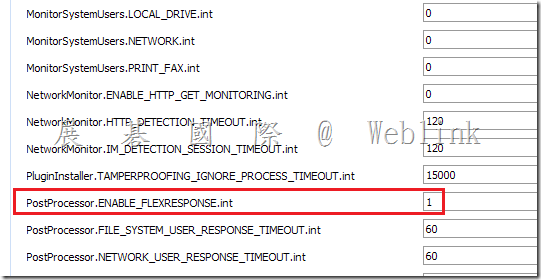
2. SEE 相關設定
3. 用戶端需進行以下安裝
l DLP Endpoint Agent
l SEE (Framework Client、RES)
l 透過 flrinst.exe utility啟用 FlexResponse Plug-in
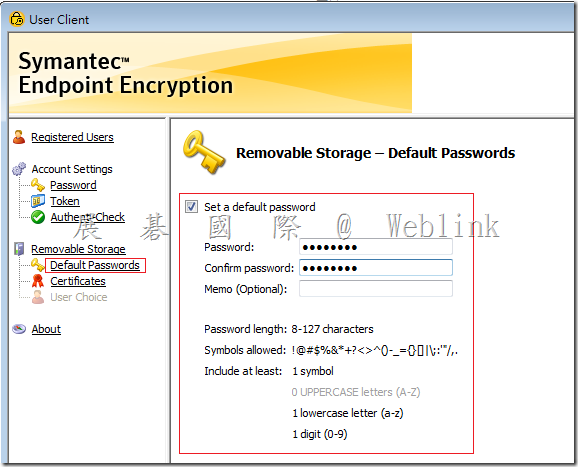
l 在 SEE User Client 設定好 Default Passw0rd
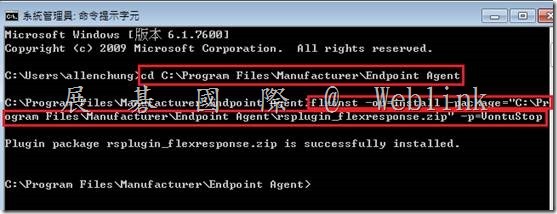
【透過 flrinst.exe utility啟用 FlexResponse Plug-in】
cd C:\Program Files\Manufacturer\Endpoint Agent
flrinst -op=install -package="C:\Program Files\Manufacturer\Endpoint Agent\rsplugin_flexresponse.zip" -p=VontuStop
【在 SEE User Client 設定好 Default Password】
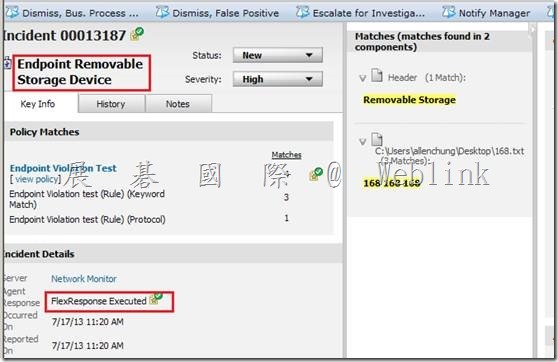
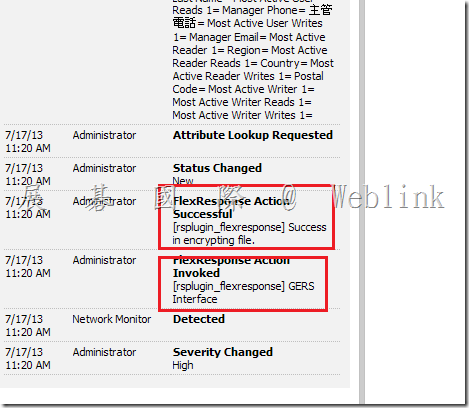
4. 驗證
SWG5 整合 DLP 相關設定
SMG 整合 DLP 相關設定
SMG 整合 DLP 相關設定
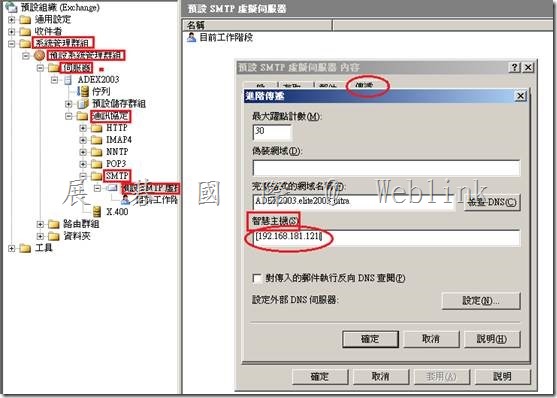
智慧主機指向 SMG [192.168.181.96]
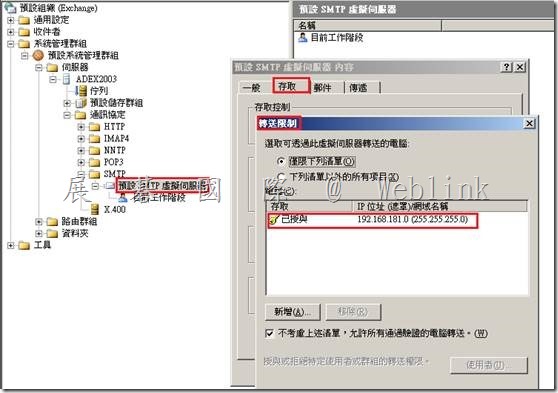
設定允許轉送
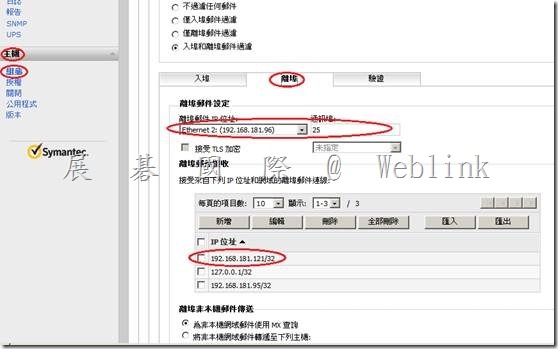
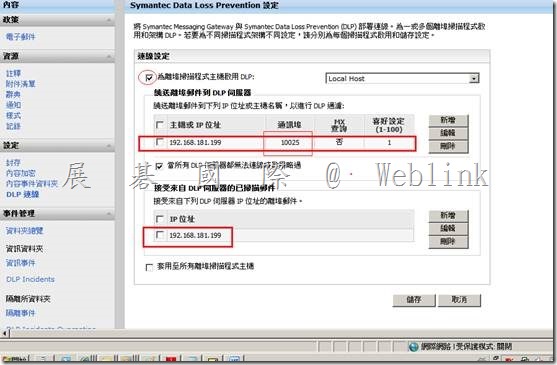
SMG接受來自 Exchange smart host 轉過來的信
在 SMG 上設定寄出信件先送至 DLP 檢查
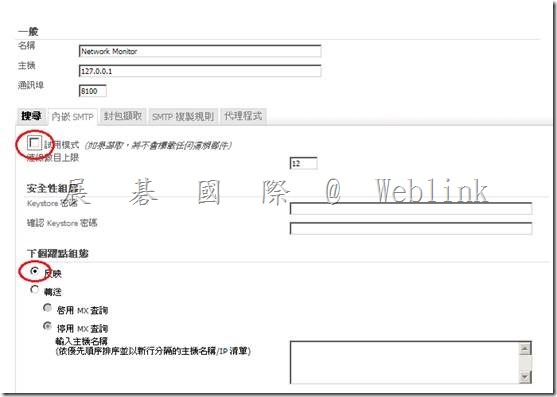
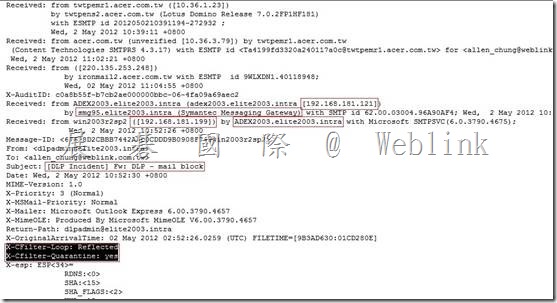
設定 DLP 使用 reflect mode來與 SMG 互動,並取消試用模式
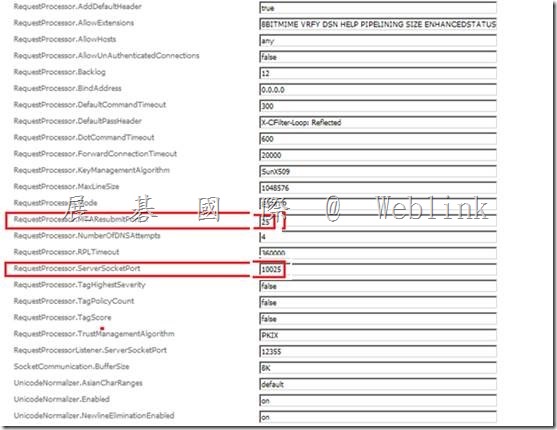
DLP 檢查完信件後,將信還給 SMG 的 25 port (DLP 預設值為 10026)
RequestProcessor.MTAResubmitPort=10026 – 25
RequestProcessor.ServerSocketPort=10025
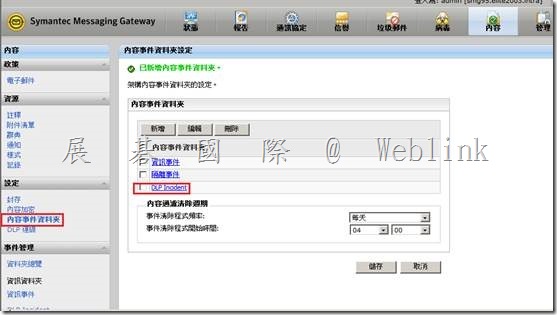
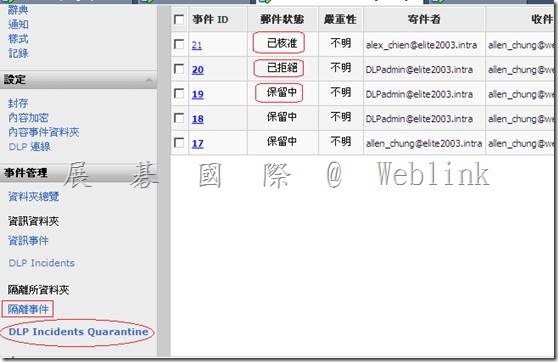
建立 DLP 事件隔離資料夾
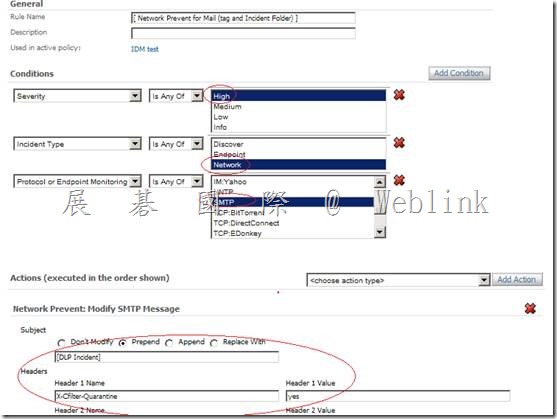
設定 DLP 的 Response Rule
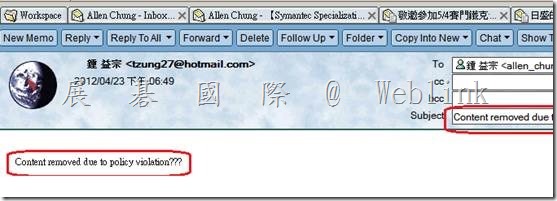
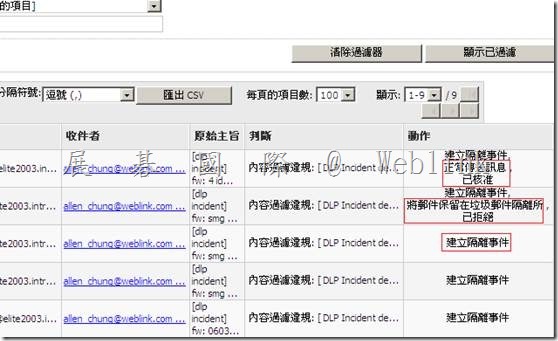
將違反 DLP policy 的信件標頭加上 X-cfilter-Quarantine: yes 的值
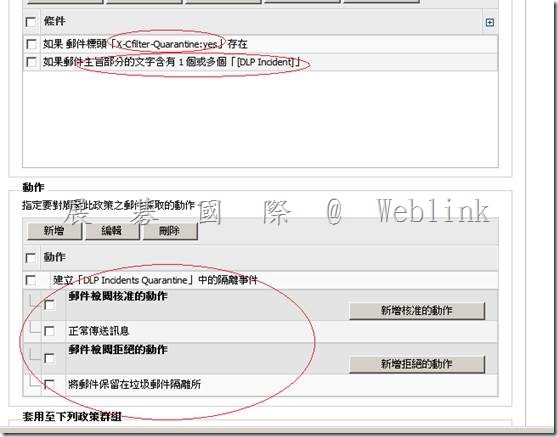
SMG 將信件標頭含有 X-cfilter-Quarantine: yes值的信,隔離到 [DLP Incidents Quarantine] 隔離資料夾
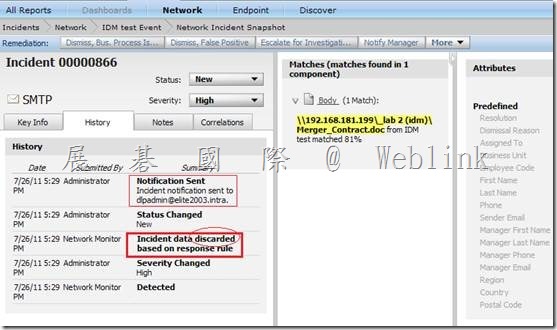
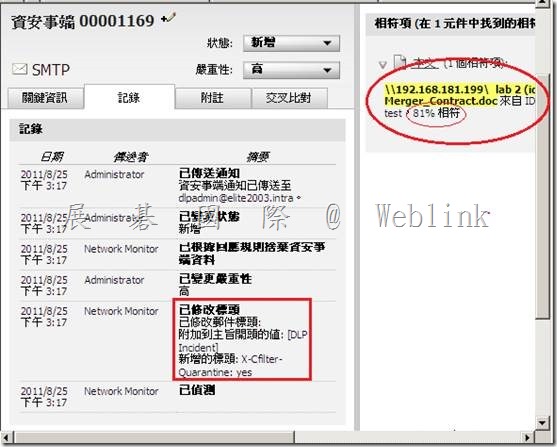
以下是 DLP Incident
以下是 SMG [DLP Incidents Quarantine] 隔離資料夾
以下是 SMG 郵件稽核日誌
【DLP Endpoint Agent Pull】
【DLP Endpoint Agent Pull】
Additionally please provide logs from the Endpoint Agent via the Enforce UI:
Go to System -> Agent Overview
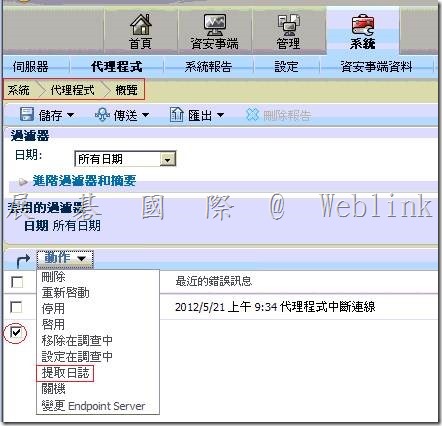
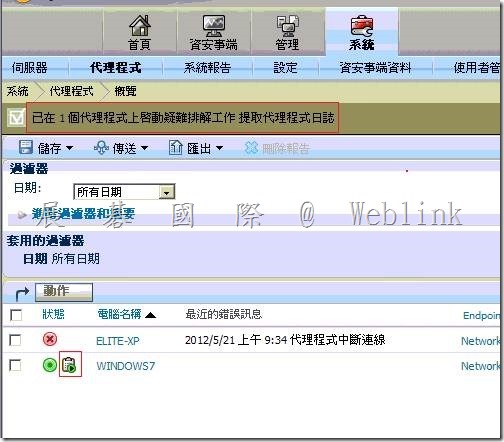
至【系統】→【代理程式】→【概覽】
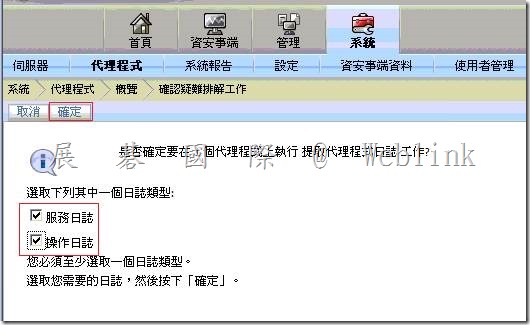
Select the agent you want and from the Actions pull down, select Pull Logs.
選擇那台要 copy .pst 檔到用戶端電腦 → 點選【動作】→ 【提取日誌】
Select both Services logs or Operational logs and click OK
Next, the logs need to be pulled from the Endpoint Server to the Enforce Server
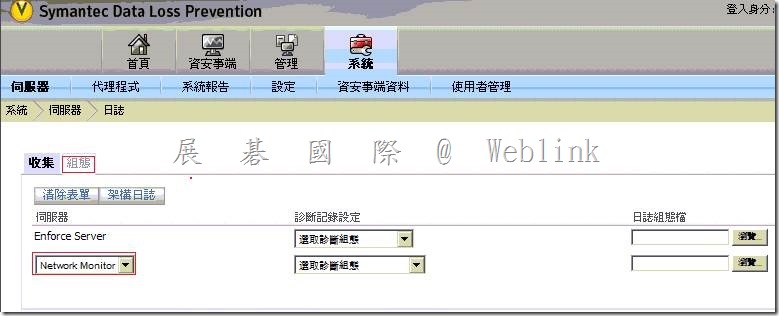
Go to System -> Servers -> Logs
Select the Endpoint Server from the drop down and check the Agent logs box.
至【系統】→【伺服器】→【日誌】→【組態】→【下拉選擇您的偵測伺服器】
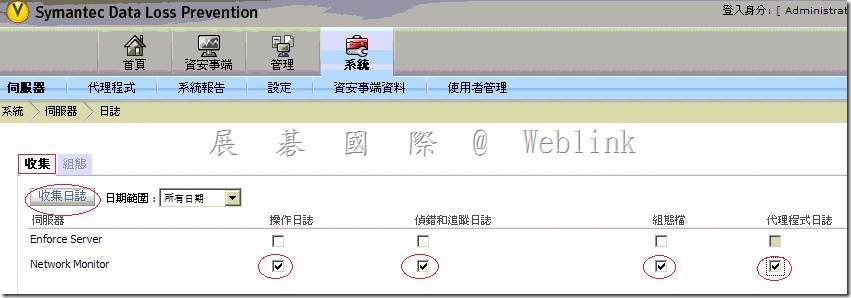
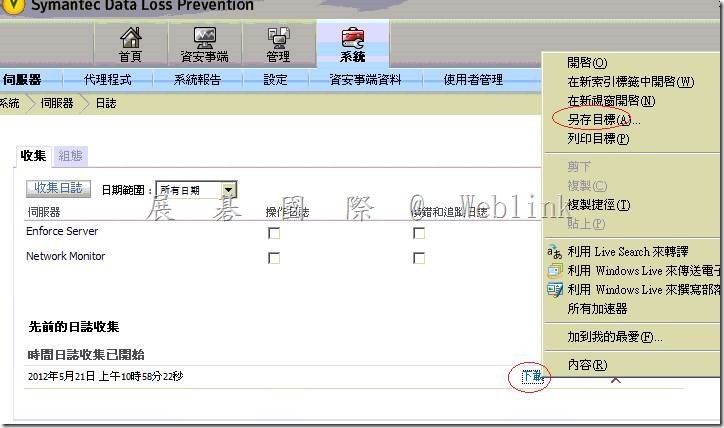
至【系統】→【伺服器】→【日誌】→【收集】→【勾選 操作日誌、偵錯和追蹤日誌、組態檔、代理程式日誌】
並按下【收集日誌】
Then click on the Collect Logs button.
This will retrieve the logs from the Endpoint Agent.
Download the logs and send them to us by replying to this mail with the attachment.
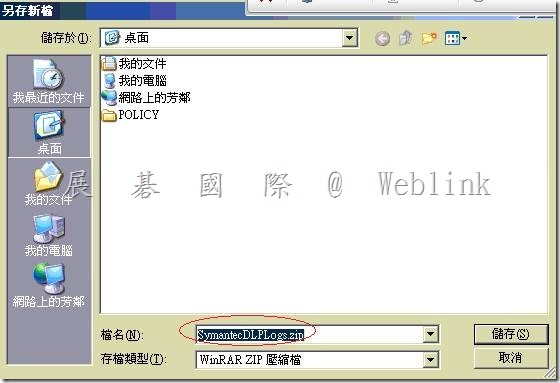
一段時間後,按下右上角的重新整理圖示,帶畫面下方出現【下載】連結時,下載【SymantecDLPLogs.zip】
請將 SymantecDLPLogs.zip 以附件的方式提供給我們

