安裝 PGP Desktop 10.3.2 MP6 在 Mac OS X 10.10 需先 disable CoreStorage

What’s Changed in Symantec Encryption Desktop for Mac OS X 10.3.2 MP6
General
• Resolved incompatibilities with Apple Mac OS X 10.10 systems.
Known issues
Compatibility with CoreStorage: CoreStorage may be applied, by default, to your Mac OS X 10.10 drives. Symantec Encryption Desktop is not compatible with CoreStorage drives. In order to install Encryption Desktop, you must disable CoreStorage. In addition, in order to prevent future issues, including issues with an encrypted disk, do not re-enable CoreStorage after Encryption Desktop has been installed and your drive has been encrypted. Failure to do so could result in data that cannot be recovered. This issue will be resolved in a future release of the product. [3653114]

所以目前安裝PGP於10.10之前需要先做以下動作

1.    先開啟terminal視窗
下指令: diskutil list查詢目前的情況
10.10版本的預設值會開啟CoreStorage
image

2.    輸入指令轉換格式:diskutil cs revert /  (請注意revert後需要加一個空格再打/)
接著下diskutil list檢查一次格式
Hdd將會轉換回App_HFS,之後就可以正常安裝

image

Surface Pro 3 安裝 PGP 全硬碟加密並完成加密,但回復原廠預設值後仍跳出註冊與 unlock disk 畫面

Surface Pro 3 安裝 PGP 全硬碟加密並完成加密,但回復原廠預設值後仍跳出註冊與 unlock disk 畫面

image

重開機後仍出現 BootGuard 驗證頁面

image

輸入第一次加密的 passphrase 仍無法通過驗證,之後出現以下頁面

image

試過格式化、重新以授權光碟重新安裝都有問題

【解決方案】

1.Surface Pro 3 安裝 PGP 全硬碟加密並完成加密,欲回復原廠預設值前請先進行解密

2.如果未解密便回復原廠預設值,請您參照以下方式將 Surface Pro 3 復原

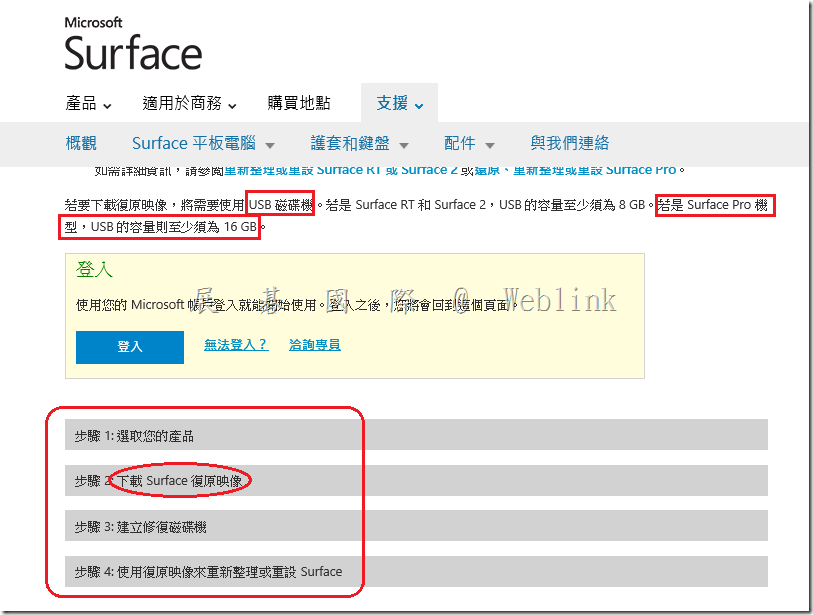
【About Surface pro 3】下載 Microsoft Surface 適用的復原映像

必須要先以 Windows Live ID 註冊 Surface Pro 3,並以此 Windows Live ID 登入以下頁面,網頁會依據您註冊的 Surface Pro 版本提供您正確的 Surface Pro Image 來還原

http://www.microsoft.com/surface/zh-tw/support/warranty-service-and-recovery/downloadablerecoveryimage

clip_image001

註:Surface Pro 3 的硬碟配置

image

已安裝 Symantec Drive Encryption (PGP WDE) 且已完成加密的用戶端,如何在不解密的狀況下,移轉到新的 PGP 主控台?

Description:

http://www.symantec.com/docs/HOWTO79579

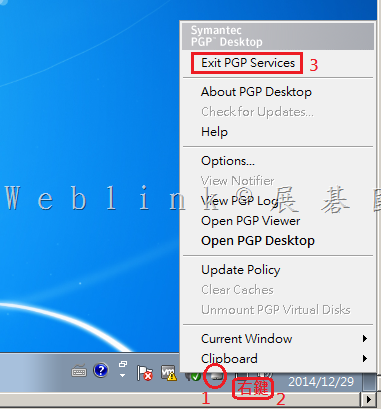
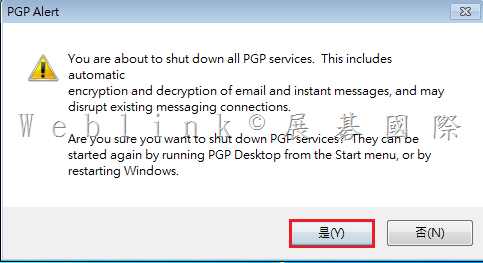
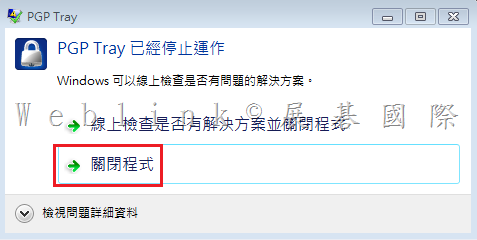
1. Click on the Symantec Encryption Desktop icon by the time, in the task bar and click Exit PGP Services.

 image


image


image


2. Delete the Symantec Encryption Desktop client preferences:

Click Start > Run… on Windows XP or Click Start and type “%appdata%" on Windows Vista or Windows 7.

Change directory into PGP Corporation/PGP and delete PGPpolicy.xml and PGPprefs.xml.

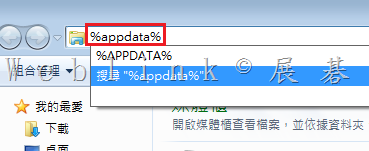
開啟檔案總管,在路徑中輸入 【%appdata%】 並按下 【Enter】

 image

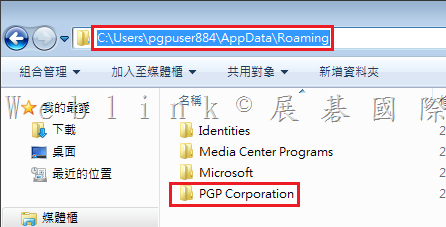
双按【PGP Corporation】

image

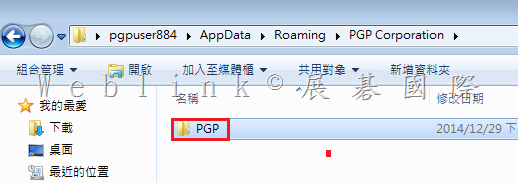
双按【PGP】

image

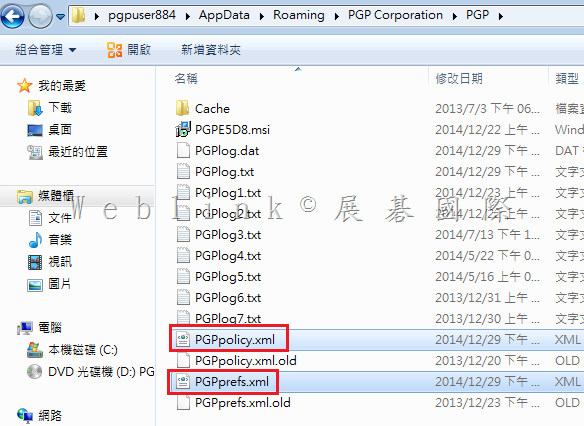
刪除【PGPpolicy.xml】與【PGPprefs.xml】

image

3. Update the PGPSTAMP registry entry to point to the new Symantec Encryption Management Server:
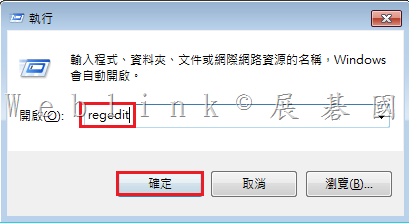
Click Start>Run… on XP or Click Start and type regedit on Vista or Windows 7.
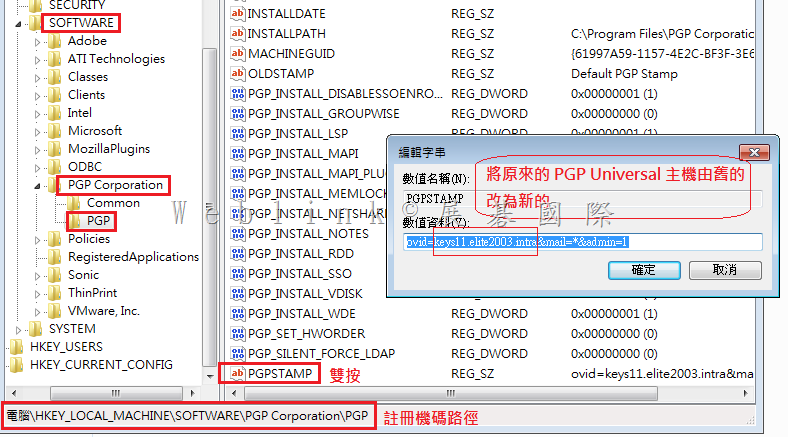
Browse to this Key name:
64 bit system:
HKEY_LOCAL_MACHINE\SOFTWARE\Wow6432Node\PGP Corporation\PGP
32 bit system:
HKEY_LOCAL_MACHINE\SOFTWARE\PGP Corporation\PGP

按下鍵盤的【Windows 鍵】+【R】,並輸入【regedit】來開啟註冊機碼編輯器

image

此畫面為 Windows 7 32 位元,路徑為【HKEY_LOCAL_MACHINE\SOFTWARE\PGP Corporation\PGP】

Right-click the string value “PGPSTAMP" and select Modify to change the Value data from “ovid=<Old Symantec Encryption Management Server name>&mail=*&admin=1″ to “ovid=<New Symantec Encryption Management Server FQDN>&mail=*&admin=1″ without the quotes.

將值由舊的 ovid=<keys11.elite2003.intra>&mail=*&admin=1 (舊主控台的 FQDN)

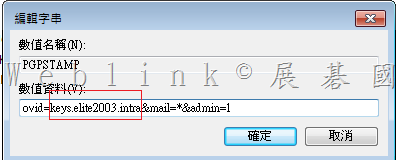
   改為新的 ovid=<keys.elite2003.intra>&mail=*&admin=1 (新主控台的 FQDN)

image

新的 ovid=<keys.elite2003.intra>&mail=*&admin=1 (新主控台的 FQDN)

image

3.  Restart PGP services:
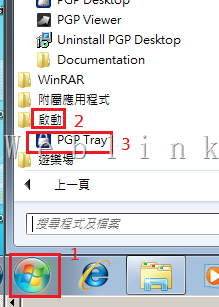
Click Start > All Programs > Startup > PGP Tray.
This will prompt Symantec Encryption Desktop to contact the new server for enrollment.

重啟用戶端 PGP 服務

image

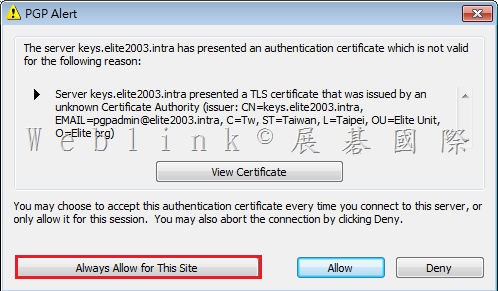
新的 PGP server 會要求重新註冊,請按下【Always Allow for This Site】來重新註冊

image

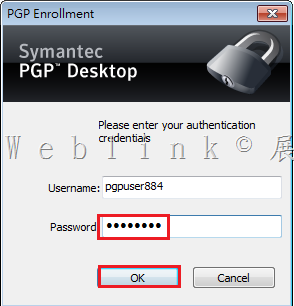
因為是整合 AD 驗證,目前登入的網域使用者帳戶會自動帶出,請輸入該網域使用者的網域密碼,即可完成 PGP client 的移轉

image

為了防止系統出現問題或是Hibernation 回復時資料的遺失,PGP WDE disable Mac OS X Hibernation function

由於 PGP WDE 在處理 Mac OS X Hibernation 回復時,會使用到一個特殊的檔案,但 Mac OS X Hibernation 回復時是拒絕任何外來檔案
所以為了防止系統出現問題或是Hibernation 回復時資料的遺失,PGP WDE disable Mac OS X Hibernation function

http://www.symantec.com/business/support/index?page=content&id=TECH149486&viewlocale=en_US

Mac OS X

PGP Whole Disk Encryption is not supported with hibernation mode in the Mac OS X. In Mac OS X, an image file is created upon hibernation of the system. Once power is restored, the state of the system is restored, including any open programs or other processes that were running. The location of this file is in /var/vm/sleepimage and is the size of RAM memory on the system.

This mode may be referred to as Safe Sleep, Deep Sleep, or Hibernation. This is not the normal Sleep mode in which the power can remain on, but the system is essentially idle. This mode does not keep an image of the processes, but rather the information is stored in the RAM memory.

The Mac OS X operating system does not support foreign file systems for hibernation. Mac OS X Hibernation mode is not supported with “boot != root". This “boot != root" is essentially the system used by Mac to boot a foreign file system. For PGP Whole Disk Encryption to boot a system, a special file system is used which is considered foreign. As PGP Whole Disk Encryption is considered a foreign file system,hibernation mode is not supported by the Mac OS X< /strong>. 
As a safeguard to prevent system issues and data loss, PGP Desktop disables the hibernation mode on Mac OS X. Although Sleep will still work, deep sleep does not build a sleep image

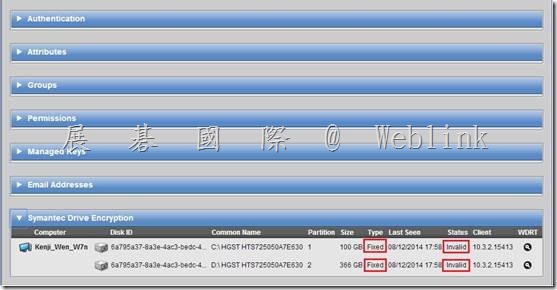
【用戶端硬碟已完成加密,並且能成功進行 policy update,但在主控台 WDE disk Status 卻顯示 Invalid】

WDE Disk Status is Invalid

【用戶端硬碟已完成加密,並且能成功進行 policy update,但在主控台 WDE disk Status 卻顯示 Invalid】

clip_image002

參考官網 KB

KB http://www.symantec.com/business/support/index?page=content&id=TECH149150

http://www.symantec.com/connect/forums/pgp-unable-decrypt-error-12198

解決步驟

1. Click Start.

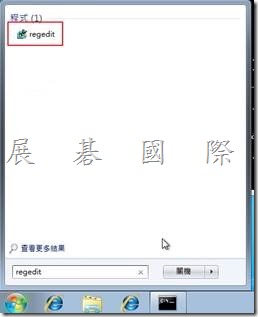
2. Type regedit in the Start Search field, and then click the regedit result in the Programs list.

clip_image004

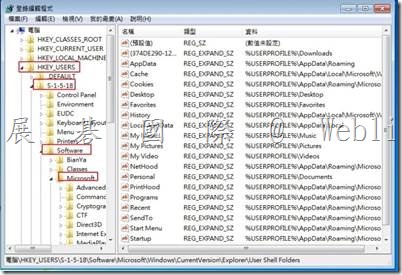
3. Browse to HKEY_USERS\S-1-5-18\Software\Microsoft\Windows\CurrentVersion\Explorer\User Shell Folders.

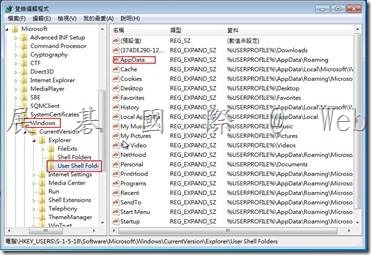
4. Select the folder and right-click the right pane in the Registry Editor.

clip_image006

5. Type AppData for the value.

clip_image008

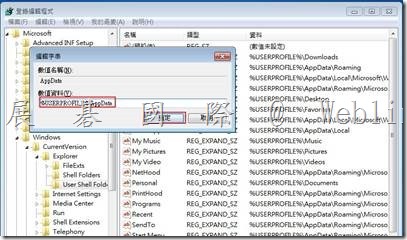
6. Right-click the AppData value and select Modify.

7. Type %USERPROFILE%\Application Data for the Value data and click OK.

clip_image010

8. Close the Registry Editor.

9. Update policy

PGP 登入 BootGuard 後出現 【Missing Operating System】(PGP command)

1. 請將硬碟裝到另一台裝有 PGP 的電腦

登入後會要求輸入 passphrase,因為是整合AD驗證,此時你會發現怎麼輸入都不行

2. 請登出電腦,再使用另外那位使用者的帳號與密碼登入網域,登入後會要求輸入 passphrase,這時候輸入網域密碼就OK了

3. 開啟 PGP command line

透過以下指令來修復 MBR


Windows XP: C:\Program Files\PGP Corporation\PGP Desktop
Windows Vista/Windows 7: C:\Program Files\PGP Corporation\PGP Desktop
Windows Vista/Windows 7 (64-bit): C:\Program Files (x86)\PGP Corporation\PGP Desktop


(1) c:\program files (x86)\pgp corporation\pgp desktop\pgpwde –enum (確認 Disk 編號)
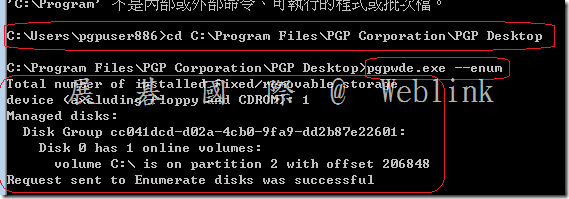
clip_image001

(2) 有可能硬碟目前狀況是解密到一半,請先Check

確認硬碟的狀況

c:\program files (x86)\pgp corporation\pgp desktop\pgpwde —disk-status –disk X

(3) 若確認硬碟目前狀況是解密到一半,請先stop

停止加密到一半的硬碟的加密程序

c:\program files (x86)\pgp corporation\pgp desktop\pgpwde —stop –passphrase <passphrase> –disk X

(4) fixmbr

c:\program files (x86)\pgp corporation\pgp desktop\pgpwde –disk X —fixmbr –passphrase <passphrase>

X 是 disk 編號

但根據經驗 fixmbr 的指令好像在新版不 work

clip_image002

clip_image003

4. 根據經驗 fixmbr 的指令好像在新版不 work

請改下recover

c:\program files (x86)\pgp corporation\pgp desktop\pgpwde –recover –passphrase “password" –disk X

Recover a disk when a MBR with BootGuard instrumentation is inaccessible.

5.若仍無法解決

(1) 請您解密硬碟

(使用 Recover CD)

(或是將硬碟裝到另一台裝有 PGP 的電腦使用 PGPWDE Command-line 解密 【c:\program files (x86)\pgp corporation\pgpwde —decrypt –passphrase <passphrase> –disk 0】)

(2) 進行 chkdsk

(3) 進行 磁碟重組

(4) 若還是無法解決就只能重新安裝OS,或是換一個硬碟

5. PGPWDE Command-line Options


Enterprise Support – Symantec Corp. – PGP WDE Command-line Tool Guide

http://www.symantec.com/business/support/index?page=content&id=TECH204285


The following commands are performed at the command prompt in the following directory:

Windows XP: C:\Program Files\PGP Corporation\PGP Desktop

Windows Vista/Windows 7: C:\Program Files\PGP Corporation\PGP Desktop

Windows Vista/Windows 7 (64-bit): C:\Program Files (x86)\PGP Corporation\PGP Desktop


Enumerate system disks

pgpwde –enum

Check the Status of a Disk

pgpwde –disk-status –disk 0

List users

pgpwde –list-user –disk 0

Instrument a Disk – Adds the PGP BootGuard for encryption.

pgpwde –instrument –disk 0

Encrypt a Disk (Manually)

pgpwde –instrument –disk 0

pgpwde –add-user <username> –passphrase <passphrase> –disk 0

pgpwde –encrypt –passphrase <passphrase> –disk 0

Decrypt a Disk

pgpwde –decrypt –passphrase <passphrase> –disk 0

Uninstrument a Disk – Removes the PGP bootguard (Perform this option only on a disk that is not encrypted).

pgpwde –uninstrument –disk 0

Stop\Pause the Encryption\Decryption Process

pgpwde –stop –passphrase <passphrase> –disk 0

Recover a disk – Allows a user to recover a disk when a MBR with BootGuard instrumentation is unaccesible.

pgpwde –recover –passphrase “password" –disk 0

Note: This article uses disk 0 as an example. This correlates to the number of the boot disk on the system. However, if additonal hard disks or USB disks are used, the number of the disk may be 1 or 2. To determine the number of the disk on the system, use pgpwde –enum at the command prompt of the PGP Desktop directory.

【安裝 PGP WDE for Ubuntu 發生錯誤】…套件庫未更新

【安裝 PGP WDE for Ubuntu 發生錯誤】…套件庫未更新

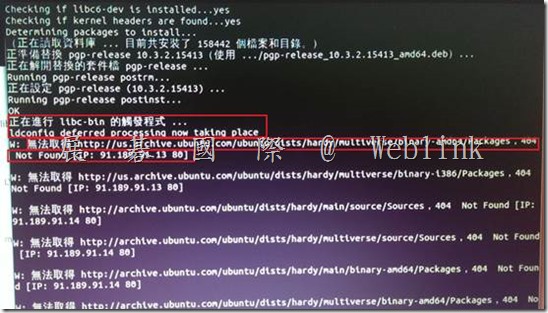
Ldconfig deferred processing now taking place

W:無法取得 http://us.archive.ubuntu.com/ Ubuntu/dists/hardy/multiverse/binary-amd64/packages,404 Not Found

clip_image002

【原因】

套件庫未更新

【解決方法】

1. 請在有網路的狀態下

輸入

sudo apt-get update

更新套件庫

2. 若仍持續無法更新,請嘗試以下步驟

(1) 下載原始檔 source.list檔 (下載檔為 sources.rar ,請解壓後將 sources.list 放到根目錄底下)

(2) 進入根目錄

#cd ~

(3) 備份user source.list檔案

#sudo cp etc/apt/sources.list etc/apt/sources.list.bak

(4) 覆蓋source檔案

#sudo cp sources.list etc/apt/sources.list

(5) 更新套件

#sudo apt-get update

(6) 安裝PGP(參考安裝sop)

 
#sudo bash pgp---

(7) 移除source檔案

#sudo rm etc/apt/source.list

(8) 還原user source檔案

#sudo cp sources.list.bak etc/apt/sources.list

3. 如果是下列 Ubuntu版本,則 PGP無法支援

(1) 確認Ubuntu版本指令 # lsb_release -a

(2) 從錯誤連結查看 http://archive.ubuntu.com/ubuntu/dists/hardy or hardy-updates

clip_image004

確認 Ubuntu 版本 【haydy 代號版本 8.04.X 已經EOL了】, 所以不再提供相依性更新包

Ubuntu 網址:

https://wiki.ubuntu.com/Releases

clip_image005

(3) 在lab環境裡

下apt-get update指令去找的source 是"http://tw.archive.ubuntu.com/ubuntu"

在網址開頭都有"tw",如圖:

clip_image007

【PGP WDE 安裝發生錯誤】Error in custom action. WiseCustomCalla2.dll is invalid or could not be found


http://www.symantec.com/business/support/index?page=content&id=TECH155685

Issue

When upgrading Symantec Encryption Desktop (formerly known as  PGP Desktop) to a later version you receive the following error:

Error


Environment

PGP Desktop 9.x-10.2.1mp5

Symantec Encryption Desktop 10.3.x and above 

Cause

This error is caused if a user doesn’t have sufficient rights to install software on the system or if there are old PGP files in the Temp folder from a previous installation of Desktop.

Solution

Log in as the domain admin or administrator to install PGP Desktop, or contact your administrator to receive sufficient administration rights.

If you are already logged in as a user with local administrative privileges and are on Windows Vista or Windows 7, you may need to disable User Access Control (UAC) while installing PGP.

Delete all the PGP folders from the Temp folder of Windows.

For Windows XP:

Go to Start –> Run –> Type in %TEMP% This will display the contents of the Temp folder. Delete all the folders that start with PGP and then start the installation again.

For Windows 7:

Go to Start –> In the search box type in %TEMP% This will display the contents of the Temp folder. Delete all the folders that start with PGP and then start the installation again.